Home » Kitchen Renovation
Category Archives: Kitchen Renovation
Can You Make Money From Lead Generation?
If you’re looking for an alternative to paid search, you might consider setting up an affiliate network. This business model is relatively passive but has a few disadvantages. For example, if you have a client-based website, you’re unlikely to get paid for SEO work. You could lose your website to a new tenant – usually your competition. Then, you’d have to invest time and money into attracting new leads.
When choosing a lead generation program, consider Douglas James Marketing and that some lead programs are better than others. Generally, a lead is qualified if they’ve progressed through a marketing funnel. Providing contact information in exchange for an incentive makes a lead a good candidate to make a purchase. Unlike an ad click, a lead’s quality depends on the ad copy and targeted audience. Facebook and other social media sites are excellent places to find high-quality traffic.
While you might be tempted to use advertising to generate leads, this can quickly become costly and require constant management. Ads on Facebook, for instance, can be freezing, leaving you without a backup plan. Fortunately, there are other ways to generate qualified leads. Websites that rank well in search engines can generate qualified leads and can be monetized through upselling. You might even be able to make money with the leads from these sites.
One of the most effective ways to generate leads is by optimizing your website for local search. Google Maps’ 3-Pack is the most prominent listing in the search results, and people are more likely to click on it before the other listings. Once people click on these listings, they’re more likely to call the business. You can read Mark Luckenbaugh’s guide to getting into the 3-Pack. Your competitors aren’t even paying for it!
As with any business, lead generation can have many advantages. Besides being relatively low-cost, lead generation requires little budgeting. It requires low start-up costs and minimal operating expenses. Another benefit of lead generation is that it can rank well for highly specific local keywords. You can get highly targeted traffic that’s free to you by targeting local customers. There are also geotargeting options available to earn money even without spending too much money on advertising.
The biggest challenge is driving traffic to your lead-generation website. To get traffic and convert them into buyers, you need to get targeted, organic web traffic. Paid ads, like Facebook Ads, don’t work for every lead generation company. But if you know where to look, you’ll make money from lead generation. The trick is to learn what works for your niche. In other words, if your competitor is running ads that have low conversion rates, Facebook Ads probably isn’t the best strategy for your business.
As you can see, lead generation can be a lucrative income stream. You don’t need a product or service to sell by generating leads for other companies. Instead, you’ll have to provide content that attracts attention and trust. Once that’s done, your marketing assets will take care of themselves. As they pile up, they’ll become passive income. Whether you use this strategy or build your own lead generation company is yours.
Word-of-mouth is one of the oldest and most effective methods for generating leads. Word-of-mouth can be a great tool, but its limitation lies in reaching your targeted audience and ensuring that your message is consistent. With email marketing, you can reach a targeted audience and earn money from it. But how do you generate leads? And how can you use the data you’ve collected? Follow these tips, and you’ll be on your way to making money in this business.
While the lead-generation business isn’t always profitable, it is an opportunity worth pursuing. It is possible to find a healthy balance between the cost of acquiring leads and the price of selling them. According to Clutch, there are more than 500 leading lead generation companies. Those companies typically have hundreds – and some have even thousands – of employees. There are many benefits to starting a lead generation business. First, you’ll be able to scale up your business if you’re willing to do the work. It can also be lucrative and can grow quickly. And second, lead generation is an incredibly scalable business.
Once you’ve got a list of leads, the next step is to follow up with them. You’ll be surprised by how much money you can make by referring others. While most website visitors will buy something from you, only 1% will buy from you. So if you’re able to generate 50 leads and sell them for $10 each, you’ll be looking at an immediate $500 profit!
You can also visit our other websites and post your article.
Conduit Hardware,78 Britnell CRT, Aqua Tremblant, Win Cheap Guest House, Quick Response Plumbing, Tighgeal, Kyles Peace, Sylars, Beans Ferry Pottery, Central Counselling, Project Homesc, Tree Aurora,Kitchens Bathrooms Floors, New Horizons Tree Service, Howell Shandyman Remodeling, Blue Star Remodeling Il, 48 hour Camaro, Colorado Health Insurance, Yes To Save Homes, Boise Chiropractor, Paperless Office Solution, United 4 Safety, Ab Sessions Plumbing Building Services, COCSBDC 2, Loving Care At Home, Team You, Business Savvy, Iric Insulation, Nexusea, Housing Counseling Association, Auto Front Office, Becker Village Mall, SR Internet LLC, Susan Sell Severett , SEO Columbus Ohio, Lake Of The Ozarks Propane Home, Indy Folkfest, The Green Wood Kitchen, Akbar Concrete Works, Naperville Inspector.
How a Plumber Clears Clogged Drains
When you have clogged pipes, you may need drain cleaning services. You can find a wide variety of products on the market, and the process of clearing your pipes is quick and affordable. But this process has some drawbacks, as it leaves remnants of previous clogs in your pipes. These residues can eventually stick to the pipes and increase the likelihood of another clog. This is why you should always call a professional plumber to handle your drainage needs.
A plumber will begin by assessing the problem and determining the best way to solve it. They can use various methods to locate the blockage, including a video inspection. A video pipe inspection allows the plumber to see what’s inside the pipes. The camera also allows them to target specific areas for cleaning, and determine the level of cleaning required. Depending on the type of drain cleaning service you need, this process can be as simple or complex as you’d like.
When a plumber performs a drain cleaning, they typically use two methods to clear the clog. The first method involves flushing the drain by allowing the cleaner and water to flow down together. This method is not recommended for clogs, as it can cause a backup. In some cases, the amount of water in the system is too high to make this process possible. If you need to call a professional to fix a problem, it’s important to call a company that has experience in drain cleaning.
The second method of drain cleaning is known as hydro jetting. This technique is used to remove any obstructions in the pipe. While the snake is used to clear blockages, a professional plumber may also use pressurized water to clear the pipe. These methods are expensive and time-consuming. A clogged drain can result in a broken pipe or overflowing water. Once the plumbing company has cleared the clog, it’s time to clean the pipes so that they can properly function again.
When a plumber uses a video pipe inspection, he or she can see if there is a blockage by watching it from a monitor. This is the best way to identify a blockage and get it fixed. You should not try to resolve a clog by yourself. This can be dangerous because the cleaner can enter the sewer system, causing a backup. And it won’t work if the water level is too high, so it’s better to call a professional to do it.
When you have a clogged drain, you can’t just dump the cleaner down the drain. Rather, you need to call a plumber to clear the clog. The plumber will assess the problem and then recommend the best way to solve it. A plumber may also use a video pipe inspection to determine where the clog is and how to get rid of it. Once he’s done, the plumbing company will clean the pipes properly.
When it comes to clearing your pipes, you’ll find that the plumber uses different methods. One of the ways to clear your drain is to use a snake, which is a combination of small sharp metal blades attached to a durable cable. The plumber lowers the blades to the sewer. However, it won’t clear all the clogs. The left-over clogs will stick to the pipe and restrict the flow of water.
Using a snake is an inexpensive, quick way to clear the drain. You can even buy a snake online for less than $10. Using a snake is a handy way to clear your pipes for minor clogs. You can use it to remove a clog in your drain by twisting and pulling it with a tool. You can also use a camera to see if the clog is a big one.
If the pipes are clogged, a plumber can use a plumbing snake to clean them. A plumbing snake consists of metal blades attached to a cable. When the snake is turned on, it will break up the clog. If your pipe is blocked, a plumber will be able to fix the problem quickly and efficiently. The process of drain cleaning is also easy to do at home. A plumber will be able to access all the pipes in the plumbing system, including the main line and sanitary sewer.
The Dos and Don’ts of Kitchen Color Schemes
Choosing colors for your kitchen is a big decision that can have lasting effects on the way you feel when spending time in this space. When choosing hues, it’s important to consider whether or not they’ll become boring after some time. If so, this could lead to an unpleasant experience and make it harder to enjoy cooking and eating in your kitchen.
To avoid making decisions that will cause regret, later on, follow these dos and don’ts when choosing paint colors for your kitchen. These tips will help ensure you love what you see every day. Read on!
The Dos of Kitchen Color Scheme
Take Expert Advice
When it comes to choosing a kitchen color scheme, it can be confusing. So, take advantage of the knowledge and experience that color professionals and designers possess. They’ll know about how colors work together and will be able to make recommendations based on your lifestyle, preferences and tastes.
Some color advisors will also help you with color selections, while others will work as interior designers or architects that provide color consultation as part of their services.
Consider the Lighting
Lighting is key when it comes to choosing kitchen color schemes. The more natural light you have in your kitchen, the more real the colors appear. If your kitchen is small and dark, consider a kitchen color scheme to make the area look bigger and more inviting.
You can paint your walls a dark tone, but only if your countertops and cabinets are not dark. Along with natural light, think about the artificial light in your kitchen. Colors tend to appear different depending on the light fixtures you use. Adding soft gold light fixtures can be enough color to add depth to your kitchen color scheme. So, whenever you think about coloring your kitchen, also consider choosing the right lighting for your kitchen.
Use Chalkboard Paint on the Kitchen Door or a Wall
A chalkboard makes a wonderful addition to any kitchen, whether it’s for keeping track of your grocery list or jotting down recipes as they come to mind. If your walls are dark, paint them with matte black Chalkboard Paint, and you won’t be able to miss them.

You can find a wide variety of chalkboard paint colors from most paint suppliers. It’s perfect for kids to scribble without damaging the walls and for adults to write lists and quotes or draw images while adding color. And if you’re not ready to commit to a wall of chalkboard paint color, a framed DIY chalkboard in your favorite color can also work.
Consider Cool vs. Warm Color Palettes
Most children learn about warm colors and cool colors during art class. Making up two halves of the color wheel, warm colors include reds, oranges and yellows, while cool colors include greens, blues and purples. These color groups tend to evoke different emotions.
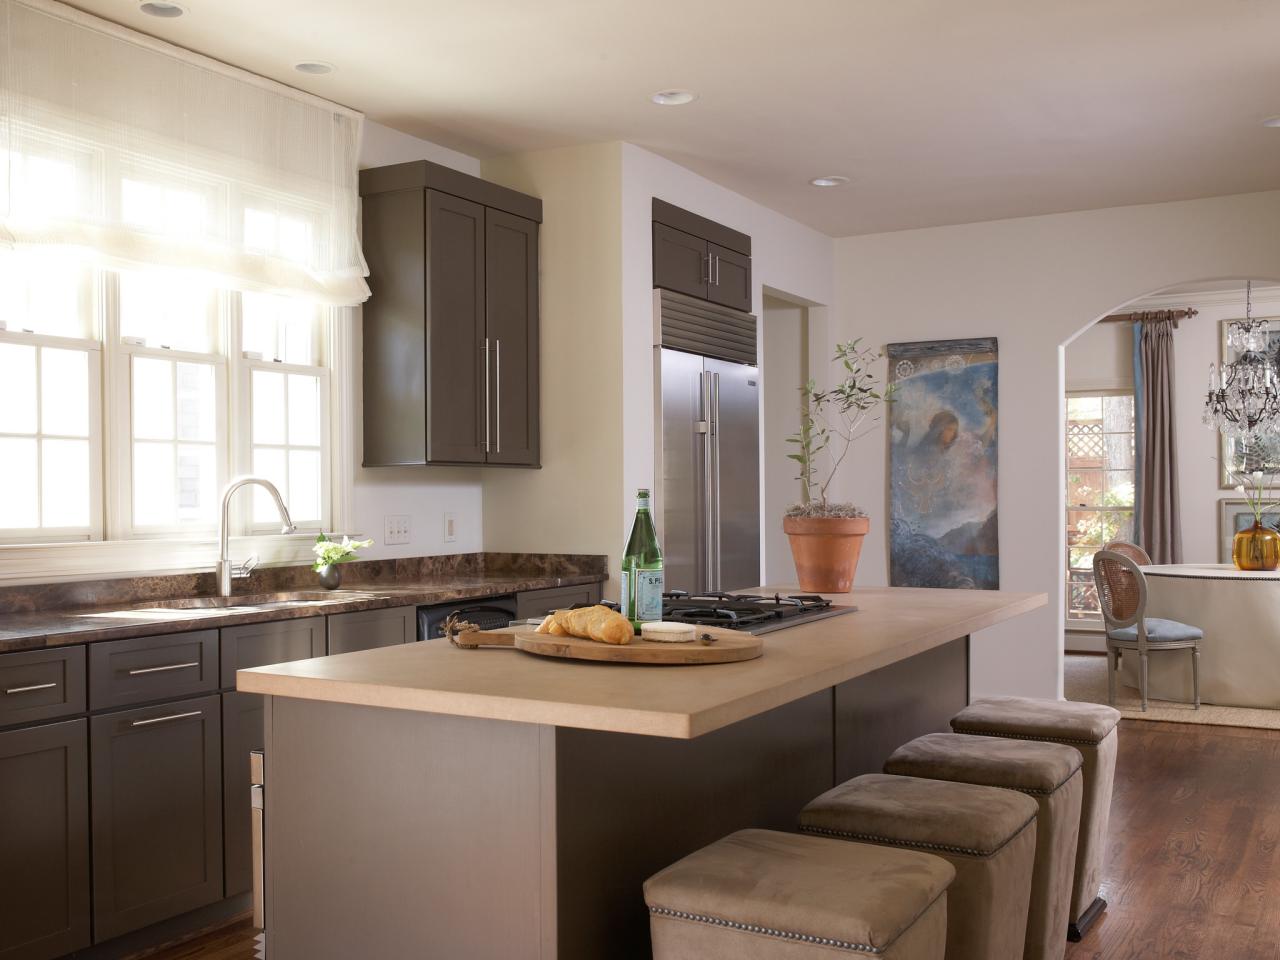
So deciding on the emotions you want in your kitchen can help you decide on these color palettes to use. Warm colors evoke cozy, warm feelings in a room, especially with yellows and oranges. These colors can also be bold, dramatic or dynamic if you focus on reds.
On the other hand, cool colors are often associated with tranquility and refreshing emotions, especially with blues and greens. Another option other than sticking to one color palette is to contrast them. For example, you can make any yellow kitchen feel more grounded by adding a touch of a cooler color.
Watch Your Undertones
Understanding how to paint undertones will help you get the colors that work best for your kitchen. All colors, even neutrals, have a color undertone that adds gray, green and even pink to an otherwise neutral space. Learning about different undertones can help you decide what colors go together in your kitchen color scheme.
Look Carefully What’s in the Kitchen
You should take a close look at what’s already in your kitchen. This can help you decide which colors go together and which ones clash. Compared to other rooms in the house, kitchens have more things that you need to consider when choosing a color scheme.
Your countertops, cabinets and appliances all bring their colors and hues to the kitchen. These items may clash with whatever paint colors you pick. Decide whether part of your kitchen remodeling plans include repainting cabinets or putting in a new countertop.
If that’s not part of your plan, you’ll have to work around the existing colors. The kitchen floor also adds color to the space, which you’ll have to work with if new flooring isn’t in your plan. Think about how different wall colors will look contrasted against different colors of hardwood, tile or linoleum floors. If your floor pattern contains multiple colors, consider tying in one of those colors when choosing a kitchen color scheme.
Don’ts of Kitchen Color Scheme
Don’t Hesitate to Use Gray Wall Colors in Your Kitchen
Gray is a pretty neutral color, so that it will go with almost any other color in your kitchen. It’s also a great backdrop for artwork, light fixtures and shelves that you might hang above the cabinets or counters. These qualities make gray one of the best colors for the kitchen.
Don’t Overdo it With the Color
It’s easy to get carried away and paint every wall in your kitchen a different color, but this can be overwhelming. Mixing colors well is harder than you might think. Instead of going hog wild with several bright colors, stick to one or two that you like and try pairing them up with neutral shades.
Adding too many colors might also make the space appear cluttered and disorganized. A basic rule of thumb is to use three colors. These include primary color, neutral color and secondary color.
Don’t Forget About Connecting Areas
Don’t forget about adjoining rooms in your kitchen color scheme. An accent wall can provide more color to an open dining hall or a living area. By dividing a few of the room’s colors across the surrounding spaces, you may connect the color scheme. Also, consider the rest of your home.
If you want to go with a modern kitchen design but your property is older, add a few key features for the sake of consistency. And to avoid inconsistencies in the house, keep the color schemes of the room similar. In this case, adding a feature wall in the kitchen is a terrific approach to experiment with color.
Don’t Ignore the Undertones
Paint colors are usually made by combining two separate tones of paint, so when looking at a paint color, you’re looking at two different colors together. One is the primary color or mass tone, and the other is the color that achieves that specific tone.
Since your kitchen has a lot of cool elements, choosing a warm undertone, even if the overall tone is cool, will look odd. Comparing the shade of paint with the pure tone of the same color is the greatest approach to choosing the perfect color for your kitchen. Comparing your shade to the pure shade will help you see the undertone more clearly and decide whether it will look right in your space.
FAQs on the Dos and Don’ts of Kitchen Color Schemes
What colors make the kitchen look bigger?
White or light colors reflect light, making spaces look bigger and brighter. In contrast, darker colors absorb light, making a room feel smaller and cozier.
Final Thought on the Dos and Don’ts of Kitchen Color Schemes
Creating a flowing kitchen color scheme might seem like a daunting task at first. But with time, patience, and a little warmth, you’ll find yourself with the perfect kitchen color scheme within no time.
The post The Dos and Don’ts of Kitchen Color Schemes appeared first on Kitchen Infinity.
Did you miss our previous article…
https://www.conduithardware.com/?p=924
How To Grow Black Lace Elderberry
If you are looking for a beautiful and unique ornamental plant, black lace elderberry is an excellent choice. It has dark purple foliage and blackberries, making for a dramatic landscape focal point during the growing season. This beautiful shrub goes by many names, including black lace, elderberry, common elderberry, black elder, European elderberry, Judas tree, and blue or black elderberry.
This versatile plant provides year-round beauty without much effort on your part. Whether you’re looking for a new ornamental shrub or simply want fresh fruit at your fingertips, this variety of Sambucus canadensis is sure to please. In this article, we’ll talk about everything you need to know about growing black lace elderberry.
Uses of Black Elderberry
Elderberry plants have gained popularity thanks to their lovely appearance and important uses in traditional industries, culture, and medicine. They fall under early spring flowers since they bloom creamy pink flowers in the spring. These are followed by blackish-red fall berries, which can be harvested for making elderberry wine and jam. You can also leave the elderberry wine on the plant to attract birds and other wildlife.

Black lace berries are also edible and high in vitamin C. If you want to plant them for food and drink, then the American elderberry, also known as Sambucus canadensis, is the better choice than the European type known as Sambucus nigra.
The intense purple black foliage is finely cut, giving it an effect similar to Japanese Maple, also known as Acer palmatum. Some designers are even using it in the more tender maple varieties since black lace is extremely durable and adaptable.
It can also be used as a dramatic accent plant, planted en masse for a troublesome high hedge, or incorporated into the mix or perennial border. Black lace is also suitable for use in woodland gardens, rain gardens, and attracting birds and butterflies to the yard. You can also plant a black lace next to a shrub with brightly colored leaves to create contrast and interest.
This is a very cold hardy, and easy-to-grow plant adaptable to most sites. In addition, this plant is deer resistant, drought tolerant, fall heat tolerant, and a landscape plant. It can also be used as a potted shrub on the patio. It’s good in groupings or masses or perennial and shrub borders.
Common elderberry plants are deciduous plants or small trees that can reach up to 20 feet in height and width. Some specimens have grown as tall as 33 feet in their natural habitat.
Planting Black Lace Elderberry (Sambucus racemosa ssp. melanocarpa)
Black lace elderberry can grow in USDA plant hardiness zones 4-7 but is susceptible to winter damage. It is best planted in fertile, loamy soil with excellent drainage and receives full sun or partial shade. If planting specimens near homes or other structures, it is a good idea to place a barrier of mulch or fencing around the plants to protect them from being damaged by lawnmowers, mower debris, and deer.

They are relatively easy to grow. They can be propagated from seeds, softwood cuttings, or semi-hardwood cuttings. Seeds need cold stratification. Seeds should be sown in the autumn and kept moist for 60 days before planting. A thin layer of vermiculite on top of the soil helps retain moisture. It also does well in wet soils.
These plants also do well in acidic to alkaline soils, but it’s also important to look for slightly acidic soil. Before planting this shrub, amend the soil with compost to ensure healthy growth. You can easily make your compost to use for the purpose. After that, it will benefit from regular fertilizing with compost once every year in the spring.
Due to their sporadic growth, elderberry plants tend to form a lot of suckers. So prune it regularly if you want to maintain size and shape for your shrubs. Pruning involves removing unhealthy, damaged, old, or dead branches in early spring.
Black Lace Elderberry Care
Black lace elderberry is self-pollinating, but if you wish to have as many berries as possible, you can plant another cultivar near your black lace elderberry for increased pollination.

Light Requirement
In the North, while black lace elderberry will tolerate partial shade, it will produce more flowers and a more attractive foliage color if grown in full sun. At the southern end of its range, it will benefit from afternoon shade.
Soil Requirements
Black lace elderberry grows best in slightly acidic, loamy soil that is moist but well-drained. The black lace elderberry bush also tolerates clay soil types better than many shrubs, but it performs better over time if planted in soil that drains well. Black lace does best in moist soil, although it will tolerate dry soils. It thrives under acid or alkaline soils.
Watering Common Elderberry
Black lace elderberry is a drought-resistant shrub and does not require large amounts of water to thrive. However, it benefits from supplemental watering during dry periods and in hot summer climates. The plant prefers evenly moist soil. And since elderberry shrubs often grow near wetlands, it tolerates wet soil better than many other plant species.
Fertilizer and Transplanting
This deciduous shrub needs to be fertilized in early spring by applying a slow-release fertilizer specialized for trees and shrubs. If you wish to transplant an existing plant, do so in spring or early summer while the soil is moist and warm. Elderberry shrubs do not recover well from root disturbance, so take care when moving them. You may harm or kill the plant with poor planning or execution.
When growing elderberry bushes in the home garden, plant them near a water source such as a drip irrigation system or pond, especially if rainfall is infrequent. Ensure that the roots get at least 1 inch of water weekly and keep an eye on soil moisture levels so you can provide supplemental watering during dry spells.
Pruning Elderberry
Best if pruned immediately after blooming. The correct time for pruning this plant is late winter or early spring. Pruning will keep it attractive, vigorous and check its spread. As the woody stems become older, they become weaker and less attractive. So, remove the older stems to direct more energy into the newer, more attractive ones.

Propagating Common Elderberry
Cutting the branches of the elderberry bush back to four inches gives you a convenient place to collect cuttings.
To propagate common elderberry, remove the smaller tip shoots from grown branches’ end and dip them into rooting hormone. The best time for this operation is fall or early winter. Remove all leaves on the cutting except the top two pairs. This makes it easier to dip into rooting hormone and reduces the chances of disease spores falling into any open cuts.
Shorten all side branches by half their length to direct energy into the main stem. Root the cuttings in a pot filled with sand, peat moss, and perlite at a ratio of 1:1:1. Water sparingly until roots form.
After three weeks, the cuttings should be ready to plant in your garden or for overwintering. Select a location that gets at least six hours of sun per day and has well-drained soil.
Common Pests and Diseases
Prone to a number of diseases, including canker, leaf spot, and powdery mildew. Apply Neem oil once pollination begins for best results. Also, make sure there is proper spacing to promote good air circulation, irrigate at soil level, and keep mulch six inches away from the main stems of the bush.
FAQs on How to Grow Black Lace Elderberry
What plants are compatible with black lace elderberry?
White pine trees and quaking aspen are good elderberry companion plants, especially if you’re looking for something taller than the shrubs.
Final Thought on How to Grow Black Lace Elderberry
Elderberry plants are very popular plants that you can never miss. Not only do these shrubs look splendid and very familiar, but they’re also low maintenance in almost any environment and growing conditions.
The post How To Grow Black Lace Elderberry appeared first on Kitchen Infinity.
Did you miss our previous article…
https://www.conduithardware.com/?p=903
Collaboration Transforms Kitchen
Rowayton, CT — Karen Berkemeyer and Leslie Dunn often work together to create their clients’ dream kitchens and baths, with the former focusing on kitchen/bath design skills and the latter incorporating interior design touches for their respective companies of Karen Berkemeyer Home in Westport, CT, and Dunn Designs in Norwalk, CT. This kitchen, along with the master bath and a guest bath, was no exception…however, this time the resultant collaboration was showcased in Dunn’s personal residence.
“We work really well together,” says Berkemeyer, noting a mutual respect for each other’s talents, which makes for great collaborations. “As a kitchen and bath designer, I focus on making sure these spaces technically and functionally work correctly. Partnering with another professional, such as an interior designer, gives clients the best of two worlds since multiple people are working on the same project. I love working with Leslie because she is so creative and has great taste. She is especially talented and creative with paint.”
Contrasting color
Paint, at opposite ends of the color spectrum, is a focus of Dunn’s kitchen, where the bright white island is contrasted with dark black perimeter cabinets.
“The use of color – combined with very simple cabinet door styles, which are a great choice for today’s kitchens – makes this design stand out,” says Berkemeyer.
Black perimeter cabinets served as the starting point for color. “She really wanted to do black cabinets,” Berkemeyer indicates.
As a contrast, the island was designed to look like a table that Dunn found, notes the designer. “Island and perimeter cabinets don’t necessarily have to match in cabinet style or color,” she says. “In fact, when done well, like in this kitchen, having them not match shows a lot of creativity and makes for an interesting design.”
Keeping cabinet styles simple is the key to making a ‘mismatch’ work, says the designer in reference to the flat-panel, flush-inset Wood-Mode perimeter cabinets and full-overlay, shallow-cut, Shaker-style Signature Custom Cabinetry cabinets on the island. Both are sheathed with custom colors selected by Dunn.
“You would never do this perimeter with oak raised-panel doors on the island,” she says. “This perimeter features a very simple door style, as does the island. They play off of each other well. This entire kitchen has created so much interest from people. They see things they would have never thought of doing…and they like the result.”
The designers also kept the cabinet hardware unpretentious. Pulls on the perimeter cabinets bring to mind cleats used to anchor boats to a dock, giving the space a bit of a nautical vibe that pays homage to the water just beyond the kitchen windows. For the island, they incorporated drawer pulls that resemble those found on a filing cabinet. Berkemeyer also designed the island with seating for four, positioning stools at a right angle to facilitate conversation between guests. The designer also added custom brushed steel accents at each leg base.
“They add another texture to the space and make the island more interesting,” she says.
To continue the contrast between light and dark, Berkemeyer topped the island with white marble, which she built up with a 2″ mitered edge. The perimeter features median-black, charcoal-colored quartz with a leathered finish for added texture.
White 3″x6″ subway tile covers the walls, extending from the countertop to the windows and beyond. Its undulated surface offers a rippled appearance while its stark light color juxtaposes against the blackness of the shallow-depth soffit on the ceiling.
“I thought the kitchen stopped too abruptly in the corner,” notes Berkemeyer in reference to the soffit. “I suggested that we add the soffit, extending it to the refrigerator on one wall and across the length of the windows on the other. It really helps pull the whole kitchen together.”
Additional dark-hued accents include the deep blue paint that adorns the window trim. “She really likes to include the unexpected!” she says.
Overcoming storage challenges
To make better use of the kitchen’s footprint and gain a few extra feet of space, the designers removed walls between the living room and kitchen, eliminating a hallway in the process. To provide visual differentiation between the two spaces without adding a physical barrier, they added reclaimed antique beams in the ceiling, extending them into the living room.
“Previously, her home had an enclosed little kitchen with separate living room,” says Berkemeyer. “Now, the kitchen is more open and looks so much larger. Taking down the wall also made it possible to include the island.”
Even with the additional space gained by removing the hall, storage was a challenge for the relatively petite kitchen. “When spaces are smaller, like in this kitchen, the biggest design challenge is usually storage,” she says. “It’s important to make the most of whatever space you have, and to make everything accessible, especially focusing on corners. Taking cabinets up to the ceiling maximizes the space. It’s important, too, to pay attention to clearances, ensuring that walkways are technically correct and easy to maneuver.”
To overcome storage concerns in Dunn’s kitchen, Berkemeyer included specialized corner organization accessories, recycling bins, pull-out drawers and several large drawers to make contents easy to access.
Glass panels in the wall cabinets provide a brief glimpse of their contents and keep the space visually ‘light.’ “Like the rest of the kitchen, the glass is kept clean, without any mullions, to maintain the desired look for the space,” she concludes. 
The post Collaboration Transforms Kitchen appeared first on Kitchen & Bath Design News.
Did you miss our previous article…
https://www.conduithardware.com/?p=874
Ceramic Tile Flooring Review: Pros and Cons
Are you looking for flooring material that can be used in the living room, kitchen, and bathroom? Ceramic tile is a great flooring material, but it comes with some advantages and disadvantages that you should consider before installing them in your home.
Also, deciding whether ceramic tiles are best for your new floors depends on your style preference and budget. Let’s have a comprehensive review of ceramic tiles to see if they can be a great option for your home.
What is Ceramic Tile Flooring?
Ceramic tile flooring is a type of hard tile made from clay. It is then kiln fired, making it a durable and long-lasting material. Ceramic tiles are available in a variety of colors, sizes, and shapes. They can be used in both residential and commercial spaces.

Ceramic tile is also known as porcelain tile or non-porcelain tile. Porcelain tiles are more durable and dense than non-porcelain tiles. Ceramic tiles come in many varieties depending on the production process. Natural stone tiles are a well-known type of tile flooring, while other types of quarried stone include granite, marble, and slate.
Each of these tile flooring types has its specific characteristics and appearance. Natural stone tiles are more expensive than ceramic tiles.
Pros of Ceramic Tile Floors
Ceramic tiles are known for their versatility, low maintenance requirements, and moisture resistance. They have a hard surface that doesn’t hold onto or attract dust, dirt, or pollen. Learn some of the pros of ceramic tiles below:
Easy to Maintain
Ceramic tiles are relatively easy to maintain, requiring only a basic mopping every so often. If any stains, dirt, or liquids get on it, they will all rest on top and won’t get absorbed. You can also keep them clean frequently by using a vacuum with a soft brush attachment or a broom to get any loose debris and dirt off the floor.
If any stains happen, you can use any cleaner, just like how to clean tile floors of different kinds. In addition to being easy to clean, germs won’t harbor on the floor, making it a great advantage when running a business that serves the public, such as a restaurant.
They’re Affordable on Any Budget
One of the biggest pros of ceramic tile flooring is that it is one of the most affordable types of flooring that you can buy. It ranges in price, so no matter what your budget is, you will be able to find a style and color that fits your needs. Most tiles will cost around $5 to $10 per square foot.
Tile is also more cost-effective than hardwood flooring but expensive than carpet. You can also find low-end ceramic tiles for as little as $0.50 per square foot and high-end tiles for as much as $15 per square foot.
When finalizing your budget, ensure you account for additional installation costs such as labor, tools, and supplies. This is because as you look into the better-looking tile and professional installation, tile flooring can cost more than quality hardwood flooring.
They Can Withstand High Traffic Areas
One of the benefits that ceramic tiles offer is that they can support heavy foot traffic. This means you can walk on them every day without wearing them down or having to worry about creaking noises while you walk over them. However, keep in mind the quality will yield more wear and tear than higher-end tile.
The intense firing process makes ceramic harder to crack than porcelain or stone tiles. A quality tile flooring installation should last 20 years, which could add long-term value to your property if properly maintained.
Water Resistance
Another benefit of ceramic tiles is that they are extremely water resistant. This will be perfect for areas with high humidity or the possibility of spilling liquids, giving you peace of mind knowing your floors will remain safe. There is a protective layer on top of the material, making it stain and water resistant.
This is very important in bathrooms and kitchens as the ceramic tile will last longer than other materials. If you buy unglazed tile such as traditional Saltillo tile, you’ll need to seal it to protect the surface from any liquids it might encounter. It must be properly sealed because the grout lines between the tiles can be susceptible to moisture.
Otherwise, water can get down deep into the lines, weakening their installation and putting them at risk for mold growth. This can lead to costly problems down the road.
Ceramic Tiles are Durable
Another element to consider is the durability of ceramic tiles. These floors are extremely sturdy and can stand up to heavy foot traffic very well. They won’t crack or break like other materials would, so you don’t have to worry about any unnecessary replacements that might affect the aesthetic value of your home.
And when one tile ends up breaking due to severe impact, you can easily replace the tile without redoing the entire floor. This allows you to keep your overall costs down because you don’t need to replace your tiles regularly.
They’re Allergen Resistant
Due to their hard, solid surface, ceramic tiles have a lot less porous area than other materials. This, in turn, makes them resistant to allergens and bacteria that might affect the overall health of the people living inside a house.
Allergen particles are easy to spot and remove, making them a great choice for family members who suffer from allergies and asthma. Ceramic tiles are a great option for people looking to keep the environment of their house free from harmful allergens or irritating materials floating in the air.
Ceramic Tiles Come in a Variety of Designs
The ceramic tiles currently on the market come in various colors, patterns, finishes, and designs, from subtle neutrals to bold mosaics. This makes it easy for homeowners to find the perfect tiles to match their home’s interior design scheme.

Modern printing technology has also led to styles that mimic concrete, wood, and marble. This means that you can create a truly custom look by cutting your tile into planks or larger squares to make your space feel more open. You can also learn how to paint ceramic tiles and give them a perfect look.
Cons of Ceramic Tiles
The durability and moisture resistant feature of ceramic tile comes at a cost. So, it’s important to understand the drawbacks of this flooring option before heading to the home improvement center to make the purchase:
They’re Not Very Comfortable to Walk On
One of the biggest complaints about ceramic tile is that it’s not very comfortable to walk on. This is because it’s a hard surface, leading to joint pain and leg fatigue over time. Tile’s hardness can also be uncomfortable in areas where people stand for long periods, like in front of the kitchen sink or stovetop.
However, a few strategically placed area rugs and cushioned mats can help absorb some of that discomfort. As an advantage, the tile floor will feel great to step on the cold floor during the hot summer months.
It’s Slippery When Wet
Another drawback is that ceramic floor tile, like other hard surfaces, can be very slippery when it gets wet. This can pose a safety hazard if you have young children or older adults in your home. It’s especially dangerous to walk on tiles with water or ice because it can cause people to slip and fall.

This floor option is quite slippery, and if you’re installing them in highly trafficked areas, you want to prevent accidents as much as possible. In that case, avoid installing them in spots where liquid or water is spilled often on the floor, leading to injuries. For example, avoid using them in public bathrooms as you don’t want a lawsuit on your hands from a customer slipping on the wet tile flooring.
They Require Maintenance to Prevent Moisture Damage
Another thing to consider before picking ceramic tile flooring is that it requires a lot of maintenance. If you’re not careful, the tiles could get damaged from water and moisture, making them a breeding ground for bacteria and germs. With the grout lines acting as a pathway for liquid, this can be especially dangerous if anyone slips or trips.
A grout sealer is highly recommended on ceramic tile flooring to keep the moisture out and prevent damage like tiles’ watermarks. This also ensures that moisture doesn’t damage the underlying subfloor causing it to warp or crack. On top of this, having perfect subfloor conditions will ensure your tiles stay in place for years to come.
They’re Heavy
Tile flooring is heavy, making it a bad choice for upper-story installations. If it’s necessary to put tile flooring on the top level of a business establishment, then a professional should first check out the framing and building structure to ensure it can support the weight of tiles.
Ceramic Tile is Hard
Tile flooring is made out of ceramic, which is naturally hard. If you’ve ever stepped barefoot on a tile floor and felt the pain or heard your mother telling you not to run around on it, then you know how tough ceramic tiles are. Resilient floors can be softened with padded underlayment, but tile cannot.
Therefore, it doesn’t make for the best material for those who need to stand for hours at a time. You can use area rugs or throw rugs in the places where people stand most, like in front of the kitchen sink or behind the counter at the cash register.
High Installation Cost
Ceramic tile installation is not a do-it-yourself project. It’s also a time-consuming job that needs professionals. And, because of all the labor involved in the process, it is one of the most expensive flooring options you can choose.
Homeowners who want to install their tile should be careful of products that are easy to install and avoid tricky tiles such as large rectified tile, polished stone tile, and natural clay or Saltillo tile, which should be left for professionals.
FAQs on Ceramic Tile Flooring Review
Is ceramic tile good for flooring?
Ceramic tile is a good choice for flooring because it is durable, easy to clean, and can be installed in many different patterns and different rooms at home.
How can you tell porcelain tile from ceramic tile?
Ceramic tile is usually made in pottery or kiln, while porcelain tile comes from the same conditions but undergoes further refinement. The clay used in porcelain tiles tends to be purer and refined than ceramic tiles. Ceramic is designed for indoor use, while porcelain can be used indoors and outdoors.
Final Thought on Ceramic Tile Flooring Review
There you have it. The pros and cons of using ceramic tile on your floors. So, before you make the final decision on what to put down, make sure you weigh all your options.
The post Ceramic Tile Flooring Review: Pros and Cons appeared first on Kitchen Infinity.
Did you miss our previous article…
https://www.conduithardware.com/?p=822
Exertis Acquires Almo Corporation
Philadelphia – DCC Technology, a Dublin, Ireland-based technology distribution and services business that trades as Exertis, has acquired Almo Corporation in North America.
The move extends the company’s international scale in the Pro AV sector and ramps up its expansion in the North American market. The addition of Almo Corporation builds on other acquisitions in North America such as Stampede, Jam Industries, The Music People and JB&A. It expands Exertis’ Pro AV capability to form the largest specialist Pro AV business in North America.
Alongside its Pro AV business, Almo Corporation is the largest distributor of mainstream appliances, delivering a comprehensive portfolio of products including full kitchen packages with essential appliances to small and medium-sized retailers throughout the U.S. In addition, it is the leading distributor of premium appliances, serving retailers and builders designing luxury residential installations for refrigeration, ventilation and cooking in both indoor and outdoor settings. Almo’s business in consumer appliances and lifestyle products will add scale to Exertis North America’s business in the consumer channel.
Almo’s 75-year-old, third-generation, family-owned business brings 660 employees, nine distribution centers and more than 2.5 million square feet of warehousing space across North America. Almo Corporation will benefit from leveraging Exertis’ financial resources and supply-chain logistics, according to the company. The acquisition will provide Exertis North America with increased back-end economies of scale allied to the front-end specialization.
Almo will continue to be operated by the Chaiken Family, with Warren Chaiken as president and CEO and Gene Chaiken as Chairman. The combined Exertis and Almo Pro AV divisions will, in due course, be led by Sam Taylor, current exec. v.p. & COO of Almo Pro AV. Shortly after the completion of the integration, the combined business will be rebranded as Exertis Almo Pro AV.
John Dunne, a long-time senior executive with Exertis, currently leading the Exertis Pro AV team in North America, will join the Almo executive team and help lead the integration. The Premium Appliances and Mainstream Appliances divisions will continue to be led by Steve Terry and Jack Halperin, respectively.
Exertis’ expanded North American operation becomes a $2.4 billion business overseen by Martin Szpiro, managing director of Exertis North America. It forms part of the international expansion strategy of Exertis International, under Managing Director Clive Fitzharris.
Tim Griffin, DCC Technology & Exertis managing director said, “The acquisition of Almo Corporation is the largest in DCC’s history and signals our confident and ambitious intent to expand DCC Technology. By integrating Almo with our North American business, we will form the largest specialist Pro AV business in North America. Almo’s 75-year history of growth and success, combined with its longstanding relationships with industry partners and its ability to continually innovate and expand will be great assets to Exertis. In turn, we will bring significant economies of scale, global supply chain access and other benefits to the customers of Almo Corporation.”
Warren Chaiken, Almo Corporation president & CEO stated, “Having just completed a year-long celebration of 75 years of growth and business success, the time is right to give our manufacturer and channel partners a truly global distribution stage so they can operate their businesses at a greater capacity, leverage more buying power and the ability to compete for a more comprehensive position in the global supply chain. We are committed to growing with our partners by remaining their value-added distributor with larger scale and access to more products, more services and more financial support. For them, this transition will be seamless in that we will operate business as usual.”
The post Exertis Acquires Almo Corporation appeared first on Kitchen & Bath Design News.
Did you miss our previous article…
https://www.conduithardware.com/?p=816
Remove Tile Grout in a Few Simple Steps
Removing tile grout can be a long, messy project. You have to use buckets for water and vinegar, wear clothes that can get dirty, and deal with the mess of paste-like grout remover floating around the room.
However, it doesn’t have to be all bad. If you want to avoid all this work, you can get your tile grout looking new again with little effort by following tips used directly by the pros.
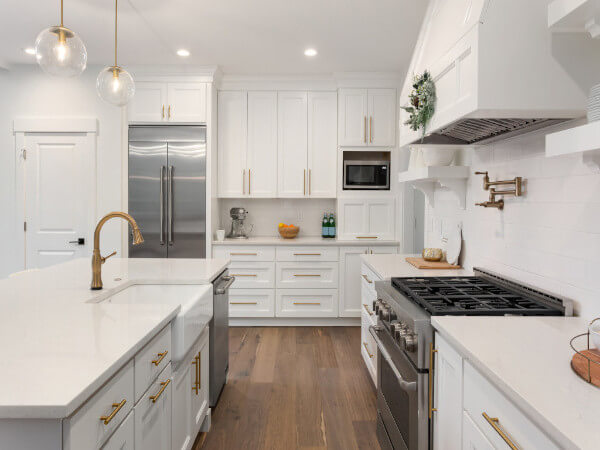
Image Credit: http://thepincer.com
In this article, we will give you the best ways to remove tile grout- with a tool, a blade, a chemical solution, or even through prevention. We will also provide some simple tips on how to clean up afterward. Let’s get started.
The Tile Grout Removal Tool
One of the best and easiest ways to remove tile grout is by using a grout removal tool. This is a handheld tool that has a small blade on the end. You can buy these tools at most home improvement stores.
To use the tool, you simply put it in between the tiles and pull out the grout that has collected there over time. The grout will come out of the tiles in small sections and may take some time to remove completely.
However, if you feel that this step is too much work, there are other methods to consider.
How To Remove Tile Grout With A Blade
Another easy way to remove tile grout is by using either a utility knife or a box cutter blade. Simply prop up one end of your tile on some spare boards or bricks so that the bottom side is facing up at an angle.
Then slide your blade into the crevice where the tiles meet, then forcefully push it forward. The grout will pop right out. Once you have removed all the grout in this way, you can then go over the tiles with a wire brush to remove any leftover bits.
If you have a lot of tiles to clean, this may be the quickest and easiest way to do it. However, it is not without its dangers- be careful not to cut yourself while doing this.
How To Remove Tile Grout With A Chemical Solution
If you don’t want to use a blade or a removal tool, you can also try removing tile grout with a chemical solution. There are many different products on the market that promise to do this job quickly and easily, but our personal favorite is muriatic acid.
Muriatic acid is a very strong chemical that can be bought at most hardware stores. It is used to clean concrete and masonry, so it is perfect for removing tile grout.
To use the acid, you will need some safety equipment- rubber gloves, goggles, and a respirator. You should also avoid any contact with your skin or clothing.
Pour the acid into a bucket and dip your brush in it. Then start scrubbing at the grout between the tiles. The acid will eat away at the grout and start to dissolve it. Keep scrubbing until all the grout is removed.
Be very careful when using this method- muriatic acid is a dangerous chemical and can cause serious injuries if not handled properly.
How To Prevent Future Buildup of Grout in the Tiles
If you want to avoid having to remove tile grout in the future, there is one simple solution – seal the grout lines with a sealant. This will create a barrier between the grout and the tiles and will help keep it from collecting dirt and bacteria over time.
There are many different sealants on the market, so be sure to do your research and find one that is right for your needs. Some sealants need to be reapplied every few months, while others can last up to 10 years.
Once you have sealed the grout lines, you will never have to worry about removing tile grout again.
Which rooms can you remove grout from?
There are various areas in your home where grout can get dirty and need removal. Here are some of the most obvious ones.
- Bathrooms: Grout lines in bathrooms are exposed to moisture regularly, which can lead to mold build-up over time. If you see signs of this phenomenon beginning to happen, it is best to remove the grout as soon as possible.
- Kitchens: Kitchen floors usually have tile grout lines with food particles stuck inside them. This attracts dirt and bacteria, which can cause dangerous cross-contamination issues if not cleaned regularly.
- Laundry Rooms: The same goes for laundry rooms- tile grout lines collect soap scum and lint from clothes, so they should be kept clean at all times.
- Shower: Grouting a shower is a tricky business- it is constantly exposed to water and can easily become dirty. If you notice that your grout is starting to look stained or mildewed, it is time for a good scrubbing.
- Basements: Basements are often damp areas, and this can cause grout lines to become discolored and dirty. Make sure to check your basement for this problem regularly, and remove the grout if necessary.
- Anywhere there are tiles: If you have any tiles in any other room of your house, it is a good idea to keep the grout clean and free of buildup. This will help keep the room looking its best and will prevent any future problems.
Removing tile grout can be a daunting task, but it doesn’t have to be. With the right tools and techniques, it can be a quick and easy job. Follow these tips and you’ll be on your way to a sparkling clean tile floor in no time.
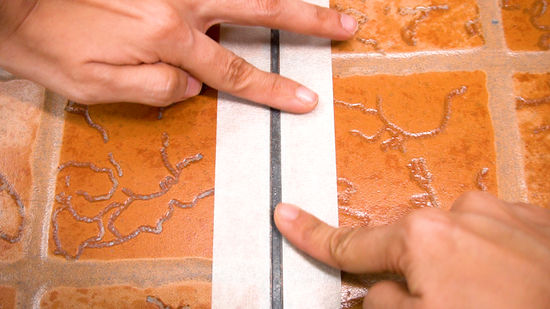
Image Credit: http://wikihow.com
Cleaning up after yourself
Once you have removed the bad grout, you should seal it with a new layer or reapply the old one to prevent future wear and tear. It is also a good idea to clean the work area so you’re not left with a mess.
Pour some diluted bleach onto the floor and use a mop to clean it up. This will remove any remaining residue from the acid and will help disinfect the area. Be sure to rinse the mop thoroughly after each pass, and don’t let the bleach come in contact with your skin or eyes.
When you’re finished, your floor should be clean and grout-free. Congratulations on a job well done.
Final thoughts on removing tile grout in a few simple steps
In conclusion, removing tile grout is a process that can be done relatively easily with the right tools and techniques. There are many different areas of your home where grout can become dirty and need to be removed, so be sure to stay vigilant and keep on top of it. A clean tile floor will brighten up any room in your house and will make it look newer and more inviting.
The post Remove Tile Grout in a Few Simple Steps appeared first on Kitchen Infinity.
Did you miss our previous article…
https://www.conduithardware.com/?p=790
How to Repair Orange Peel Texture
Orange peel texture is a common issue in the home improvement industry. This problem can happen for many reasons, but most commonly it happens because of improper installation or removal of roofing materials. The good news is that there are some things you can do to fix it.
This article will outline how to repair orange peel texture and prevent future occurrences. Let’s get started.
What is orange peel texture?
Orange peel texture is a term used to describe the appearance of a surface that has been covered in a thin layer of paint or another coating. The surface appears bumpy and textured, similar to the skin of an orange. This can be caused by many factors, including improper installation or removal of roofing materials, using the wrong type of paint or sealant, or excessive weathering.

Image Credit: http://eegrestore.com
Alternatively, it may be caused by using paint or sealant that is too thick. In this case, the paint or sealant may have been applied with a sprayer instead of a roller and not properly brushed out to smooth the surface. When this happens, it can be difficult to tell which part of the roof has been painted and which parts haven’t; therefore it appears as though the entire roof is orange peel textured.
Main causes of orange peel texture
If shingles are not installed correctly, they can pull away from the roof over time, causing the underlying roofing material to appear bumpy and textured. Also, if the shingles are removed too quickly, they can tear away from the roofing underlayment, causing them to appear bumpy and textured as well.
Alternatively, orange peel texture may be caused by using paint or sealant that is too thick. In this case, the paint or sealant may have been applied with a sprayer instead of a roller and not properly brushed out to smooth the surface. When this happens, it can be difficult to tell which part of the roof has been painted and which parts haven’t; therefore it appears as though the entire roof is orange peel textured.
Finally, if your home is in a sunny or hot location, the sun may cause the paint to blister and peel, also resulting in an orange peel texture.
How to fix orange peel texture
There are several ways that you can fix orange peel texture.
In this first place choosing the best ceiling materials to buy should be done before getting started.
If the problem is caused by using paint or sealant that is too thick, then the solution is to use a roller instead of a sprayer to apply the paint or sealant. Use a medium nap and go over it about three times with the roller, brushing out any visible lines left behind by the roller.
If your home is in a hot location and has been exposed to too much sun, you can install reflective roof shingles to reduce heat absorption and lower your cooling bills. If you applied a primer that was too thick, apply a professional grade primer at half strength so that it doesn’t dry orange peel texture.
Finally, if the problem is caused by improper installation or removal of roofing materials, then the best solution is to hire a professional to come and fix it. They will be able to properly install or remove the roofing materials so that it doesn’t pull away from the roof over time.
Tips for avoiding orange peel texture in the future
There are several things you can do to prevent orange peel texture from cropping up on your roof again.
First, if you are going to be roofing your home yourself, make sure that you do a good job. Read the instructions thoroughly before getting started and use quality materials. You’ll also want to make sure that if you’re getting someone to do the job for you, they aren’t making any mistakes as they work. This could be anything such as not adding enough shingle adhesive or tearing off shingles too quickly.
Once the roof is finished, don’t walk on it for at least 48 hours so that it can be properly dry up. This will help prevent orange peel texture from forming by giving the coating time to dry completely before it has any chance of peeling away.
If you are having any other problems with your roof, be sure to contact a professional right away. They will be able to assess the situation and recommend the best course of action. Remember, it’s always better to be safe than sorry, especially when it comes to your home.
Roof texture is not always an easy thing to fix yourself. If you are not sure how to go about repairing the texture on your roof, or if you think the problem may be more serious, it is always best to call in a professional. They will be able to take a look at the situation and let you know what steps need to be taken to fix it. By taking care of the problem as soon as possible, you can avoid further damage and keep your home looking its best.

Image Credit: http://seejanedrill.com
How To Repair Orange Peel Texture – FAQ
What is orange peel texture?
Orange peel texture is a type of finish that is often seen on walls and ceilings. It is characterised by its bumpy, uneven surface.
What causes orange peel texture?
In addition to the types of roof material chosen, there are several factors that can contribute to the development of orange peel texture:
- Porous materials: If the surface material is porous, such as drywall or plaster, it will absorb the paint or primer unevenly. This will create a bumpy surface when the material dries.
- Poor surface preparation: If the surface isn’t properly prepared before painting, it will also be more likely to develop orange peel texture. The surface should be clean and free of dust, dirt, and grime.
- Incorrect application: If the wrong type of paint or primer is used, it can affect how well it adheres to the surface and may create an uneven texture when dried. It may also be hard for the finish coat to adhere to a rough surface produced by a poor-quality primer or paint.
- Drying time: Generally speaking, finishes with long drying times are more likely to develop orange peel texture than those with short drying times. This is because in some cases, the paint will begin to dry in certain areas before you have finished applying it. While this isn’t always avoidable, proper ventilation and working in small sections at a time can help minimize this risk.
- Environmental factors: Sometimes exterior painting jobs produce orange peel texture because of environmental factors such as humidity, temperature, and wind. Exterior painting jobs are especially affected by these factors as they can affect the drying time and how well the paint cures.
How do I fix the texture of the orange peel texture?
The process will depend on what’s causing it, but in general, you should start by eliminating any environmental influences that may be a factor. For example, if there is too much moisture in the air or if it’s very cold or hot outside, this may affect how your finish coat dries and contributes to the orange peel texture. You may have better results painting when conditions are more favorable for finishing work.
Final thoughts on how to repair orange peel texture
In conclusion, orange peel texture is very ugly and bad for resale. You should try your best to properly maintain and repair your roof to avoid this.
If you have any other questions or concerns about orange peel texture or any other roofing issues, be sure to contact a professional right away. They will be able to help you get the problem taken care of quickly and efficiently.
The post How to Repair Orange Peel Texture appeared first on Kitchen Infinity.
Did you miss our previous article…
https://www.conduithardware.com/?p=783
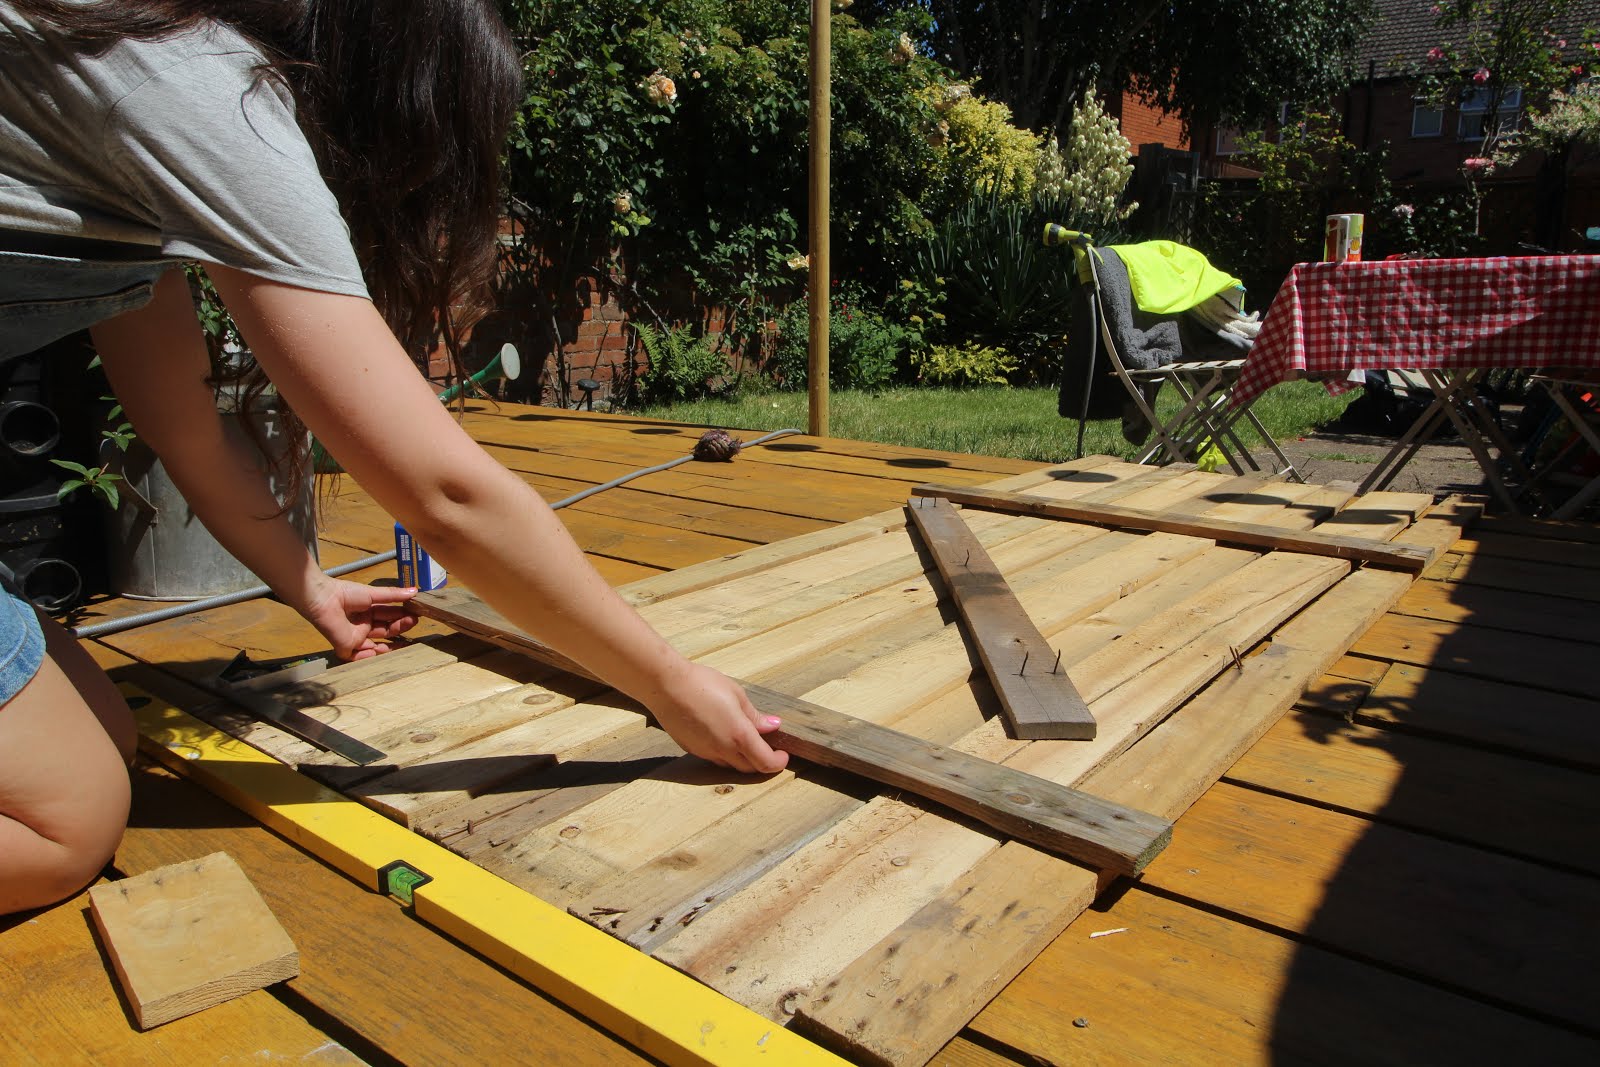
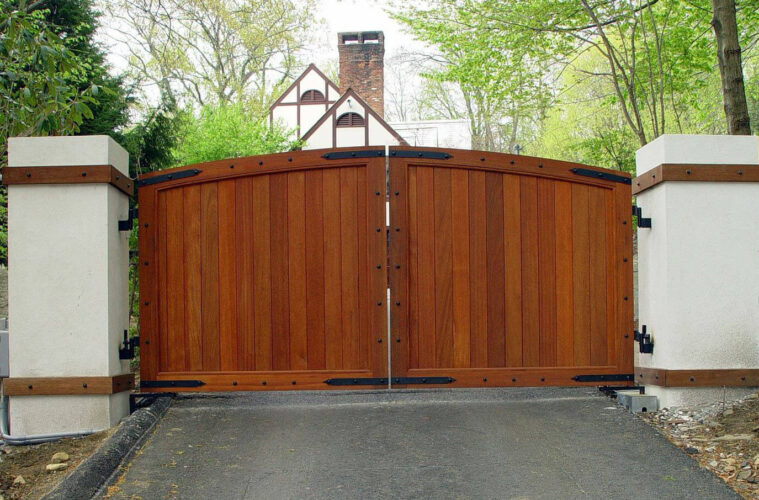
How to Build a Wooden Gate for Your Yard
A wooden gate that is not maintained will look ugly and uninviting. It can also be a safety hazard for your family, pets, or guests. The good news is that you don’t need to hire a professional to build or repair your gate. You can do it yourself with the right tools and instructions.
You can build your good-looking wooden gate from start to finish and make it as durable as you like. Here’s how to do it.
The Tools and Materials Needed for the Job
Other than the gate, you’ll need a few common hand-held carpentry tools to get started. These include:
- Tape measure
- Wheelbarrow
- Screwdriver
- Pencil
- Miter saw
- Cordless drill
- Small diameter drill bit
- Carpenter’s glue
- Straight edge ruler
- Hammer
- Shovel
- Safety glasses
- Speed square
- Posthole digger
- Hearing protection
- One-handed bar clamps
Steps to Building a Wooden Gate
Step 1: Preparations
When planning the materials needed to build your gate, it’s important for you to do a little math to make sure that both of the posts will be at the same height. The idea is to set one post in concrete in one corner of your yard and then make another post on the opposite side of your yard match up with it. Think through the location and weigh out all the considerations and locations where you want to build your gate.
Step 2: Dig Holes and Plumb Posts
Take the time to dig your post holes to have the same depth and size. You will also want to make sure that your posts are plumb before you set them in the concrete. Use a level or speed square to test for plumb and adjust as needed.
Step 3: Measure and Cut the Tongue and Groove Boards
Once you have the posts in place and are sure of the height, it’s time to measure and cut the tongue and groove boards. You will want to cut four pieces that are each 72 inches long. Use a measuring tape to make a pencil mark at 72 inches on each tongue and groove board. After that, cut the boards 72 inches long using your miter saw.
The frame for a basic wooden fence gate should be a simple box with four sides, usually smaller than the gate opening. Typically, you would use the same variety of wood you used on the fence. If you want a different color, redwood is sometimes used for large gates.
Step 4: Measure and Cut the Horizontal Bases
Next, you will need to measure and cut the horizontal bases for your gate. You will need a measuring tape to measure three 42-inch segments on two of the 1×6 cedar boards and not tongue and groove boards. Cut these segments, so you have three boards that are 42 inches long.
Step 5: Lay Out the Boards
Once you have your boards cut, lay them out on a flat surface and make sure they line up with each other. If the tongue and groove boards fall apart while doing this step, then move them to where they will not get in the way of your layout. This won’t be hard if you understand other carpentry work such as building a floating deck.

Step 6: Attach the Tongue and Groove Boards
You will need to clamp the boards together while attaching them with screws. This keeps the boards in place while you attach them. Attach them to the 1×6 horizontal brace boards underneath the 7/8-inch exterior screws. Pre-drill holes for the screws to eliminate splitting. Keep a close eye on the lower boards, so they don’t move out of position when you work.
Step 7: Anchor and Plumb the Brace Posts
You will want to make sure the posts are plumb or vertical. You can use a level to check this. To keep them in place, you will need to anchor them to the ground. If your soil is soft, you can use a post hole digger to make a hole deep enough for the post to be stable. Post length should be at least ⅓ longer than the planned height of your gate.
Pour some gravel into the bottom of the hole to allow for drainage and place a cement brick at the base of each post. Make sure your posts are tall enough to reach about three feet off the ground when they are all put together or tall enough to be bent around by hardware cloth. Cover with soil and tamp down until it is solid.
Take your next two posts and place them about a foot from each other. The closer they are, the more support you will have. Decide which direction you want your gate to swing, then place one of the corner posts in between them so that it is even on both sides. Use a level again to make sure this post is straight.
Step 8: Measure and Cut the Diagonal Brace
Next, use a measuring tape to measure the length of your hardware cloth and cut it so that it is just a bit longer than the width of your yard. You can use wire cutters for this task. Put the hardware cloth into place and attach it at each corner with hog rings, pushing them down on either side of the post.
Now it is time to install the diagonal brace. This will help keep the gate stable and prevent it from sagging. Measure from the top of one post to the opposite of the other post. Mark this spot on each post and then use a level to draw a line between the two marks. Lay your straight edge over this diagonal brace, staying parallel with the lines of the horizontal slats.
Make six pencil marks on a diagonal brace parallel to the top and bottom of each horizontal brace. Remove the temporary screws, then cut the diagonal brace with your miter saw at those six marks. Three cut pieces will be discarded, leaving two cut pieces that you’ll use as the diagonal brace.
Step 9: Attach the Diagonal Brace
Run a line of carpenter’s glue over the end of the diagonal brace, then drive in a 3-inch screw. Then, press the pieces on the gate in between the horizontal braces. Weigh down the two glued pieces with cinder blocks, rocks, and anything sufficiently heavy. Let the glue dry for about two hours, then remove the weight. Drive-in two more screws, one at each end of the diagonal brace.
Step 10: Cut Frame Pieces to Size with a Miter Saw
Using a miter saw, cut the pieces of the frame to size. You can start the gate by cutting the top and bottom pieces to the same width or length as you planned for, slightly smaller than the opening in the fence. Cut the upright side planks about 3 inches shorter than the height of the gate.
Step 11: Screw-in Top and Bottom Planks
Screw the top and bottom boards to the gate frame. Position the plank, so its edges are flush with the frame, then screw into place every 16 inches or so, using three screws per board. Drill a pilot hole for the screws before putting them in to not split to the wood. Fasten with deck screws, pre-drilling to keep the wood from splitting.
Measure from the top bend to the opposite bottom corner and make sure both sides are the same. As you start assembling the gate framing, it’s good to lay it out on a flat surface such as a patio or driveway. Attach the top and bottom rails to the side rails, ensuring it’s square.
Step 12: Cut an Angle Cross-Brace and Attach it to the Top and Bottom Rails
This will help to maintain strength and rigidity. Connect these to the frame boards that match the rest of the fence by using deck screws, pre-drilling. Use a miter saw to make your diagonal cut and place diagonally onto the box and trance with a pencil where the angles go. Place the cross-brace at a 45-degree angle extending from the bottom corner of the gate to the opposite corner of the top of the gate. But if it’s a rectangular frame, make a drawing to scale and measure the angle you’ll need with a protractor.
Step 13: Cut and Install the Planks
Place the first plank with its bottom side against the foundations and side rails and tight in between them at both ends. Use a combination square to ensure all of your planks are even before screwing down. Cut the planks using a table saw and secure them using deck screws, drilling pilot holes to keep your planks nice and clean.
Step 14: Design the Top of Your Gate
The top of your gate should have a nice curve to it. Cut the two 2x6s to the desired length and then use a jigsaw to cut out the arch. Drill pilot holes and then screw the boards together using deck screws.
Start by drawing an arc across the top of the fence gate using a string and a pencil, filling it with decorative curves of your taste. If you’re a woodworker, feel free to get fancy with your decoration. Use the jig to cut along your pattern.
Step 15: Install Hinges and Mount Your Gate
Once the top is finished, it’s time to install the hinges. Place them on the upper left and right corners of the gate. Pre-drill holes and then screw the hinges in place using 3-inch screws. The final step is to hang your gate. Have someone help you hold it in place while you screw it into the hinges.
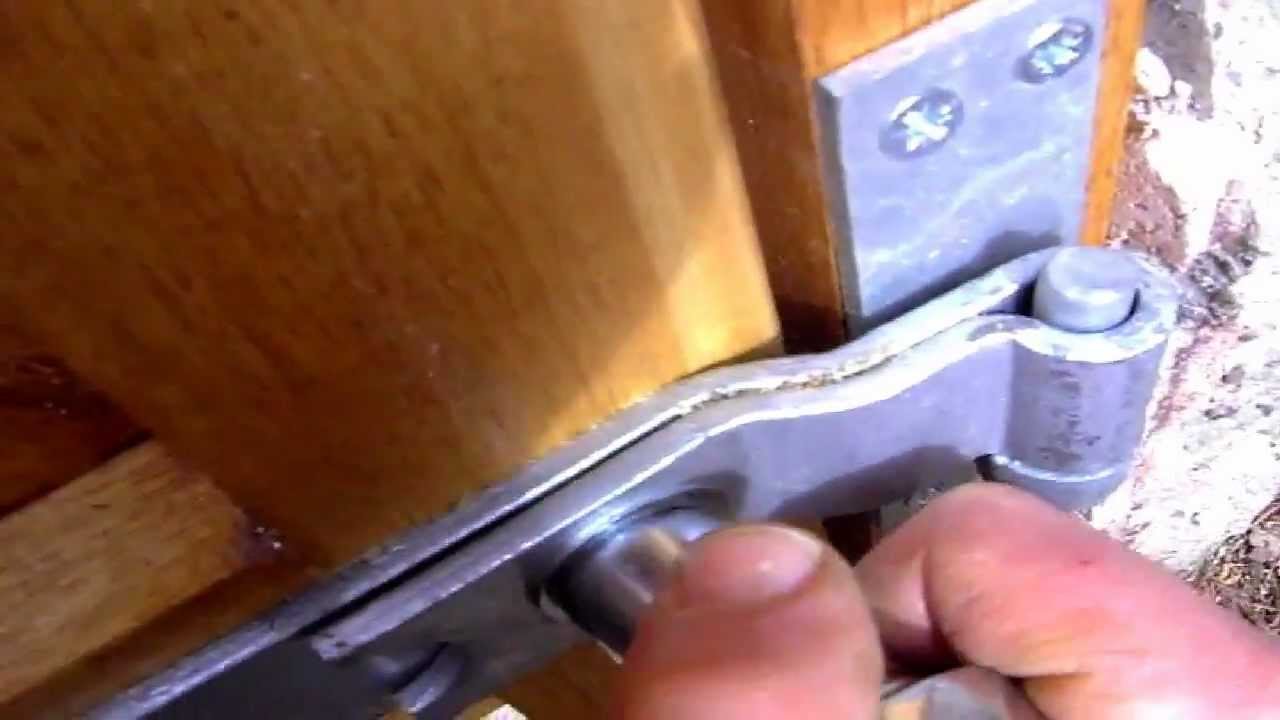
Leave about a 1/4 inch of distance on the hinge side of the gate. Using the cordless drill and screws included with the hinges, screw the hinges at the top, middle, and gate frame. Check to ensure the gate swings properly. Adjust the hinges to level, tighten or loosen the gate if necessary. Add diagonal cross brace to keep the gate square and prevent sagging. Remember that installing a brace with a little pressure in the opposite direction will make your gate warp. So, take diagonal measurements to check for squareness.
Step 16: Mount the Gravity Latches
Mount the gravity latches on the gate frame, one near the top and one near the bottom. The latch should be positioned so that it will snap into place when the gate is closed and hold the gate shut. Drill pilot holes and then screw in place using 2-inch screws.
Use a cordless drill and the screws included in the latches to screw the slide latches in place on the top and bottom of the gate. Screw the receiving section of the latches to the gate frame and mount the flip latch in a similar fashion at the center of the gate.
Step 17: Seal the Wood
Seal the wood with a sealant or weather proofing product. This will help protect the wood from the elements and keep it looking nice for years to come. You can use a paintbrush or garden sprayer to apply your sealant.
Try to cover the whole surface evenly, making sure you hit the bottom of the planks, which absorb more water than the end grain. This area is likely to rot or become discolored so let it dry for a couple of hours in dry climates or a day in more humid climates.
Step 18: Use Your Wooden Gate
Now that your wooden gate is complete, it’s time to enjoy it! Not only will it add beauty and privacy to your home, but it will also provide a secure barrier for your family and pets.
FAQs on How to Build a Wooden Gate for Your Yard
What are the benefits of having a wooden gate at home?
The benefits of using a wooden gate over another material are many. If you’ve already learned how to build your own house, adding a gate with the traditional look can be the best decision. It can blend in with all home styles, from modern to Victorian to an earthy farmhouse. Unlike other materials, it requires very little maintenance and looks as good as the day you installed it years later.
How can you attach pickets to the frame?
Use one angled piece from the bottom of the hung side to the corner of the latch side. Lay out pickets on the frame to check spacing and mark when you’re not satisfied.
Final Thought on Building a Wooden for Your Yard
Wooden gates provide a sense of privacy and security for your home and yard. They also add beauty and value to your property. Installing a wooden gate is a relatively easy project that can be completed on the weekend.
If you have any questions or need assistance with this project, don’t hesitate to contact a professional contractor. They will be able to help you with the planning and installation of your wooden gate, ensuring that it is a beautiful and safe addition to your home.
The post How to Build a Wooden Gate for Your Yard appeared first on Kitchen Infinity.
Did you miss our previous article…
https://www.conduithardware.com/?p=761