Home » Kitchen Improvement
Category Archives: Kitchen Improvement
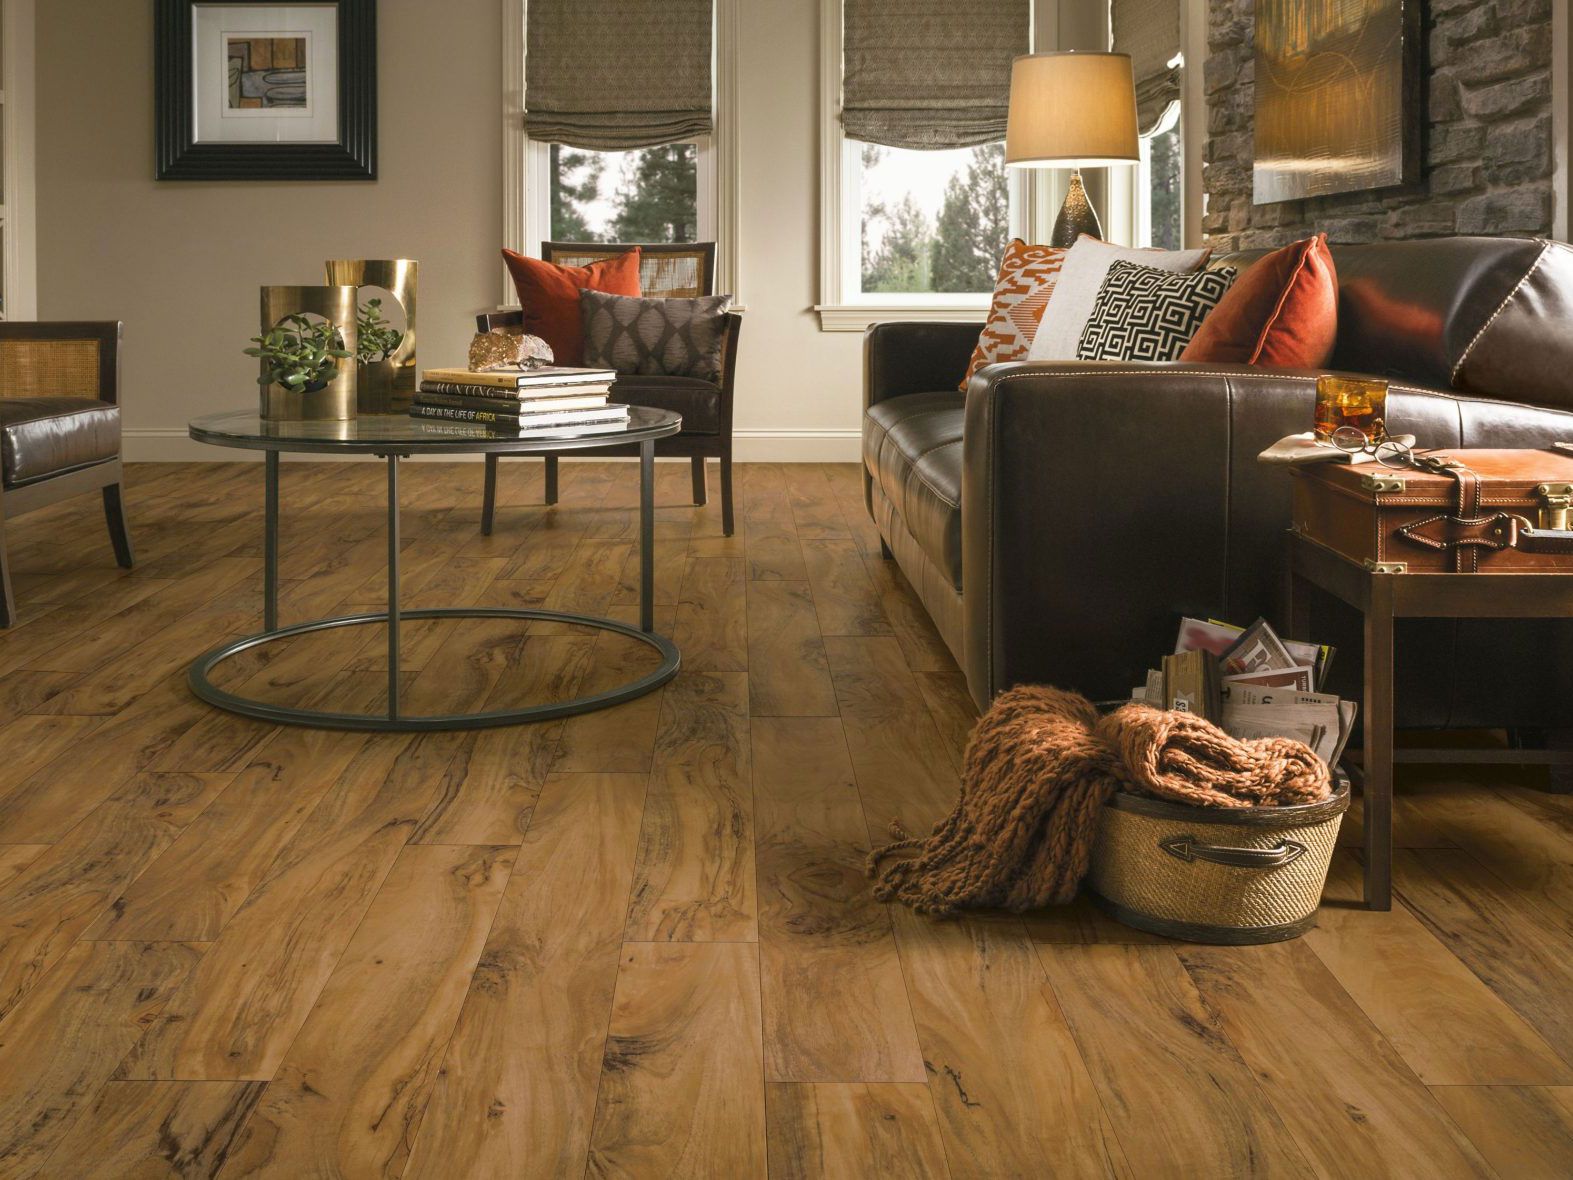
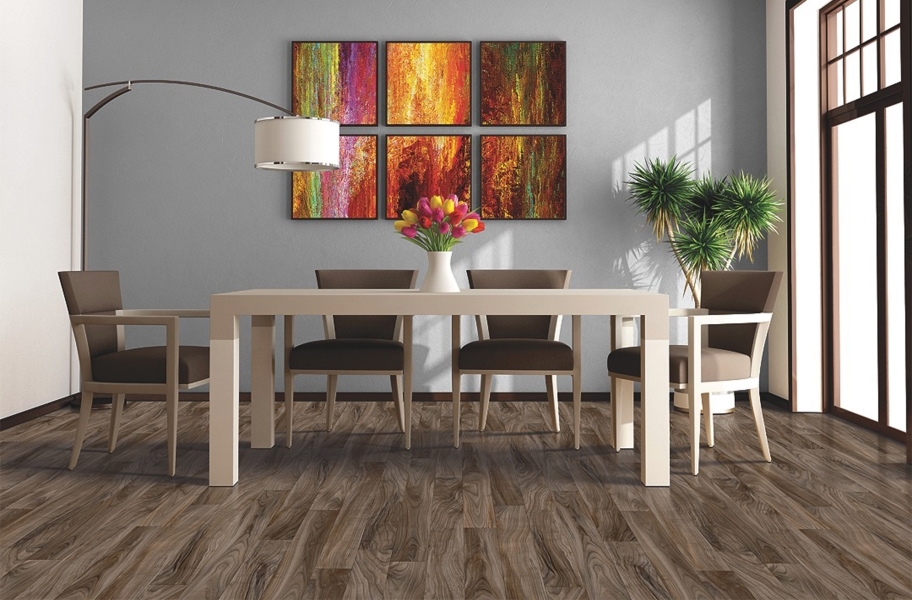
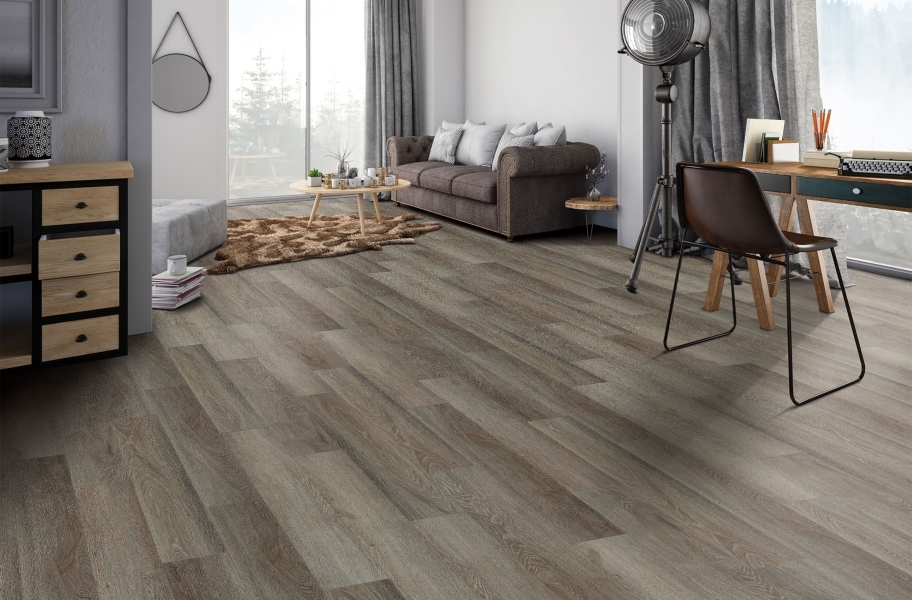
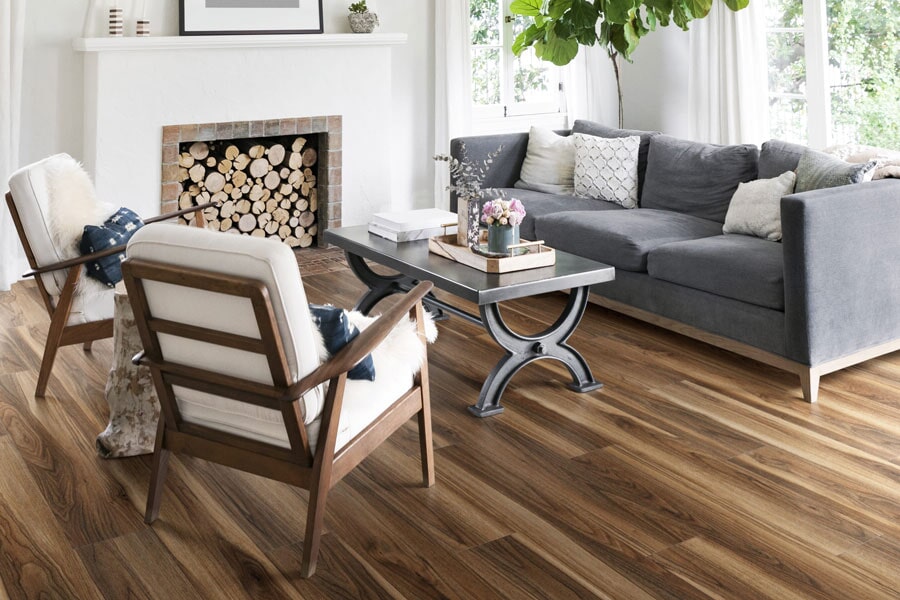
13 Top Manufacturers of Luxury Vinyl [LV] Flooring
When it comes time to replace your current floor, you have many flooring options out there to choose from. One option that is quickly gaining popularity is vinyl plank flooring. Luxury vinyl plank flooring gives you a look and feel of hardwood but without all the hassle that goes along with it.
This makes luxury vinyl plank flooring one very popular choice when you’re making the final decision on your next flooring project. Today, we are going to take a closer look at some top manufacturers who produce this type of product so that when the time comes for you to make that final decision, you will know who to go with.
What is Vinyl Flooring?
Vinyl flooring is a synthetic material that looks and feels like real flooring without the cost. Vinyl flooring comes in many forms, including luxury vinyl plank, sheet vinyl, and luxury vinyl tile. They are created by layering a specialized PVC plastic on top of a fiberboard backing to give the product strength.

Pros of Vinyl Floors
Stain Resistant
Almost every brand, style, and texture of luxury vinyl plank is stain proof, and those that aren’t are heavily resistant to staining.
DIY Installation
In most cases, vinyl plank flooring is easy to install. Large rectangular planks can usually be laid down in a matter of hours with a very small learning curve.
Affordable Luxury Vinyl Plank Flooring
One of the biggest pros of luxury vinyl plank floors is that they offer an affordable alternative to real hardwood and laminate. The overall price of LVP flooring has come down in recent years for many reasons. There is style and type for every budget. It’s priced between $2 and $7 per square foot, making it cheap compared to hardwood, carpet, and decent tile.
Residential and Commercial Use
Luxury vinyl plank can be used for both residential and commercial applications. They are durable enough to withstand heavy foot traffic in office buildings, educational facilities, retail stores, hotels, airports, or anywhere requiring a high cleanliness level.
Cleaning Vinyl Plank Flooring
Vinyl flooring is easy to maintain. You don’t need anyone to teach you how to clean vinyl floors. A quick mop or vacuum removes most surface dirt. For tougher stains, use a mixture of hot water and vinegar to soak the area for up to 15 minutes before wiping it off with a clean cloth. The flooring can be refinished if too much scuffing occurs over time.
Styles and Finishes
Due to the wide variety of installation methods, vinyl plank flooring comes in a variety of styles and finishes. While less expensive options in other flooring materials mean lower quality, vinyl flooring isn’t the case.
Cons of Vinyl Plank Floor
Volatile Organic Compounds and Off-Gassing
Since the plank flooring is synthetic, it emits a scent that some people can detect as volatile organic compounds or VOCs. These can be hazardous to health, although they typically begin to dissipate within the first 24 hours of installation. It’s good to keep windows open during and after installation, but not directly in front of air conditioners or fans that might trap the odors.
No Added Home Value
Unlike hardwood flooring or wall to wall carpeting, vinyl flooring doesn’t typically add to resale value. However, it offers excellent durability and resilience that increases useful life by decades. This makes it an important consideration if you’re planning to live in your home for many years after installation.
Not Easily Repaired
If you drop a perishable item such as an egg, wine bottle or bread crumbs on your vinyl flooring and try to wipe them up quickly, they may leave a noticeable stain. You can’t simply refinish the flooring with wood floor wax as you would for hardwood floors.
Professional installers can successfully repair vinyl floors, but the damage may already be permanent because, unlike hardwood floors, vinyl floors are not made with real wood.
What to Look for in a Quality Vinyl Plank Floor
Not all luxury vinyl flooring is created equal. Vinyl planks and tiles vary between $1 and $8 per sq ft. Here are some of the factors that explain the variation. You should look for these features when choosing the best vinyl plank flooring.
Rigid Core
Lesser grades of vinyl floors may come with a fragile core made from polystyrene foam, which breaks apart as you walk on it and can damage your subfloor. Luxury vinyl planks should have a rigid core made from PVC. The most common core is wood plastic composite, while the newest type is stone plastic composite.
Thickness
Rigid core vinyl planks average 5mm thick, while vinyl tiles range from 11 to 13 mm. Thicker is better because thicker planks and tiles can withstand more wear and tear before showing signs of damage.
Price and Warranty
Prices can range from $1 to $7 per square foot, depending on the type of material and manufacturer. Luxury vinyl tiles typically cost more than luxury vinyl planks. A good quality product should come with at least 20 years for residential use and 10 years for commercial use.
Vinyl Plank Flooring Brands
1. Mannington
This is one of the oldest major vinyl flooring manufacturers founded in 1915. Mannington offers luxury vinyl in two product lines. These include Mannington luxury sheet vinyl and Adura luxury tile and plank flooring.
Mannington is unique in offering a sheet vinyl product described as luxury vinyl. The luxury vinyl products are either tile or plank products for all other manufacturers. The Adura brand comprises both tile and plank offerings. Most of the tiles mimic natural stone, and the tiles are typically 18×18 inches square or 12×24 inches in size.
Some products are meant for glue-down applications, while others use a click-lock connection. If you’re looking for near authenticity in vinyl wood flooring, go for the plank collection, which features variable widths, realistic colors, and surface textures.
2. Shaw
Shaw is the only other company that offers a product that resembles luxury vinyl flooring. The Shaw Contract Flooring brand offers an array of sheet products and luxurious vinyl planks you can find. While they’re a little more expensive, you’ll get a high quality, the durable plank that exceeds your expectations.
Shaw also tends to back its products with generous warranties, demonstrating the company’s faith in what it sells. There are LVP types to choose from Shaw floors. These include the DuraTru collection, the least expensive, and ranging from 5 mil to 7 mil in thickness.
For thicker flooring, choose the Floorte style, which is a mid-range of their collection, offering you a dozen of styles to choose from. Most residential applications come from this collection. For commercial use or higher-end products, choose Floorte pro.
The prices will rise in Floorte pro but with up to 30 mil thickness and a solid plank using SPC. The thicker mil also comes with longer warranties, including commercial use. One advantage of choosing vinyl plank flooring from Shaw is that most of the company’s products are fully waterproof instead of just being water-resistant. Shaw is one of the largest and most famous vinyl plank flooring brands.
3. Armstrong Vinyl Plank Flooring
Armstrong Vinyl Plank Flooring is another manufacturing brand that has been around for decades. Armstrong’s vinyl plank flooring comes in both floating and glue-down installation methods and a variety of styles, including contemporary, traditional, rustic, and classic designs.
Most of Armstrong’s luxury types of vinyl are plank products that mimic wood grains. With the company’s lifetime warranty covering residential use, you can’t go wrong with this brand. The average prices are between $5 and $7 per square foot.
4. Forbo Flooring Systems
Forbo is a Swiss-based company that makes a point of being as environmentally friendly as possible by using green energy, minimizing transport, and cutting down on waste. Their Allura residential line offers a vast array of around 100 different styles to choose from and not fewer than eight installation methods.

The company also offers specialist flooring such as acoustic flooring that helps reduce noise, durable, low-maintenance homogeneous flooring, and versatile and varied heterogeneous options, opening up plenty of creative possibilities.
This is a great option to consider, especially if you’re interested in installing ecological, high-quality flooring in residential or commercial settings.
5. Mohawk Flooring
Mohawk Flooring is a renowned name in the flooring industry. They offer a huge variety of stylish and versatile options that are easy to install and affordable, with customers hailing from nearly every walk of life.
Mohawk offers luxury vinyl flooring and laminate, resilient sheet, and hardwood. Mohawk has been around for over 100 years, and they are the largest flooring manufacturer in the entire nation, processing 100 million square feet of products per month.
Mohawk floors are easy to clean and care for, making them a popular option for people with young children and pets in their homes. Some Mohawk products also include a special pet-friendly warranty, so if it gets damaged by your furry companions, you’ll be covered, contrary to Mohawk’s competitors.
On the downside, Mowhak comes with a shorter warranty than other brands, so if you’re looking for a long warranty brand, then this isn’t the right option. With their plenty of experience, Mohawk is a reputable company that comes at the most reasonable price possible.
6. NuCore Flooring
The luxury vinyl flooring from this brand is highly durable and resilient to every foot traffic and resists scuffs. The planks are not only durable, but they’re also waterproof, making it the only brand offering 100% waterproof across the entire line.
All their models are wood grain finishes to emulate a real hardwood floor. The brand also features an innovative design with a cork underlayment that is hypoallergenic. This underlay also provides a softer floor when walking, absorbs more sound, and is warm for colder climates.
The interlocking floating design with this cork underlay allows you to lay more flooring without the need for transition molding. You’ll also get a lifetime warranty on residential installs with this brand. Maintenance is also simple, with regular sweeping and mopping.
Made to withstand pets, children, and high traffic areas, NuCore is the perfect choice if you’re looking for the look and performance of your floors.
7. Karndean
This is a relative newcomer in the world of luxury vinyl flooring, originating as a small business in 1973. Although it’s a small manufacturer, Karndean specializes in nothing but luxury vinyl flooring and is highly regarded in the industry. It offers wood-inspired plank styles and stone inspired styles, making it one of the most diverse companies despite its small size.
Its unique flooring products mimic other materials such as metals, fabrics, cork, and bamboo. It comes with a pro-rated lifetime warranty. However, some models require professional installation for the full warranty to take effect. So, make sure you read all of the fine print before purchasing.
8. COREtec Plus
COREtec Plus is another manufacturer that only manufactures luxury vinyl flooring. It prides itself on using eco-friendly materials without sacrificing performance and design. Featuring an innovative core construction, COREtec Plus’ products are water resistant and offer more than 10 times the hardness of other brands for easier maintenance. Like Karndean, it’s recommended to have your COREtec installed professionally.
It offers White Glove services, including installers, for an additional charge. Using this service will also give you a full warranty on installations, and you can use the floors as soon as the job is complete. The major lines of COREtec include original, pro, stone, wood, and one plus. Each of these lines has its models of LVP.
9. Proximity Mills
Proximity mills have manufactured high-end luxury vinyl flooring in the U.S. for over 30 years. The company’s London Towne Collection is finished in an old English style and is one of the most elegant products on the market today (and it doesn’t look like vinyl). It comes in 12 patterns, six colors, and four textures, which are part of the FSC certification. The company also manufactures two luxury vinyl planks under the brand name Aireloom and has a new line of luxury vinyl tile called Proximity Tile Collection.
Proximity Mills floors boast advanced toughness and durability, and all flooring from the company comes with a lifetime warranty for residential use. However, its commercial warranty are not as good as those offered by other companies.
Proximity mills also pride themselves on exceptional customer satisfaction. And on the downside, they don’t allow anybody to sell their products, making it a little difficult to get hold of proximity mills flooring.
10. Cali
Cali flooring is a good choice if you’re concerned about investing in green products. It’s manufactured using 100% renewable energy, and the material used to make this vinyl tile comes from post-consumer and post-industrial waste, reclaimed wood and scrap tires.
The company was born of an idea that came to the founders after a surfing trip in Hawaii, and their original products were engineered bamboo flooring. Among the lines produced by Cali is Mute step flooring, which incorporates a cork underlay to help reduce noise while increasing comfort.
The next is Vinyl Pro Classic, designed for ease of installation, vinyl plus, including cork underlay and Longboards which are vinyl planks sold in a larger format.
11. Flooret
If you want to keep things simple but have a luxury vinyl tile, as a result, look no further than Flooret. This company offers luxury vinyl tiles by the square foot with either a wood or stone pattern on top. The product is meant to be kept in place without adhesives and floated over existing flooring, including wood, concrete and ceramic tile.
It has a single line of vinyl flooring, divided into the base and the signature versions. The difference is the wear layer, with base offering 20 mils and signature providing a whopping 40 mil, making it indestructible.
These types are UV protected and feature ceramic bead technology to enhance toughness and durability. All Flooret products include a lifetime warranty. It also offers affordable pricing, thanks to its simplicity and the direct to customer business.
12. Lifeproof Vinyl Flooring
Nail-down and glue-down installations are available. It comes in various widths and designs, including wood plank effect vinyl flooring, authentic-looking tile styles and luxury vinyl planks that look like stone. The classic square printed pattern is also for those who want something plain and simple.
Lifeproof flooring also boasts a 20 mil wear layer and a waterproof rigid core, contributing to its durability. If you’re looking for flooring that won’t break the bank, then this is the right choice.
13. Raskin
This is a company specializing in attractive modern flooring solutions that are also quick and easy to install. Both loose lay and glue down options are available. The company offers several flooring options, including premium waterproof, commercial and loose lay.
All these are characterized by high levels of quality and attractive artistic designs. If you’re looking for a well-known flooring option that can make a real impact, then this is the real choice.
FAQs on Top Manufacturers of Luxury Vinyl Flooring
What thickness of vinyl plank flooring is best?
The thicker the plank, the sturdier it is. So the rule of thumb is to use 4mm to 6mm thickness in heavily used areas of the house and 4mm and below for areas like the bedroom.
Final Thought on Top Manufacturers of Luxury Vinyl Flooring
As you can see, vinyl flooring is easy and simple to install. And the best vinyl plank flooring will give you years of trouble-free use, easy to maintain, and suits the style and decor of your home.
The post 13 Top Manufacturers of Luxury Vinyl [LV] Flooring appeared first on Kitchen Infinity.
Bird Bath Fountains and Why You Need One
Birds are a great addition to any yard, but how do you get them to come? You can’t just put out a birdbath and expect birds to flock. They need more than that; they need food, water, and shelter. To attract the most birds into your garden, it’s important to make sure all of their needs are met.
All it takes is one little bird bath fountain in your backyard or front yard. The sound of running water will attract many songbirds, including blue jays, woodpeckers, and sparrows. If you’re looking for something more traditional, like a stone basin with plants around it, we have those too! There are dozens of designs available so you can find the perfect one for your home.
Types of Bird Bath Fountains
Hanging Bird Bath Fountains
A hanging bird bath fountain is a great way to add motion and sound to your outdoor space. The sound of falling water refreshes and captivates. It can even contribute to the overall ambience of your yard or garden.

These bathroom fountains for birds are made from durable steel and other metals, making them long-lasting, low-maintenance additions to your garden. You can also use it as a bird feeder if you prefer.
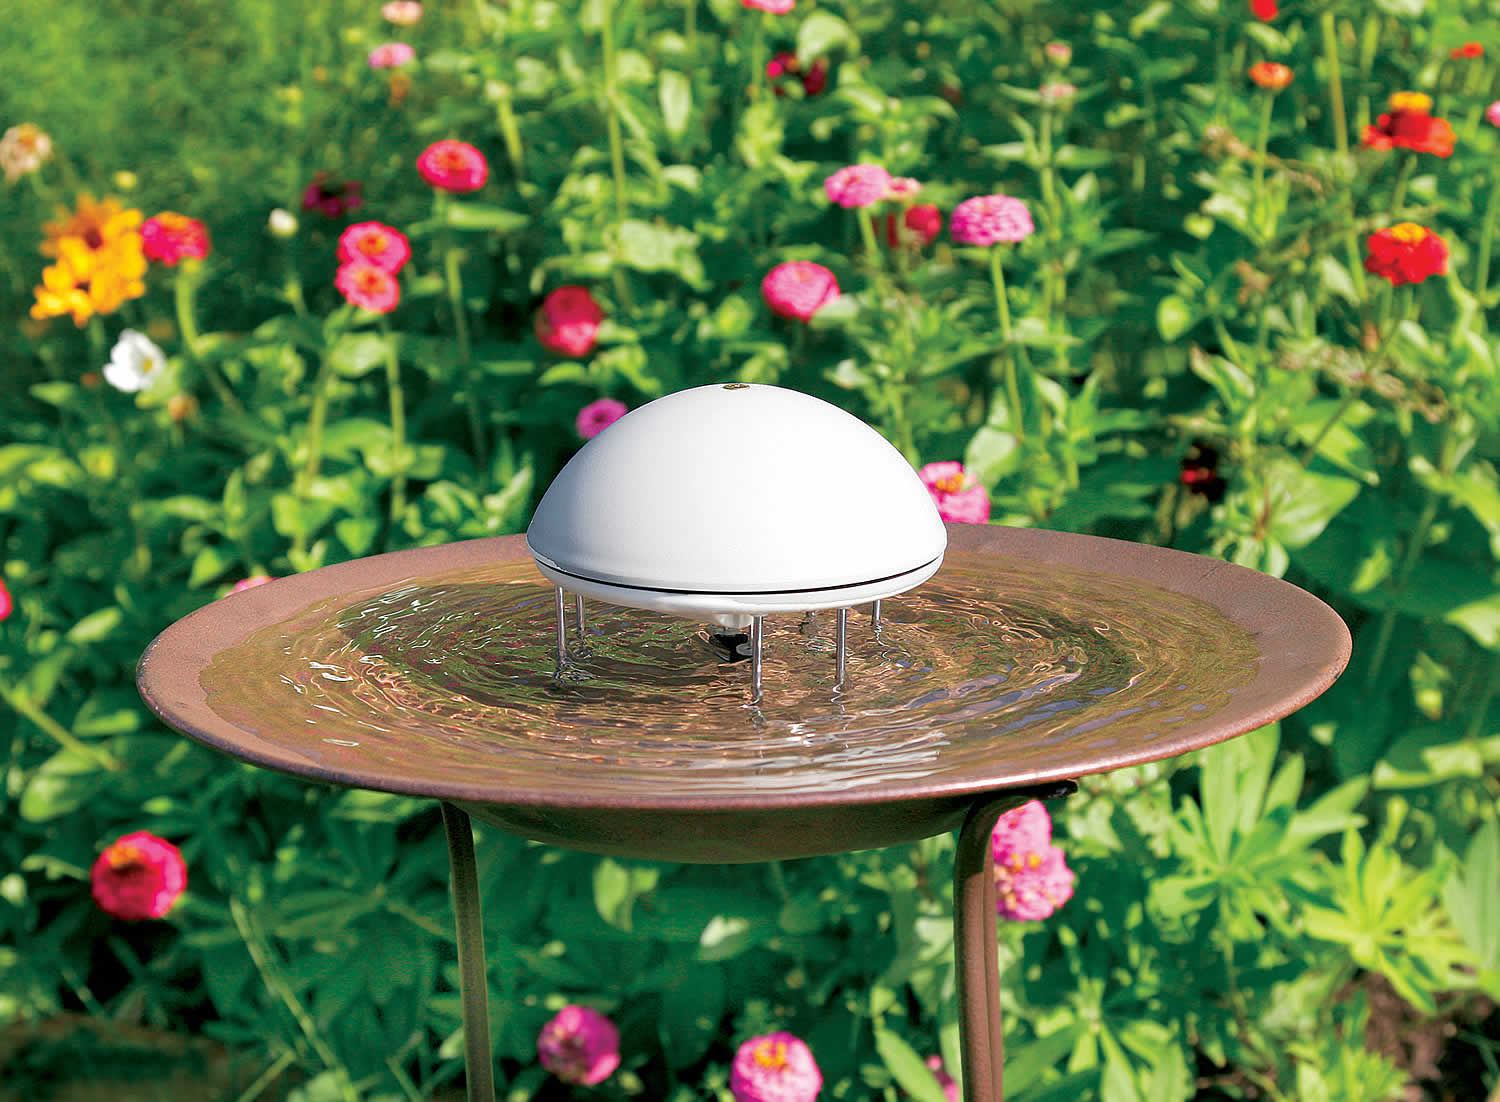
Pedestal Bathroom Fountain for Birds
Built with you in mind, pedestal bird bath fountains add a touch of class to your yard while giving birds the perfect place to get clean and take a drink. Like other bathroom fountains for birds, this type is made from durable materials such as resin and metal.
This classic pedestal-style bath is popular with bird lovers. It can withstand all types of weather to attract birds year-round. The shallow bowl is also ideal for smaller birds.
Water Wiggler Bathroom Fountain for Birds
As the name suggests, this bathroom fountain also wiggles to attract birds. It moves water through an internal tube system that gets birds’ attention with movement and sound. The cup is ideal for tiny songbirds such as finches, flycatchers, wrens, thrushes, and more.
Birding experts also recommend the water wiggler to catch the attention of more bird species with moving water. You might also attract migrating birds like warblers that don’t visit bird feeders.
Ground Bird Bath Fountain
This fountain is a ground-mounted bathtub fountain with a very shallow dish. Its design allows water to change directions many times before it eventually falls into the shallow dish. The single tube emits a gentle bubbling noise that makes it readily available for birds in search of water.
It lessens the need for frequent cleaning because dirt and debris do not settle as quickly as they would on a static model. Ground dwelling birds like sparrows and juncos will appreciate the easy access to water. It holds four cups of water in the shallow basin.
Tree Stump Bird Bath Foundation
This fountain provides water for various types of birds in an instant. It is built around a tree stump foundation which offers the user several options in addition to holding water. You can place plants in the water or on top, you can feed the bird’s fruit that will attract them to your yard, and they can even rest inside it when weary.
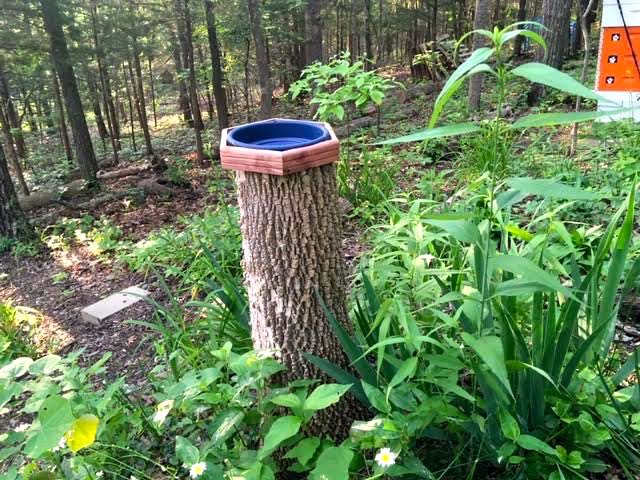
The three-leg design prevents it from being knocked over by other birds or neighborhood kids. If you adore cardinals, then this is the right choice. The natural look will blend well in your backyard.
It’s made of durable resin to last for years. You can also use it as an indoor decorative piece. The realistic-looking tree stump is topped off by a bird’s nest, with faux green succulents growing on the wood.
Glass Koi Bath Fountain
Koi fish baths are remarkable pieces that add an aquatic feel to your home. The inclusion of glass makes it look like you’re gazing into the waters of a river or pond. It has a calming vibe and can add to the serenity in any room. This glass bowl is bright and light, with a sturdy metal base included. The frame folds up easily to store it in your garden shade.
Sunflower Bird Bath Fountain
If you want a smaller fountain, this one is a great choice. It’s a hollowed-out sunflower complete with a birdbath and foliage around the base. The colors are bright and cheerful, and it gives an old-world feel to your garden or porch setting.
The pedestal birdbath can be used as a beautiful home accent, but it’s also functional. The water falls out of the bowl and into the pool below, which can be used to your pet’s or children’s delight. This is a great way to keep them cool in the summer months.
Mosaic Bird Bath Fountain
How beautiful and unique! This one is made from a mosaic of brightly colored tiles and has a little bird on top that sends water into the bowl below. You can set this in your front yard or backyard, and it will give off a strong sense of style and class. It’s perfect for pet owners who want to keep their animals cool during the warm months.
This handcrafted mosaic piece will also sparkle in direct sunlight and beautify the shade. It doesn’t come with a stand, so the seller recommends the dish on an inverted terra-cotta pot.
Stone Bird Bath Fountain
Here we have a very natural and rustic birdbath fountain. It’s made from mainly stone and is perfect for people who want to keep nature close by but still give their outdoor space a touch of class. It has an upper portion with a little opening that the water pours out of. You can either sit this on dry land or fill it up with water and let the birds drink from it.
This is another natural birdbath fountain that is gorgeous. It uses a large enough bowl to place plants inside of it if you wish to do so. This also has an inverted top portion, so it creates a nice gentle sound when the water starts to flow.
Ceramic Bird Bath Fountain
This is the perfect fountain for anyone who wants a little piece of art in their outdoor space. This has a small base and inverted top but with intricate designs that give it such an uplifting feeling when you look at it. Setup is quick and easy, you screw the bowl onto the pedestal stand.
Concrete Bird Bath Fountain
This is what I ended up getting for my backyard. It has a unique design, with the bowl perched atop the pedestal stand. However, there are no bells and whistles when it comes to this fountain. You can also create your unique design by painting it whatever color you like.
Cast Iron Bird Bath Fountain
This birdbath fountain has a classic look to it. But what makes this stand out from the rest is the little pump that pumps water up and runs down throughout the tiers of this fountain. It adds to its charm and loveliness. If you like an artistic touch to your backyard, then this is just for you.
Solar Bird Bath with Lights
If you want to go green and add some style, then this is the fountain for you. All you have to do is leave it out in the sun and watch your fountain light up your backyard. The solar power powers the pump, so there are no messy wires running all over the place. Just make sure that this birdbath faces south to receive direct sunlight to turn on at night.
Solar Water Fountain with LED Lights
This is the most colorful of the three fountains. You have a simple fountain with some solar panels in front by day. But by night, watch lights light up within the solar panels and reflect off the water for an enchanting glow. Since the lights are solar-powered, you don’t have to worry about hauling extension cords around or even changing batteries.
The three different shine modes allow these lights to turn on at dusk and off at dawn. Just make sure that this fountain is facing south to get enough sunlight to charge during the day.
Plastic Bird Bath and Feeder Fountain
This is the cheapest and simplest of bird bath fountains. It has a little basin for birds to drink from, along with a feeding ring above it, so you can also feed them as they drink. The entire fountain is made out of plastic, so no need to worry about rust or metal pieces that might fall apart.
They included a plastic water tray that holds water, so remove it, and you have a bird feeder. The base is crafted of durable Eastern red cedar wood.
FAQs on Bird Bath Fountains and Why You Need Them
What is the importance of bird bath fountain?
Birds need bird baths in the winter, just as they need the rest of the year. In the very cold months, water can be very hard to find, and they do appreciate a bird bath with accessible water in it. If your backyard has a heated bird bath, then you can expect some activity all year, even in the winter. They give you an opportunity to interact with different bird species and identify baby birds as well.
How often should you change the water in the bird bath?
You should change the water every two to four days then clean up the bird bath. Remember, taking care of birds coming to your yard involves providing them with clean water in the fountains.
Final Thought on Bird Bath Fountains
Birds need a full and clean bird bath. So if you build it, they will come. Make sure you clean your bird bath with a garden hose every couple of days. If you see dead bugs floating in it or algae starting to form, that’s a clear indication that it’s time to clean. You can also learn different ways to attract birds to your compound such as putting our hummingbird feeders.
The post Bird Bath Fountains and Why You Need One appeared first on Kitchen Infinity.
Reasons for Yellow Leaves on Houseplants
It’s very frustrating when your favorite houseplant starts to show signs of stress, isn’t it?
Those yellowing leaves could mean that the plant is getting too much or not enough water. It might also be a sign that the light in the room isn’t right for this type of plant. Maybe you’re using tap water with chemicals in it or it could also mean that you’ve been fertilizing your plants every other week, which might be too little.
No matter what the cause is, understanding why your particular houseplant is showing these symptoms will help you find solutions more quickly and easily.
In this article, I’ll discuss the possibilities of why yellow leaves are happening to your houseplants, what the symptoms mean, and what you can do about it, so if you’re ready to learn about all these things – read on.

Image Credit: http://gardeningknowhow.com
Plants need the right amount of light, water, and nutrients to grow well
All plants need the right balance of light, water, and nutrients to grow well. They use sunlight to create food through photosynthesis, and if they’re not getting enough light, they might start to turn yellow. This isn’t just true for houseplants – outdoor plants need the right amount of light too.
If your plant is getting too much water, the leaves might start to turn yellow because the roots can’t get enough air and the leaves will wilt. This happens because when you water your plants, the water doesn’t have time to evaporate between watering, which is what helps keep the roots healthy.
Low humidity in the air can also cause houseplants to lose their moisture more quickly, leading to yellow leaves. You can increase the humidity in the room by using a humidifier or placing your plants near a water source.
If you’re using tap water to water your plants, it’s important to check if any chemicals in it might be harmful to your plants. If so, you can use filtered or distilled water instead.
Houseplants need the right nutrients to stay healthy, and you can provide these nutrients by fertilizing your plants at least once every two weeks with a general-purpose fertilizer. Fertilizing your plants regularly will help them grow big and strong.
Different solutions to consider
Now that you know all about the reasons for yellow leaves on houseplants, let’s move on to the solutions.
If your plant is getting too little sun it’s best to find a brighter spot in your home. A south-facing window is great because it will get plenty of sunlight throughout the day.
If you’re using tap water that has chemicals in it like chlorine, you can use filtered or distilled water instead. If you have well water, the chemicals are most likely coming from your pipes. You can talk to someone at your local hardware store for more information about removing these chemicals from your house’s plumbing system if this is an issue you face.
You may find that even after fertilizing regularly with products made especially for houseplants, that they still start to show signs of yellowing leaves because of lack of nutrients – this is likely because you’ve been fertilizing every other week, but plants need supplemental food every week. If you find that this is the case, switch to fertilizing more often.
If your plant is losing moisture quickly, try using a humidifier or placing your plant on top of an inch-thick water-filled tray so the bottom sides of the leaves are touching – this will help increase humidity levels in your room.
You can also try moving your plant to a brighter place since bright light helps increase humidity levels.
If you have tried all of the above solutions and are still having issues with yellow leaves on your houseplants, then it might be time to talk to someone who knows about plants at a garden center nearby. If you’re not very familiar with gardening or plants in general, don’t worry about trying to diagnose what is wrong – it’s better not to guess and risk doing something that harms the plant.
Consider cleaning your household leaves and flowers to remove dust and other particles that can settle on the leaves and block sunlight. Regularly wiping your houseplants’ leaves with filtered or distilled water will also help remove any dirt or residue that might be clogging the pores in the leaves and causing yellowing – this is especially important if you’re using tap water because of its chemicals.
Other factors to consider
It’s also important to remember that sometimes leaves start to turn yellow simply because the plant is growing older – this is normal, and if it happens just once or twice then there probably isn’t anything to worry about.
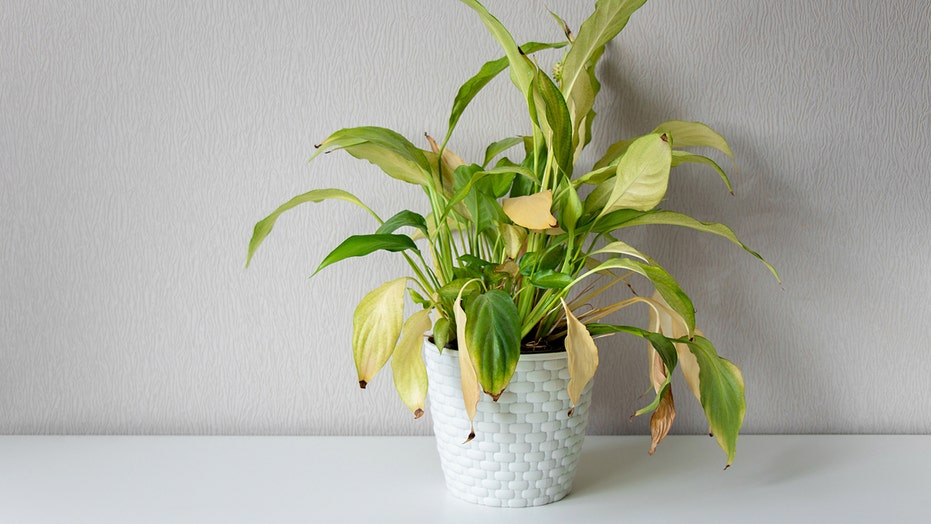
Image Credit: http://foxnews.com
But if your plant seems like it’s getting worse over time (the reason for yellow leaves might be different every time), you should take note of the changes. If multiple plants in your home are turning yellow at the same time, or you find areas on the leaves where they look brown instead of green, these could be signs that something more serious might be wrong with your plant(s).
If you’re concerned about any changes to your plants, now is a great time to do some research before reaching out to someone who knows about plants for help. The internet is a great resource for learning about the specific problems your plants might be having, and garden centers usually have experts on staff who can help you out as well. With a little detective work, you’ll be able to get to the bottom of the problem and solve it in no time.
Reasons For Yellow Leaves On Houseplants – FAQ
Why are my houseplants’ leaves turning yellow?
The most common reasons for yellow leaves on houseplants are overwatering and under-watering. Other causes can include pests, diseases, or nutritional deficiencies.
How can I prevent my houseplants’ leaves from turning yellow?
The best way to prevent your plants’ leaves from turning yellow is to water them properly. Make sure to water deeply but infrequently, and never allow the soil to become soggy. You can also fertilize your plants regularly with a balanced fertilizer, and keep them free of pests and diseases by using regular pest control measures.
Final thoughts on reasons for yellow leaves on houseplants
In conclusion, there are many reasons why your houseplants might be turning yellow. It could be a sign that they need more water, or that they’re getting too much sun. It might also mean that they’re being overfed, or that they have a nutrient deficiency. By pinpointing the cause of the problem, you can take steps to correct it and help your plants get back to their healthy green selves.
The post Reasons for Yellow Leaves on Houseplants appeared first on Kitchen Infinity.
Did you miss our previous article…
https://www.conduithardware.com/?p=931
How to Remove Gasoline Stains and Odors
Gasoline is one of the most difficult stains to remove from clothing or carpeting. The stain will not only be hard to remove, but it can also cause an unpleasant odor. Since gasoline evaporates quickly, you have a short time frame to clean up and treat the stain before it becomes permanent.
Luckily, there are several ways that you can go about removing gasoline stains and odors from your clothes and carpets. Below, we’ll cover some of the more popular removal methods.
Before You Begin
Before you start, make sure you test any detergents or cleaning solutions in an inconspicuous area to avoid damaging the fabric. Cleaning chemicals and the dryer’s high heat can interact with the gasoline, so it’s not safe to use a home dry cleaning kit for these stains.
If it’s dry clean only, immediately take the garment to a professional dry cleaner. Do not dry the clothes in a clothes dryer until the stain is entirely gone. This is because if gasoline is still present in the garment, it can ignite your dryer and cause a fire.
Tools and Materials
- Paper towels
- Soaking basin
- Washing machine
- Scrub brush
- Baking soda
- Water
- Stain remover stick, spray, or gel
- Ammonia
- Vinegar
- Orange cleaner
- Dish soap
Instructions
Remove Excess Gasoline
If the gasoline splashes on your clothing and has begun to soak into the fibers, you need to remove it as much as possible immediately. Place a couple of paper towels over the stained area’s top, press down, and then pat dry with another clean paper towel until no more gasoline transfers from the garment.

You can also use baking soda to absorb gasoline from a wet spot on your clothing. Make sure you prevent the flammable towels or cloths used for blotting from starting a fire by setting out the cloth or towel to air dry. Flammable gas fumes will dissipate in the open air.
Once your item is dry, find a sealable metal tin, put the towel or cloth in it, and wet the material until it’s damp. Seal the container and discard it with your trash.
Pre Treat with Stain Remover
Before you treat the stain with a stain remover, test the product on an inconspicuous area of the garment to ensure that it does not cause any discoloration or damage to the fabric. Apply a liberal amount of the stain remover to the clothing.
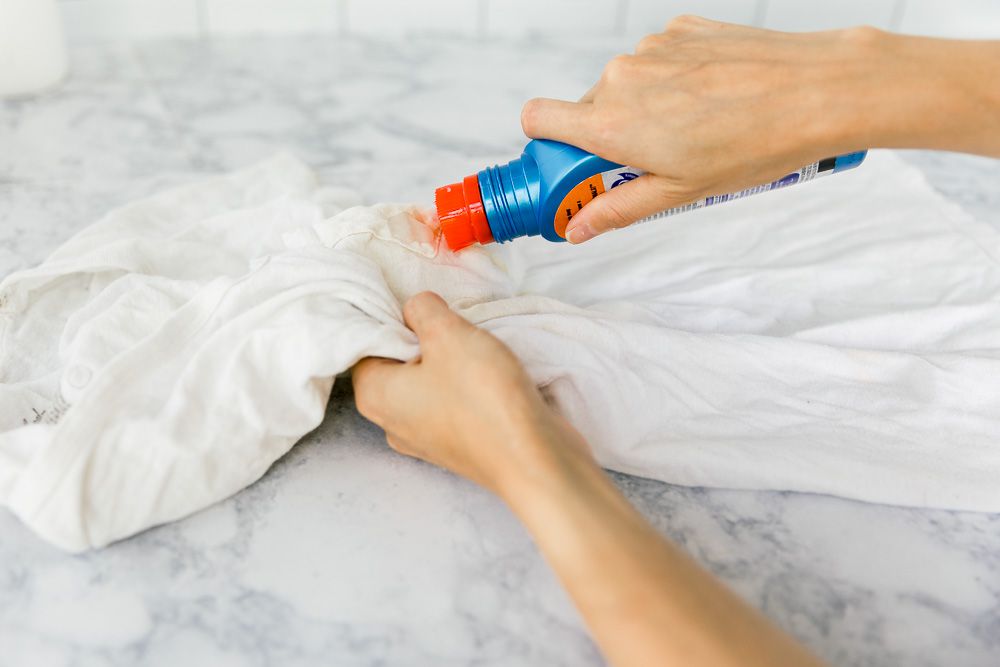
Stain removers can be found at most local grocery stores in either an aerosol can or a liquid form. Wash the clothing at the hottest setting appropriate for the fabric. Hot water is necessary to remove the gas fully from the clothing.
Use Liquid Dish Soap or Heavy-Duty Laundry Detergent
Dish soap has powerful enzymes that can help it break down oil and grease left behind by food, and it can work very well for other stains such as gasoline. You can also use enzyme-based heavy-duty liquid detergent.
Apply two tablespoons of dish soap or liquid detergent with a soft-bristled brush. Allow your clothing to sit for up to five minutes before soaking it in hot water for 30 minutes. Make sure you use the hottest water safe for the fabric type. Remember not to use DIY laundry detergent as it won’t be effective enough.
Treat with Baking Soda Paste
Another great way to remove gasoline stains and odors is to make a baking soda paste. Mix two parts baking soda to one part water in a bowl. Apply it to the stain, then use a scrub brush to rub it into the fabric. Leave your clothing out to air dry to absorb the paste, then brush off the excess baking soda.
If the stain and odor remain, repeat the step or soak the stained clothes overnight submerged in water with one cup of baking soda added. Wash, rinse, and check for odor. Repeat the baking soda paste application or baking soda soak until the odor is gone.
Soak Lingering Odors White Vinegar
If you still have a gasoline smell after trying baking soda, you can try using white vinegar. Pour white vinegar into a spray bottle and spritz the area where the gasoline odor is present. Let the vinegar sit for about 30 minutes, then blot it up with a cloth.
The vinegar smell will dissipate over time. If you want to get rid of the gas smell in your car, soak the gas with old towels or clean rags as quickly as possible. Then use a mixture of equal parts baking soda, white vinegar, and hot water to neutralize the odor.
Rub and wipe it away with a clean rug. If the smell lingers, use a few sprays of Febreze to get rid of the smell.
Soak Heavily Soiled Items in Ammonia Solution
Another way to remove gas stains and odors is by using ammonia. Soak the clothing in the washer full of warm water and one cup of non-sudsing household ammonia. This will smell, so make sure you shut the lid. Let them soak for several hours overnight, then drain and wash as usual.
The ammonia will neutralize the gasoline odor. Never use chlorine bleach or detergent containing chlorine with ammonia. This mixture can make a dangerous chlorine gas that produces toxic fumes.
Remove Gasoline Stain with Coca Cola
Another household remedy for gasoline odor and stains is Coke. Soak the stained clothing in a bucket of Coca-Cola and let sit overnight before washing as usual. This will also remove any grease, oil, or tar stains from items such as motor oil and grease stains on clothes, driveway spills, and grass trimmings stuck to your clothes after cutting the lawn.
You can also add two cans of Coke and one box of baking soda to a sink filled with cold water. The Coke will break down the stain while baking soda absorbs the odor.
Fast Orange Laundry Detergent
If you have a severe gasoline odor, Fast Orange is a laundry detergent that can help. This detergent is formulated to remove stains and odors on clothes caused by gasoline, oil, and other mechanical fluids. Add one cup to your washing machine and let it run through the entire cycle.
You can also use this detergent for hand washing by pouring a little of it into the water, stirring it up, and letting the fabric soak for about 30 minutes. Then rinse the clothing, and the gasoline stain and odor will be removed.
FAQs on How to Remove Gasoline Stains and Odors
Can you put gasoline-stained clothes in the dryer?
It’s not good to put gasoline stained clothes in the dryer because the heat will set the stain and make it harder to remove. The best way to dry clothing that has been stained with gasoline is to line dry or air dry the clothing outside. This will help to dissolve the fumes and reduce the risk of fire.
Can you use bleach on gasoline stains?
You should never use bleach on gasoline stains because it will make them worse. Gasoline stains are oil-based, and bleach will only set the stain, making it more difficult to remove.
Final Thought on How to Remove Gasoline Stains and Odors
Gasoline can be a tough stain to remove. But if you follow the above tips carefully, removing gasoline stains and odors won’t be a problem. Also, consider pre-heating the clothing with the right products to break down the stain and odor before washing to effectively remove these types of stains.
The post How to Remove Gasoline Stains and Odors appeared first on Kitchen Infinity.
Did you miss our previous article…
https://www.conduithardware.com/?p=896
What is the KonMari Method?
Many people live in cluttered homes which end up complicating their life as well. It’s not that they don’t know how to declutter your room but the process itself is very complicated.
Well, if you could focus on the things in your home that give you joy, then everything else would fall into place. Marie Kondo has developed a method that makes this easy and simple, so you can get rid of clutter fast without having to sort through every item in your house one by one. It’s called the KonMari Method because she says we should only keep items that spark joy.
Here’s everything you need to know about the KonMari method.
What is the Konmari Method?
KonMari, also known as KonMarie or Marie Kondo, is a tidying expert in Japan. She has written several bestselling books on the process she uses to transform individuals and families. Created by Marie Kondo, professional home organizer and author of the bestselling book, The Life-Changing Magic of Tidying Up, the Konmari method emphasizes removing clutter from your home and surrounding yourself with things that spark joy.

In other words, the konmari method is a simple but effective tidying method that ensures you’ll never relapse to clutter again. It uses unique selection criteria by choosing what sparks joy. Through this tidying process, you can reset your life and spend the rest of your life surrounded by the people and things you love most.
After the release of the Netflix TV show Tidying Up with Marie Kondo in 2019, many people globally have been using Marie Kondo’s tips to declutter their homes and stay organized.
How Does the KonMari Method Work?
KonMari has six basic rules that can help you declutter, get organized and create a home filled with items that make you happy. Here’s how the KonMari method rules work:
Commit Yourself to Tidy Up
The KonMari method is not a quick fix for a messy room. Instead, it’s a chance to reset your entire life, but only if you commit to following its principles. The first rule of tidying is setting your intention to seriously tidy up and resolving to put in the time and effort required.
When approaching your tidying festival with a clear vision and a can-do attitude, you’ll find the energy and motivation you need to tidy all your belongings in one go. The effort will be worth it in the end, and you’ll not only experience the joy of living with objects that you love, but you’ll also be on the path of establishing your ideal lifestyle.
Marie Kondo’s theory is the more you can get rid of, the easier it will be to tidy up and remain organized. So, don’t get discouraged if the process takes longer than a day.
Imagine Your Ideal Lifestyle
Before you start, imagine your ideal lifestyle and identify the objects that make it a reality. If this is your first time tidying up, you might not be able to picture what your perfect life looks like. But it’s never too late to change and improve after all.
Marie Kondo’s tidying process isn’t about decluttering your house or making it look neat on the spur of the moment for visitors. It’s all about tidying up in a way that will spark joy in your life and change it forever.
Consider what kind of a house you want to live in and how you want to live in it. Make sure you describe your ideal lifestyle. You can draw and sketch out what it looks like if you like. You can also describe in a notebook or cut out photos from magazines.
When you imagine your ideal lifestyle, you’re clarifying why you want to tidy and envision your best life. The tidying process represents a turning point, so make sure you consider the ideal lifestyle you inspire.
Finish Discarding First
Once you know what your ideal lifestyle is, you’ll be able to decide which items have value in your home and fill a purpose for that lifestyle. Considering each item and sorting them to keep and discard piles allows you to create more space for the organization and storage solutions that come later in the Konmari method.
Discarding items is not the point of the Konmari method, but it’s important because it provides the opportunity to determine the items that will help you live your life as you envision it as well as those items that no longer fit into your lifestyle. After you’ve discarded, you can turn your full energy and attention to what sparks joy.
Sort by Category, Not Location
The Konmari method advises sorting by category rather than the room. This allows you to work on one type of item at a time and ensures that each category is treated with equal importance. In other words, you’ll have a hard time getting motivated to finish if all of your clothes are in one room and the books are in another.
If you’re cleaning your home room by room, you’re most likely rearranging items and tossing out only a few things since it doesn’t feel like a ton of clutter for that room. Tidy by categories such as clothes, books, papers, miscellaneous items and sentimental items.
This way, you’ll be on the right track to success. If you find yourself doing this, try to give each category its own dedicated space and do your best not to keep related items together. The Konmari method prefers that you spread out categories throughout your entire home.
Follow the Right Order of Tidy
This is probably the most important aspect of Konmari. You want to tidy up in the correct order to meet your tidying needs by starting with what’s most necessary first.
The right order for this method includes clothes, books, papers (all documents and manuals), miscellaneous items like small electronics and accessories, and mementoes.
Ask Yourself if it Sparks Joy
Deciding if something sparks joy is the criteria for keeping and discarding items when decluttering. In the Konmari method, your feelings are the standard for decision making, especially knowing what sparks joy. To determine this when tidying, you need to pick up each object at a time and ask yourself quietly if it does spark joy.
Pay attention to how your body responds. Joy is personal, so that everyone will experience it differently. By selecting only those things that inspire joy, you can precisely identify what you love and what you need.
How to Use The Konmari Method at Home
Clothes
The first category you need to tackle for a tidy house is clothing. While you might be used to cleaning out clothes in your closet and then your drawers, the Konmari method suggests gathering clothes and accessories from all over your home, including your bedroom closets, coat closets, drawers and under the bed and put them all in one pile.
This will allow you how much you have and help you realize how much you don’t wear. If an item sparks joy, keep it and if not, give it to gratitude and donate your clothing. You can then learn how to iron the clothes remaining ones correctly and arrange them the right way.
Books
After clothes, the next category on the Konmari method checklist books, gather every book in your home and put them in a pile to decide which ones spark joy and which ones don’t. If your ideal lifestyle means that your space is filled with books, keep them.

Papers
Every paper in your home, including documents, letters, bills and receipts, should be sorted using the Konmari method. Keep only what you need or use daily, plus one copy of everything else.
Miscellaneous Items
Any other items that don’t fit into the above categories should be put in a pile to determine what sparks joy and what doesn’t. Sort through everything carefully. Create groups like electronics, beauty supplies, home decor, canned goods and writing utensils.

It might be tempting to go room by room for an extensive category; make sure you gather items from all over your home and put them in one pile. That way, you’ll be able to store similar items together to easily find them and not have anything to spread out.
Sentimental Items
Sentimental items hold deep meaning and can be tough to part with. If you’ve ever seen the episode of ‘Hoarders’ where the woman won’t get rid of her deceased mother’s old suitcase, this method isn’t for you.
Keep only those sentimental objects that truly bring you joy and store them in a designated area. That way, you’ll have them but won’t be reminded of them at every turn.
How to Store Items that Spark Joy
After deciding what to keep in your home, good storage solutions will help you keep everything organized. Here are some of the best Konmari organization and storage tips:
Try Konmari Folding
The Konmari folding method is perfect for organizing your clothes. Marie Kondo didn’t only create her method of decluttering and organizing, but she has also shared a unique folding technique for clothes and linens. The Konmari method of folding helps keep drawers, baskets and bins neat and tidy.
Use Boxes in Drawers
Don’t toss them out if you have gift boxes, shoe boxes, and jewelry boxes. These are great DIY home storage solutions for keeping small things like jewelry, beauty supplies, phone chargers and other miscellaneous things organized in drawers and cabinets.
Store Papers in File Organizers
The paper file organizer is perfect for storing mails, bills and other papers. It protects your documents from getting lost in the clutter of the drawer.
Invest in Wicker Baskets
Wicker baskets are great for keeping your cupboard free from clutter. Use them to store foodstuffs, dry fruits, snacks and other kitchen essentials.
FAQs on What is the KonMari Method
Is the Konmari method effective?
The Konmari method is a highly efficient and effective organizing strategy that has helped many people declutter their homes. The beauty of this method is that it doesn’t follow any specific order in tidying up – you can start from anywhere and go on to the next activity.
What are the benefits of the Konmari method?
The Konmari method advises people to get rid of useless, unnecessary belongings. If applied correctly, this will help you find more relaxation and peace in your life. It also teaches you not to keep hold of things that do not bring joy into your life.
Final Thought on What is the Konmari Method
Do you have items that spark joy that you can’t fit in your home? Well, get organized with these temporary storage solutions with extra space storage to keep items that fit your ideal lifestyle, even if you don’t have room for them now.
The post What is the KonMari Method? appeared first on Kitchen Infinity.
Vinyl House Siding: Pros and Cons
Vinyl siding is a great material for anyone looking to improve the look of their home. This type of siding can be very durable and resistant to damage, making it a good choice if you have kids or pets who tend to destroy your property.
However, vinyl siding has some disadvantages that you should consider before installing this product in your home. For example, vinyl is not as energy efficient as other siding materials such as wood siding or fiber cement panels. Also, vinyl siding tends to fade over time due to exposure to sunlight and other weather conditions than fiber cement siding and wood siding.
In this article, we’re going to look at some of the pros and cons of vinyl house siding to help you make an informed choice. Read on.
What is Vinyl House Siding?
Vinyl siding is a durable form of plastic commonly used in residential and commercial buildings. Vinyl siding comes in a variety of styles, colors, and textures, even imitating the look of wood siding and other siding materials to suit your needs. You should know which one to choose when building your own house so you don’t end up with what you don’t like.

Vinyl siding is also very easy to install, which is why it has become one of the most popular types of exterior siding in the United States.
Pros of Vinyl Siding
Easy Installation
Vinyl siding is made to be easy to install, which means that you can get the job done in less than half a day. That’s why most homeowners choose to install it themselves. However, it’s always recommended to seek professional help and advice before tackling this project.
The installation process requires the help of a contractor for their expertise. Proper installation means less likelihood that the siding will expand or crack over time, leading to bigger and more expensive maintenance issues. Construction warranties may also be voided by faulty or improper installation, so make sure you do your research and seek professional help if needed.
Material Durability
The material used in vinyl siding is also very durable, meaning it will last for many years. Vinyl doesn’t warp, rot, crack, or peel with time, so you don’t have to worry about costly replacements down the road as a homeowner.
When installed properly, vinyl also won’t shrink, expand or contract over time. This is beneficial to the homeowner who wants a trouble-free product that requires minimal upkeep and maintenance. In case a rock flies from your lawnmower and pierces the siding, you can replace the plank fairly easily and cheaply.
Most manufacturers also boast a lifespan for the vinyl siding of up to 30 years. A properly installed and well-maintained vinyl siding does a good job of protecting a building’s exterior surfaces while keeping its interior well insulated.
Relatively Inexpensive Compared to Other Siding Materials
Like stone or brick, vinyl is an investment. For around $1 per square foot installed (the average cost for new home construction), you get long-lasting siding that will protect your home in many climates. It’s also relatively inexpensive compared to other popular materials such as wood clapboard siding, wood pulp, fiber cement siding, and aluminum.
Though the prices will vary depending on the manufacturer and the installation process, you can expect vinyl siding to cost between $3.50 and $7 per square foot. Fiber cement siding is double that price. So, if you want the most bang for your buck, you can never go wrong with vinyl flooring.
No Painting Required
One of the biggest benefits of vinyl siding is that it does not require painting. This is because the material, made from polyvinyl chloride (PVC), has a color built into it that makes it resistant to sun damage and ultraviolet rays. With no need for paint or maintenance, you will save yourself time and money.
Vinyl siding colors cannot be mechanically abraded, scratched off, or stripped. So, if you wish to restore or change the color of your vinyl siding via residential exterior painting, this siding material is highly receptive to paint. With vinyl siding, you can easily outfit your home or business with any color scheme of your choice as long as you know how to choose paint colors.
Vinyl Siding is Low Maintenance
Although vinyl house siding does not require paint, it will wear down over time and need to be replaced. The occasional cobwebs, bugs, mud, and other debris can easily be sprayed down using a garden hose. Never use a power washer on your vinyl siding, as this could cause serious havoc if the water enters your home through cracks around the siding or exacerbate minor tears in the crevices.
Cons of Vinyl Siding
Despite all its benefits, vinyl siding has its setbacks. Here are the cons of vinyl siding:
Moisture Problems
Vinyl houses siding does not absorb moisture; rather, it creates a waterproof barrier between your home and the outside elements. Vinyl siding is installed over a styrene insulation board which can cause water vapor to become trapped in the wall cavity without an escape route.

Thus, if water seeps into small cracks and holes in the vinyl, this can cause major damage to the wood foundation or create conditions that attract mold, mildew, rot, and termite infestation.
Vinyl Siding is Less Eco-Friendly
Vinyl siding is plastic and is made of polyvinyl chloride, which isn’t eco-friendly. The manufacturing process produces greenhouse gasses such as nitrogen oxide and carcinogens, including dioxin. Another by-product of vinyl siding manufacture is sulfur dioxide which causes acid rain and smog.
This process also requires a vast amount of electricity. These gasses and chemicals can contribute to climate change and pollute the air. That’s why most recycling plants do not accept PVC products because they’re both challenging and expensive to recycle.
Vinyl Siding May Lower Your Home’s Value
Although it is cost-effective, vinyl siding still requires a large initial investment. If you’re looking to sell your home soon, this may be a deterrent for potential buyers who might not want the inconvenience of dealing with maintenance and replacement costs on their own.
Vinyl siding may decrease your home’s value since many homebuyers tend to view it as inferior to real wood, masonry, or other materials. It could potentially result in lower offers if and when you decide to move to your home later.
Maintenance Issues
Even though vinyl siding can withstand harsh conditions such as strong winds and heavy rainfall, it can have some maintenance issues. Vinyl siding is sensitive to extreme heat and cold. If you live in an area with harsh winters or summers, your vinyl siding may warp because of the temperature changes.
Besides irregular coloring, warping can also affect how tightly your panels lock together, leading to water damage if it’s not fixed immediately. Siding planks often split or break due to the expansion and contraction caused by temperature changes. If a lawnmower sends a rock flying at your house, it may pierce the siding. Vinyl siding cannot be patched, so the entire plank must be replaced.
Installation is Simple But Not Full Proof
Although vinyl siding is easy to install, it can be expensive to have a professional do the job for you. Vinyl will not bend around corners, so if your house has rounded corners, you’ll need someone with experience installing vinyl siding to do this part of the job. And if your siding is nailed too tightly, it will expand, crack, bulge or warp.
Construction warranties often last only one year, and the product warranty may be voided by faulty installation. Not every contractor has invested in proper training and certification, which is loosely regulated and expensive. Whether you’re investing in a brand new vinyl siding or seeking a siding replacement, you must do your homework well while hiring contractors for this project.
Color Fading
Many vinyl siding brands have been tested to resist color fading when exposed to UV light from the sun. Inferior materials may fade in just a few months, causing homeowners lots of headaches and expenses. In fact, some contractors refuse to use certain products because they don’t hold up well over time.
While there are many vinyl siding manufacturers, not all of them are equal in quality. Indeed, some vinyl house siding brands require homeowners to use specific cleaners and paints. Using the wrong products can destroy your beautiful new siding over time.
FAQS on Vinyl House Siding
What happens if water gets behind vinyl siding?
Rainwater leaking from your gutter ends up behind the siding and causes a wall to rot. However, vinyl is a rare siding product that remains completely unaffected by the water behind it.
What do you put under vinyl siding?
You can install vinyl siding over common wood sheathings such as plywood, oriented strand board, or other materials.
Final Thought on Vinyl House Siding
Whether the pros of vinyl siding outweigh the cons or vice versa, there are many reasons to select vinyl as your siding material or consider other options. But whatever the case, make sure you hire a siding specialist that can install, repair, and replace your property’s siding.
The post Vinyl House Siding: Pros and Cons appeared first on Kitchen Infinity.
Gains in Single-Family Housing Expected to Increase in 2022

WASHINGTON, DC — Breaking an eight-year trend, there have been more single-family homes under construction in recent months than multifamily units, according to the National Association of Home Builders, which predicted additional gains in single-family construction in 2022.
Despite some cooling earlier this year, the continued strength of single-family construction in 2021 means that there are now 28% more single-family homes under construction than a year ago, said Robert Dietz, chief economist for the Washington, DC-based NAHB.
“These gains mean single-family completions will increase in 2022, bringing more inventory to market despite a 19% year-over-year rise in construction material costs and longer construction times,” Dietz said.
Ongoing single-family and multifamily housing production accelerated in November, due to strong demand, with overall housing starts increasing 11.8% to a seasonally adjusted annual rate of 1.68 million units, according to U.S. government figures.
Despite inflation concerns and ongoing production bottlenecks, builder confidence in the market for newly built single-family homes also edged higher for the fourth consecutive month on strong consumer demand and limited existing inventory, the NAHB added.
“While demand remains strong, finding workers, predicting pricing and dealing with material delays remains a challenge,” said Dietz. “Building has increased but the industry faces constraints, namely cost/availability of materials, labor and lots. And while 2021 single-family starts are expected to end the year 24% higher than the pre-COVID 2019 level, we expect that higher interest rates in 2022 will put a damper on housing affordability.”
The post Gains in Single-Family Housing Expected to Increase in 2022 appeared first on Kitchen & Bath Design News.
Did you miss our previous article…
https://www.conduithardware.com/?p=853
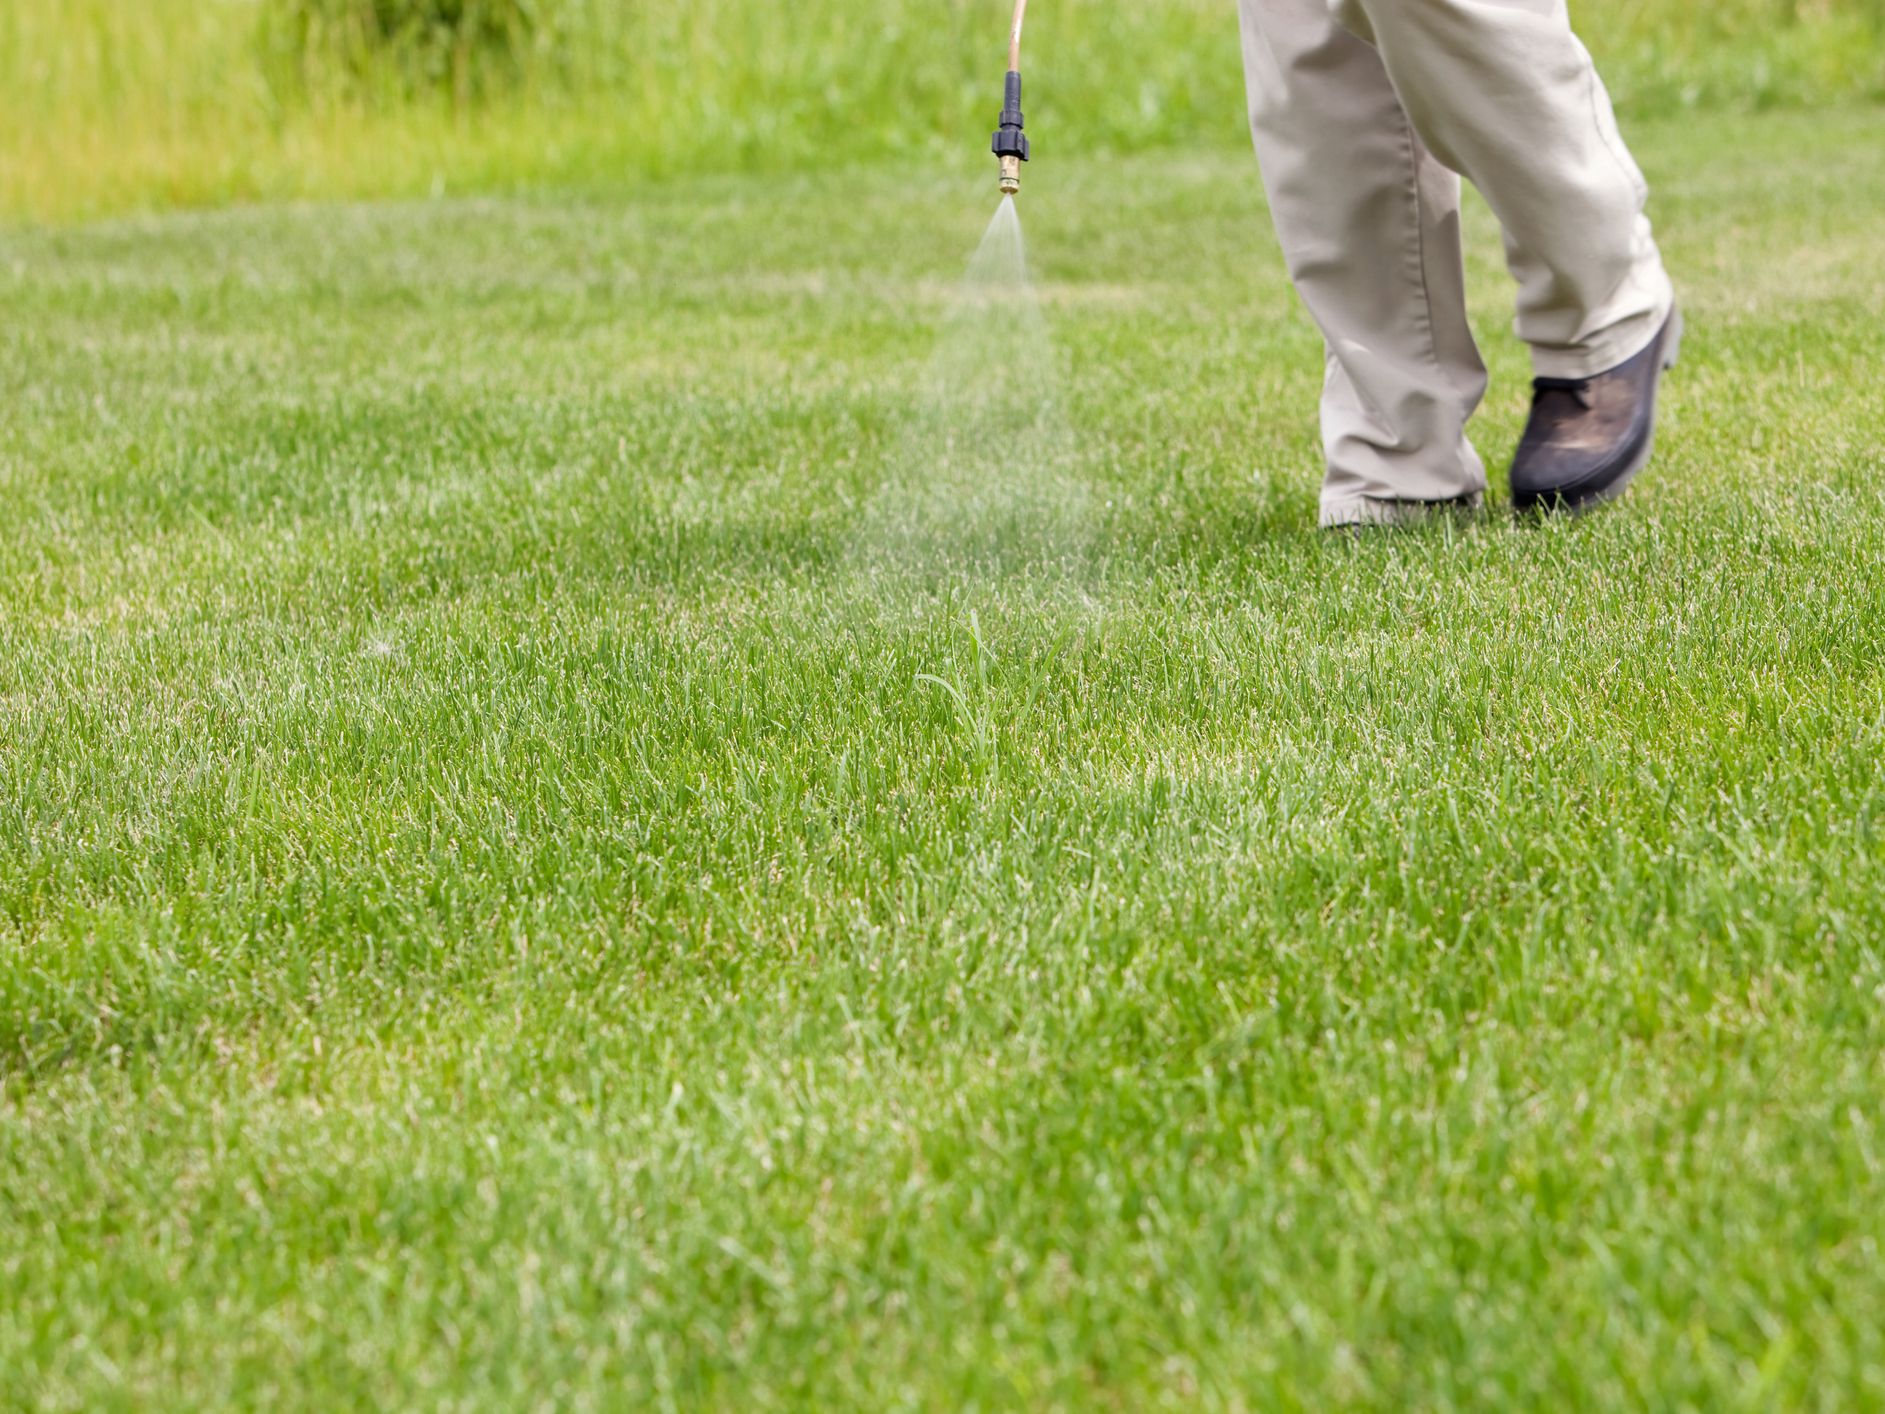
How to Kill Crabgrass
Crabgrass is an invasive weed that can ruin your lawn. If you do not fight back, it will become a serious problem for you and may even lower your home’s value.
The first step in fighting crabgrass is knowing about its behavior and lifestyle. By understanding how this weed behaves, you will have an easier time finding ways to kill it and defend your turf from this invasive plant.
Many products out there claim they can help you get rid of crabgrass once and for all, but only a few works as advertised. In fact, some may cause more harm than good if used incorrectly because they contain harmful chemicals or toxins that can damage the grass when applied incorrectly or too often.
To make sure you choose the right product for killing crabgrass, check out our guide on how to kill crabgrass below.
How to Kill Crabgrass Naturally
If crabgrass is a problem in your yard, you have more than one way of getting rid of this weed. The most natural way is to cultivate a healthy lawn and outcompete the pesky weed. Other natural ways include pulling the weed in the spring, providing your lawn with the proper nutrients, and reseeding where necessary.

For tenacious crabgrass infestation, you can learn how to kill crabgrass with post emergent herbicides that kill grass well after germination. Post emergent herbicides work by killing the crabgrass plant.
On the other hand, pre eminent herbicides kill crabgrass before the seeds emerge. This makes it easier to get the job done and allowing you time in the season to cultivate a lawn where there once were weeds.
When to Kill Crabgrass
It’s important to familiarize yourself with the plant’s life cycle to effectively eradicate crabgrass. When spring soil temperatures reach 55 to 60 degrees Fahrenheit, crabgrass seeds germinate. From mid summer through fall, the plant produces more seeds to increase its numbers. Once the first frost arrives, the plants themselves are killed, not the seeds.
When using an organic method, wait until the seedlings are big enough to hand pull the roots and all. While crabgrass doesn’t spread via roots, removing the whole plant in early spring before amending the soil and reseeding is essential.
Pre-emergent herbicide, also known as crabgrass preventer, comes in either a granular or liquid form and kills crabgrass seedlings right as they germinate.
How to Kill Crabgrass Step by Step
Tools and Materials
- Post emergent herbicide
- Pre emergent herbicide
- Non selective herbicide
- Work gloves
- Organic compost
- Pitchfork or weeding tool
- Grass seed
- Pump sprayer
- Garden rake
- Spade
- Safety glasses
Pull Out the Crabgrass by Hand or Using a Tool
Before you start, you should gear up. Wear eye protection, gloves and old clothing that you don’t mind getting dirty. Also, the soil will be wet, so make sure your shoes aren’t worn out. Before hand pulling the young crabgrass, water the problem area with a sprinkler or garden hose and wait about 30 minutes for the water to soak in.
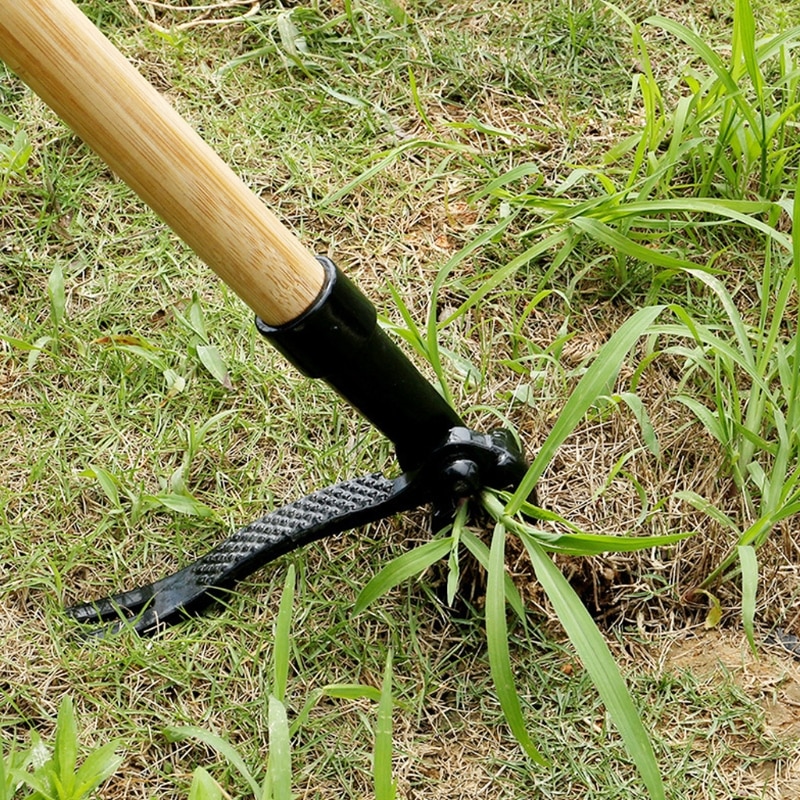
This method is very important because even if you use herbicide to kill crabgrass weed, you’ll still have to dig it out to completely get rid of it. Try this method before using chemicals because chemicals have detrimental effects on the surrounding lawn grasses. Removing crabgrass naturally by digging up is a great way of eliminating the weeds without killing lawn grass.
Apply a Crabgrass Killer Herbicide
Different types of crabgrass killer herbicides are available, but you need to make sure the one you choose is for your type of lawn. For instance, a homeowner with a St. Augustine grass lawn should not use a product designed for a Bermuda grass lawn because it will kill St. Augustine and the weed.
For buffalo grass, centipede grass, fine fescue, Kentucky bluegrass and perennial ryegrass, use herbicide with mesotrione as an active ingredient. It’s also important to read and follow the herbicide label instructions carefully. Improper use of these products can not only kill crabgrass but also other plants in your lawn.
Use a quality broadleaf weed killer to kill the crabgrass plants that remain after the seeding process. It will take several weeks to work, but it should eventually kill off any remaining crabgrass plants. Raking up all dead grass will make it easier for homeowners to keep the area free of crabgrass seeds.
Add Compost
Use a fertilizer with crabgrass fertilizer added to it to save time. Apply the fertilizer just before it rains to work the fertilizer and the herbicide into the soil. This will help thicken the turf. Thicker turf helps to squeeze out crabgrass plants missed by the herbicide. You can also learn how to make compost to use instead of artificial fertilizer.
Apply Grass Seed
If you have large bare patches in your lawn, reseed these areas with a good quality grass seed mix. A mix that contains perennial ryegrass, Kentucky bluegrass and tall fescue is a good choice. These grasses are all cool-season grasses that will germinate and grow quickly, helping to fill in the bare spots.
Apply Corn Gluten Meal
Corn gluten meal is a by-product of the corn milling process. It is a natural, organic herbicide that helps to suppress crabgrass growth. Apply it in the spring, before crabgrass germinates, at the rate of 10 pounds per 1,000 square feet.
Water the area well after application. Corn gluten also works as a lawn fertilizer due to its high nitrogen content. It works by inhibiting crabgrass seeds from forming roots after germination. Corn gluten meal can be put down as pre-emergent to prevent crabgrass and other weeds that germinate in the spring.
However, corn gluten doesn’t prevent the germination of crabgrass. Instead, it only controls it by feeding lawn grass with sufficient nitrogen, making lawn grass grow faster, choking out crabgrass.
Fight Crabgrass with Healthy Lawns
Fight those pesky crabgrass infestations by first building a healthy lawn. Black Medic, tall fescue and hybrid Bermuda grass varieties are all known for their ability to handle stress and drought and do not encourage the spread of crabgrass. A thick lawn provides a dark canopy of grass blades over the seeds to sprout.
Thoroughly water your lawn once a week to encourage the grass’s root system to go deeper, making the whole lawn hardier and heat tolerant. Avoid short, frequent watering as the sips will promote a shallow, weaker root system in your lawn. Also, don’t mow wet grass if you want to encourage healthy growth.
Apply a Double Dose of Herbicide to Crabgrass Hotspots
Limit crabgrass growth in areas like driveways, sidewalks and curbs or on south-facing banks by doing a targeted double treatment when necessary. This is because these areas absorb a lot of heat during the summer months, making them more susceptible to crabgrass.
Once you’ve treated your entire lawn, go back and make another pass about six to eight feet wide, along with hotspot areas. This will help keep crabgrass from taking hold.
Burn Weeds Off With a Blow Torch
When you’ve got an area where there is no grass at all, or you want to kill the weeds and not take out the entire lawn, try this trick. The target weeds absorb so much heat that they will pop when hit with flame. Some varieties of quack grass, for example, will burst into flames with just a couple of seconds of direct exposure to the torch flame.
However, be careful when using this method, as you can also damage nearby plants if you’re not careful. Make sure that you keep the flame moving and don’t hold it in one spot for too long. Also, avoid burning the lawn if it’s still wet from dew or rain.
This method is effective for killing weeds growing underneath the base of a tree, as the flame will effectively kill everything within about 3 to 4 inches of where it meets the ground.
Mow the New Grass
Crabgrass has a tough triangular stem to slice with a weed eating blade. However, if you take your mower and raise the blades as high as they will go, you can effectively cut the grass at its base. While this may not kill it immediately, it will prevent it from growing back for a period of time while the new grass takes hold.
If you have a lot of crabgrass, it’s best to start with the highest blade height and then work your way down as the new grass grows in. This will allow the lawn grass to protect its turf, depriving crabgrass seeds of the light they need to germinate.
Use Vinegar to Kill Crabgrass Organically
Vinegar is a natural herbicide that can be used to kill crabgrass. It’s important to use white distilled vinegar, as other types of vinegar may not be effective. To use vinegar to kill crabgrass, mix one part vinegar with three parts water in a spray bottle.
Spray the mixture on the crabgrass and weeds, and then wait for the weeds to die. Be sure to avoid spraying vinegar on any plants you want to keep, as it will kill them.
Use Baking Soda to Kill Crabgrass Naturally
Baking soda can be used to kill crabgrass. When making the mixture, it’s very important that no additional ingredients are included. To use baking soda for killing crabgrass, mix one tablespoon of baking soda with one cup of water.
Add baking soda slowly, so the solution doesn’t bubble over when mixed. Pour this mixture on the crabgrass that you want to kill.
FAQs on How to Kill Crabgrass
What kills crabgrass and not the lawn?
Post emergent herbicides such as all in one weed killer or image herbicide kill crabgrass plus other lawn weeds and leave the lawn healthy.
Is there an organic way to kill crabgrass?
Yes, you can use baking soda as an organic way to kill crabgrass. Baking soda is a natural herbicide and will not harm the green lawn or surrounding areas.
What causes crabgrass?
Crabgrass is a summer annual weed that thrives in hot summer weather conditions and does best in soil with a neutral to acidic pH level, typically between 6 and 7.5. It becomes dormant during the winter months and will remain until springtime when the soil warms up.
Crabgrass is typically seed produced; however, it can also reproduce via its roots or stolons in the same season in which it germinated.
Final Thought on How to Kill Crabgrass
As you can see, crabgrass is an unsightly weed that can wreak havoc on your lawn. It is important to get rid of crabgrass at the first sign of its germination to keep it from spreading. The most effective way to get rid of crabgrass is through preventative measures, such as applying pre-emergent herbicides in early springtime when the soil is still cool.
If you cannot get to your lawn early in the season, you should apply a post-emergent herbicide to kill the crabgrass. These methods, when used together, will give you good results in keeping these weeds under control so they won’t wreak havoc on your lawn.
The post How to Kill Crabgrass appeared first on Kitchen Infinity.
Did you miss our previous article…
https://www.conduithardware.com/?p=830
How to Design a Nursery
Are you looking for ways to design a nursery for your newborn baby? Well, there are so many beautiful baby items out there you can use to create a lovely place for your little one. You want to create a beautiful nursery for your newborn baby, but you don’t know where to start.
We’ve created this guide with all the tips and tricks you need in order to design a lovely place for your little one. Let’s get started!
Plant a Seed
Naomi Alon Coe who is an interior designer of Little Con Interiors, specializing in nursery and child design, says that many clients come to her with a single item that inspires the overall design. It can be a wallpaper pattern or just a crib or another piece of furniture they fall in love with.
Decorate the Walls with Decals
Your baby’s nursery is one of the most important rooms you will design. It contains everything your child needs for napping, feeding, and playing. Take some time to think carefully about how you want it to look.
Wall decals are inexpensive, easy to install yourself, and can be removed without causing damage if you change your mind about the decoration you want. You can find a wide range of shapes and colors in the local shops near you or online.
Add Relevant Furniture to Your Baby Nursery
When it comes time to start furnishing your nursery, you’ll likely spend lots of time looking at different cribs, dressers, and changing tables. It can be difficult to know what to buy when your child is still very small, and their needs may change rapidly. One piece of furniture that will come in handy is a rocking chair.

Not only does it provide a comfortable place for you to rock your baby to sleep, but it can also be used as a feeding chair. If you’re looking for a dresser to match your nursery decor, make sure you select one that has storage for diapers and other baby items. Every nursery also needs a glider to get the baby back to sleep and for late-night feedings.
Doing so will allow you to keep everything neatly organized in one place. Storkcraft Portofino 4 in 1 convertible crib or changing table will convert from a crib to a toddler bed then a full-sized bed. It also features plenty of shelving and drawer space. The changing table also detaches to act as a nightstand when your baby is past the diaper stage.
Maximize Your Small Space
According to interior designers and decorators, if your baby’s nursery is small, you’ll want to consider the feature wall color. You can easily and inexpensively paint the room a light color to make it look bigger.

Also, add a mirror to open up the appearance of the room. In addition, consider buying a baby a rounded crib as opposed to a traditional one. The round crib isn’t always cheap, but it’s a gorgeous family heirloom that you can pass down from generation to generation.
Round cribs can go into different areas of the room more than rectangular ones. You can also put a round crib center of the room if needed.
Consider Upholstered Nailhead Double Chaise
If you have a little more space, consider adding an accent chair to the room. The chair can be used as a place for your child to sit or nap, or it can simply serve as decoration. You could even put this beautiful West Elm upholstered chaise in the room.
From there, furnish the rest of the room with a mix of storage and display pieces. Look for pieces that will grow with your child. A changing table that can later be used as a desk or a low dresser that can function as a bookshelf are great options.
Don’t Go Overboard with a Theme
It can be tempting to settle on a theme for the nursery right away, but it’s best to wait until your baby’s arrival. Some babies are born with dark hair and olive complexions, while others are born blonde and fair-skinned. Babies also come out looking like either their mom or dad, meaning that they might already look like they fit into a certain theme.
If you’re not sure what theme to choose, it’s best to go with a gender-neutral design that can grow with your child. For example, interior designer Cathie Hong of Cathie Hong interiors cautions against overdoing the modern trend of having a nursery theme.
Even if your nursery has a specific theme, try to keep the color palette soft and minimal to create a calm and non-stimulating environment for both the mom and the baby.
Design a Room the Will Grow with Your Baby
While you might want to create a beautiful room for your baby’s arrival, it’s important to keep in mind that the room will have to grow with your baby.
An interior designer called Bean recommends choosing elements in draperies, wall coverings, and lighting so that with a few changes in furnishings, art, and accessories, the room can still work for tweens and teens.
Consider the Lighting
When lighting your nursery, use dimmer switches because they create a calming atmosphere. You’ll also want to have plenty of task lighting so that you can see what you’re doing when you’re caring for your baby at night.
Also, consider a ceiling fan or overhead light combo because they’re an excellent accessory in a nursery to keep it cool, comfortable, and ventilated. After some diaper changes, you’ll be thankful for having a well-ventilated room.
Test your bulbs for overheating and ensure you’re using the appropriate bulb wattage for your lamp, especially table lamps. Avoid floor lamps; even if they look nice next to a reading chair or a dim corner, they’re not the best choice ever for a nursery.
Make a Nursing Nest
A nursing nest is a great addition to your nursery if you’re planning to breastfeed. It’s a comfortable place for you and your baby to relax together and can be helpful in getting your newborn to latch on correctly. You can make your own nursing nest out of a soft blanket or buy one that’s already made. You can also keep a small end table with drawers or shelving for cubbies next to your cozy nursing chair for your stuff.
You can stock a few things, including baby food, nursing pads, burp cloths, extra blankets for spit-up incidents, and wipes. You can also store a water bottle, maybe a good book or magazine, and a feeding log if you’re early in the game.
Changing Area
You’re going to want a changing area in your nursery. This can be as simple as a changing pad on top of your vintage dresser, a changing tray, or an actual changing table. If you have the space, go for the changing table – it’ll make diaper changes easier. You’ll want to have plenty of stores nearby for diapers, wipes, ointments, powder, and other essentials.
Keep a good stock of diapers in the nursery to make late-night changes easier on you and your baby. If you have a big enough budget, it might be worth getting a pack n’ play bassinet to keep in the room for speedy diaper changes during the first few months.
Install Black Out Shades or Drapes
Your baby will likely sleep best in a dark room. Install blackout shades or drapes to ensure the room is as dark as possible when your little one is trying to get some shut-eye. This will not only help your baby sleep better but will also keep the room cooler in the summertime. It’s great for comfort but, most importantly, for safety.
Get Organized
No one likes a messy room. Learn how to declutter your room to clear off surfaces. Make sure to put away any loose or potentially dangerous items before your baby arrives. If you store everything in the closet, you’ll have easy access to all clothes for middle-of-the-night changes. You can use cubbies, baskets and toy boxes to throw stuff in and locate it easily later on.
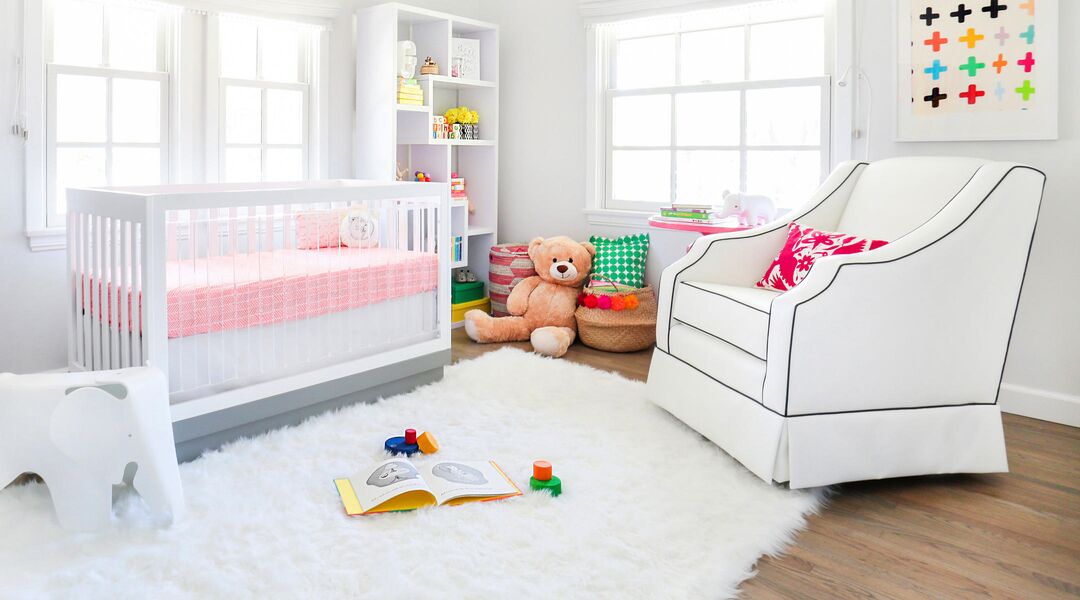
At least one wall should be reserved for changing diapers, dressing, bathing, and so on. You’ll want to have easy access to a sink, toilet, and storage for diapers, wipes, and other necessities. When choosing nursery furniture, it’s important to think about both form and function.
You’ll need a place for your little one to sleep, play, and store all of their necessities. Few of us can afford to buy a changing table, so you’ll want to look for items that can double as both a play area and diaper station. A dresser with ample storage space and a mirror provides room for clothes, toys, diapers, and other baby essentials.
Keep Colors in Nursery Simple and Practical
When it comes to color, it’s best to keep things simple in the nursery. Bright colors can be stimulating and overstimulating for a newborn baby. Stick to neutrals like grays, greens, and blues, or go with soft pastels. Knowing your child’s gender ahead of time is also essential as it can help you determine the color palette.
For example, if your kid is a baby girl, you can paint walls in lavender and white, with a carpet in the same colors. For your son’s nursery, consider other neutral colors that are colors of boys. Make sure you redesign and tweak the room to reflect your child’s personal tastes.
These colors will be soothing for your little one and won’t clash with their eventual room décor. If you’re looking for more helpful tips on nursery design, check out the Pinterest board.
FAQs on How to Design a Nursery
What are the most important factors to consider when designing a nursery?
The most important factors to consider when designing a nursery include the qualification of the staff, getting ready for school, and health and safety.
When should you prepare a nursery?
It’s best to put together a nursery before your baby is on the way so you won’t feel rushed when the time comes.
What color should I paint my baby’s room?
While it’s tempting to go bold, painting your little one’s bedroom in bright colors could restrict their vision and sense of security. Stick to neutrals like yellow, blue, and white.
What should I put on the walls?
Artwork can be a great decoration for your little angel’s room. It helps them express their personality while teaching them about shapes, patterns, and color recognition. Don’t forget to include pictures of your family members too.
Final Thought on How to Design a Nursery
As you can see, answering how to design a nursery is not as difficult as it seems. Just keep in mind your child’s needs and wants, and make sure to have a lot of fun with the process.
The post How to Design a Nursery appeared first on Kitchen Infinity.
Did you miss our previous article…
https://www.conduithardware.com/?p=826
Leads Robust, But Margins Being Squeezed, KBDN Survey Finds

CHICAGO — Sales leads and project requests are robust, and revenue forecasts are bullish, but profit margins are reportedly being squeezed, COVID-19 remains a concern, and kitchen/bath dealers and designers continue to face supply-chain snafus, product price hikes, a skilled-labor shortage, and other headwinds to more robust growth in the months ahead.
That’s the primary consensus of a series of surveys conducted by Kitchen & Bath Design News and other industry sources attempting to get a handle on 2022 business prospects, following a year in which the kitchen/bath market witnessed sharp growth in both its remodeling and new-construction sectors, while COVID-19 continued to reshape the nation’s housing landscape, incomes and saving accounts rose, design trends and homeowner demographics evolved, and larger, more-multi-functional homes continued to remain a focus of consumer spending
But the pace of market growth, while projected to be palpable, has tapered off in recent months, and is expected to cool even more in the months ahead, as inflation scythes through the economy, product and labor availability continue to hamstring design/remodeling firms, housing affordability remains at historically low levels, and uncertainties tied to the coronavirus continue to loom.
KBDN’s nationwide survey of dealers and designers, conducted at the tail end of 2021, found that an overwhelming majority (86+%) of those polled said they expect their company’s revenue to either increase or remain roughly the same in 2022 compared to 2021. In contrast, less than 14% said they anticipate a revenue decline in 2022. Revenue gains are anticipated for both new and remodeled kitchens and baths, although dealers and designers are more bullish about revenue growth from kitchens (34.2%) than they are from baths (7.9%).
Dealers and designers also report that sales leads and project requests are up dramatically compared to the same time a year ago – understandable given how the current confluence of COVID-related demand, savings growth, home appreciation, government stimulus and other factors continue to spur homeowner spending. Specifically, a whopping 65+% of survey participants report their current sales leads are either somewhat or much higher now compared to a year ago, while only about 15% report that sales leads are lower and about 19% say they are about the same.
But while sales leads and strong, and revenue is generally expected to increase, surveyed dealers and designers paint a different picture when it comes to anticipated profit margins. For example, while 33.6% of those surveyed expect 2022 profit margins to increase, 14.2% expect margins to decline compared to 2021, and more than half (52.2%) expect margins to remain the same.
Other survey findings:
n With the COVID-driven emphasis on health and wellness, work-at-home arrangements and families sheltering in place, increases in client requests are being reported for products that range from universal design, smart appliances and aging-in-place elements to outdoor kitchens, anti-microbial materials and home ventilation.
n Pricing is apparently not a major factor for clients, many of whom seem willing to spend whatever it takes to get the kitchens and bathrooms that they want. For instance, while roughly 60% of the dealers and designers surveyed by KBDN say that pricing is either less important to clients or about the same as it was a year ago, far less (40%) say that pricing is more critical to clients now.
n While 51% of the design professionals surveyed say they are either extremely, very concerned or somewhat concerned about COVID-19 negatively impacting their business operations and profits in 2022, more than half (54%) say they are “not very” or “not at all” concerned, even in light of the new Omicron variant impacting the nation.
n While less than 5% of survey respondents report clients postponing or cancelling projects, nearly 44% report they are experiencing longer lead times for product deliveries and/or production and shipping delays.
The post Leads Robust, But Margins Being Squeezed, KBDN Survey Finds appeared first on Kitchen & Bath Design News.
Did you miss our previous article…
https://www.conduithardware.com/?p=797