2022 KBIS, IBS Health & Safety Guidelines Updated

HACKETTSTOWN, NJ — A revised set of health and safety protocols, including COVID-19 vaccination requirements and/or proof of a negative coronavirus test result, have been issued for the 2022 Design & Construction Week (DCW), the annual three-day event that encompasses the Kitchen & Bath Industry Show (KBIS) and the International Builders’ Show (IBS).
The National Kitchen & Bath Association, which owns KBIS, and the National Association of Home Builders, owner of IBS, last month released the revised protocols for DCW, scheduled for Feb. 8-10 at the Orange County Convention Center in Orlando, FL. The guidelines apply to attendee and exhibitor registrants for both KBIS and IBS, and are subject to revision, event sponsors noted.
“The safety and wellbeing of our attendees, partners, exhibitors, site workers and staff remains our top priority, said DCW organizers, adding that they are “working with our vendors, partners and the Orange County Convention Center to … deliver a safe and productive environment in which to conduct business.”
“As we get closer to returning to an in-person event, we continue to update our health and safety policies based upon current recommendations from the Centers for Disease Control and Prevention, the state of Florida and local Orlando health authorities, event organizers added. “We will continue to monitor their recommendations and will update relevant information as needed.”
Guidance related to large gatherings relative to COVID-19 and associated variants continues to change, DCW organizers said. “What will remain constant,” show officials said, “is the commitment of the NAHB International Builders’ Show (IBS) and NKBA’s Kitchen & Bath Industry Show (KBIS) and to the health and safety of attendees, exhibitors, partners and staff at our shows.”
Details regarding the health and safety policies for Design and Construction Week can be found at: http://www.designandconstructionweek.com/healthsafety.html.
The post 2022 KBIS, IBS Health & Safety Guidelines Updated appeared first on Kitchen & Bath Design News.
Did you miss our previous article…
https://www.conduithardware.com/?p=165
U.S. Action Urged on Supply Chain Bottlenecks, Tariffs

WASHINGTON, DC — A pair of prominent industry-related trade associations have issued pleas for Congress and the Biden administration to help ease global supply chain bottlenecks that are stunting housing affordability and hindering the availability of key products used in new construction and residential remodeling.
The National Association of Home Builders (NAHB) and the Association of Home Appliance Manufacturers (AHAM) last month each issued separate calls for government policymakers to eliminate current trade barriers and seek solutions to port congestion and major delays in truck and rail transportation.
Testifying before the House Small Business Subcommittee on Oversight, Investigations, and Regulations, NAHB Chairman Chuck Fowke told government lawmakers that disruptions in the building materials supply chain exacerbated by the COVID-19 pandemic are having “a disproportionate” impact on smaller homebuilding firms.
“Without large economies of scale, small businesses generally cannot negotiate bulk discounts on lumber and other key building materials,” said Fowke. “The effects of this uncertainty trickle all the way to the (prospective) homebuyer, many of whom have balked at projects due to unexpected price increases.”
According to the Washington, DC-based NAHB, historically high lumber and building materials prices continue to serve as “headwinds” for the U.S. housing sector, significantly impeding housing affordability.
“From steel mill products and plastic piping to cooper pipe and wood windows and doors, prices are up dramatically year-to-date and are exacerbating the growing housing affordability crisis,” Fowke said. “Until a long-term solution can be reached, Congress and the administration should temporarily suspend duties on a wide array of imported building materials and goods, from Canadian softwood lumber to Chinese steel and aluminum.”
In addition, “policymakers must continue to aggressively explore solutions to ease building material supply chain disruptions that are causing project delays and putting upward pressure on home prices,” Fowke added.
Days before Fowke’s plea, AHAM joined several other trade associations in telling Congress that ongoing supply chain challenges “are hurting the competitiveness of U.S. manufacturers, stalling the economic recovery (and resulting in) unprecedented damage to the global product supply chain.”
“The ability to produce and deliver home appliances to consumers has been dramatically hindered by the COVID-19 pandemic and other supply-related issues, creating hardships for consumers and businesses at every step in the supply chain,” said Joseph McGuire, AHAM president and CEO. “The result is ongoing shortages of products, materials, components and labor, leading to delays and increased costs.”
The post U.S. Action Urged on Supply Chain Bottlenecks, Tariffs appeared first on Kitchen & Bath Design News.
NAHB Urges White House Action on Lumber Prices

WASHINGTON, DC — With builders continuing to grapple with lumber price swings and supply chain disruptions, the National Association of Home Builders has once again appealed to the White House to redouble its efforts to address lumber price volatility and address supply chain bottlenecks for lumber and other building materials.
The Washington, DC-based NAHB this week sent a letter to President Biden, requesting that government officials address three key issues that, if unaddressed, “will severely hamper the ability to provide affordable housing and provide jobs to strengthen the economy,” said the association, which has already conducted several meetings on the subject with top administration officials.
“While lumber prices have fallen precipitously since peaking in mid-May, prices have been moving upward over the past month,” said the 140,000-member NAHB, urging the Biden administration “to make it an important priority to address lumber and building material supply chain issues that are contributing to price volatility and harming housing affordability.”
The NAHB urged U.S. officials address the current congestion at the ports and to “return to the negotiating table with Canada and develop a new softwood lumber agreement that will end tariffs on lumber shipments into the U.S.”
The post NAHB Urges White House Action on Lumber Prices appeared first on Kitchen & Bath Design News.
Did you miss our previous article…
https://www.conduithardware.com/?p=159
NKBA Cites ‘Thirty Under Thirty’ Class of 2022

HACKETTSTOWN, NJ — The National Kitchen & Bath Association has unveiled its Thirty Under 30 Class of 2022.
The program, currently in its tenth year, recognizes talented kitchen and bath professionals under the age of 30. Nominees were evaluated on their career or educational achievements, commitment to excellence in the kitchen and bath industry and leadership within their organizations, according to the NKBA.
The 2022 Class includes: Jessica Bolles, Oasis Showroom/APR Supply, York, PA; Michael Boone, Green Forest Cabinetry, Chesapeake, VA; Andrew Converse, Moen, Cleveland, OH; Alex Dickson, PK Brand Management, Kelowna, BC, Canada; Darla Duncan, Prime Cabinetry, Kennesaw, GA; Hannah Guilford, Heart & Hammer Homes, Fryeburg, ME; Cara Hansen, Triple Dot Design Studio, Vancouver, BC, Canada; Jesse Jarrett, Jarrett Design LLC, Emmaus, PA; Becky Leu, Leu Interiors, Des Moines, IA; Andrea Liston-Jones, Liston Design Build, St. Charles, MO; James McDonald, McDonald Contracting, Arlington, MA; Madelaine Millholland, CASE Design/Remodeling, Bethesda, MD; Basia M’Pinda, Kohler/Williams & Associates, Winnipeg, MB, Canada; Antoinette Nunez, CKBD, F&J Builders, Wilmington, DE; Hannah Pregont, Superior Marketing, Brooklyn, NY; Megan Reed, AKBD, CLIPP, Beyond the Box Inc., Billings, MT. and Kelsey Richter, BDA & Associates, Fishers, IN.
Other Class of 2022 members include: Caitlin Ryan, Fisher & Paykel | DCS Experience Center, New York, NY; Grace Sheehan, CLIPP, Kitchen Doctors, Midlothian, VA; Justyna Skolasinski, AKBD, Crystal Lumber, Crystal Falls, MI.; Amanda Slattery, Artistic Cabinetry, Jackson Lake, NE; Benjamin Stoler, Delta Faucet Co., Indianapolis, IN; AJ Tentler, Delta Faucet Co., Indianapolis, IN; Summerlyn Travis, Strohmaier Construction, Spokane, WA; Hannah Triebel, Sunnyfields Cabinetry, Baltimore, MD; Austin Waldhauser, Kenwood Kitchens, Columbia, MD; Emily-Anne Walker, Ferguson Enterprises, Williamsburg, VA; Patience Whipple, Chariot Plumbing Supply Design, Sandy, UT; Pip Wu, D.I.D, Ferguson/Wolseley, Burnaby, BC, Canada and Shantelle Yablonski, Superior Cabinets, Saskatoon, SK, Canada.
The incoming class will be formally inducted during KBIS 2022 in Orlando, FL, according to the NKBA.
The post NKBA Cites ‘Thirty Under Thirty’ Class of 2022 appeared first on Kitchen & Bath Design News.
‘Strong Growth’ Foreseen for Remodeling Through 2022

CAMBRIDGE, MA — “Strong growth” in home improvement and maintenance expenditures is expected to continue over the coming year, according to the Leading Indicator of Remodeling Activity (LIRA), released last month by the Remodeling Futures Program at the Joint Center for Housing Studies of Harvard University.
The LIRA projects year-over-year gains in annual improvement and repair spending will reach 9% in the fourth quarter of this year and maintain that pace into 2022. Annual improvement and repair expenditures by homeowners could reach $400 billion by the third quarter of 2022, according to the Joint Center, which warned that “several headwinds” – including the rising costs of labor and building materials, as well as increasing interest rates – “could still taper expected growth.”
“Residential remodeling continues to benefit from a strong housing market with elevated home construction and sales activity and immense house price appreciation in markets across the country,” said Carlos Martín, project director of the Remodeling Futures Program at the Cambridge, MA-based Joint Center. “The rapid expansion of owners’ equity is likely to fuel demand for more and larger remodeling projects into next year.”
In related remodeling market news:
n The U.S. building products market will continue building on its “exponential growth” of the past two years, gaining an additional 2.9% from 2023 through 2025, with the professional sector increasing by 4.6%, according to a newly released forecast by the Home Improvement Research Institute (HIRI). The Indianapolis-based HIRI predicted that the total U.S. building products market will increase by 13% in 2021 over the previous year, with the professional sector growing by 18.2%. The total building products market is forecast to grow an additional 2.3% in 2022, with the professional sector growing by 7.1%, HIRI added.
n Businesses in the residential construction and remodeling sectors anticipate “strong activity” through the balance of 2021, although many companies report steady increases in backlogs since the beginning of the COVID-19 pandemic, along with wait times of nearly three months before new projects can begin, according to the Q4 2021 Houzz Renovation Barometer, a quarterly gauge that tracks market expectations, project backlogs and recent activity among U.S businesses in the construction and architectural/design services sectors. Results of the survey were released last month by Houzz Inc., the Palo Alto, CA-based online platform for home remodeling and design.
“Confidence prevails across the industry through year-end,” said Marine Sargsyan, Houzz senior economist. “We’ve seen some settling of home renovation and design activity following record high performance earlier in the year, yet many businesses are struggling to catch up with heightened demand as they navigate supply chain challenges and labor availability, leading to record-long backlogs.”
n Demand for remodeling remains strong, and remodelers “are doing quite well as long as they can adequately deal with material and labor shortages,” according to the latest Remodeling Market Index (RMI) compiled by the National Association of Home Builders. The NAHB last month released its NAHB/Royal Building Products Remodeling Market Index (RMI) for the third quarter of 2020, posting a reading of 87, up five points from the third quarter of 2020. The finding “is a signal of residential remodelers’ confidence in their markets, for projects of all sizes,” the NAHB said.
“We are seeing strong demand and continued optimism in the residential remodeling market, despite the fact that supply constraints are severe and widespread,” said NAHB Chief Economist Robert Dietz.
The post ‘Strong Growth’ Foreseen for Remodeling Through 2022 appeared first on Kitchen & Bath Design News.
13 Best Microfiber Cloths
Most microfiber cloths are eco-friendly and come in several sizes to help them pick up small dust and bacteria particles. Larger clothes are suitable for heavier, messier cleanups, while smaller and fine fibers are suitable for computer screens and glass tables.
But not all microfiber cloths can get the work done the way you want it done. So, what are the best microfiber cloths? This article outlines some of the best microfiber cloths based on their quality, affordability, and durability. Let’s get started!
1. AIDEA Cleaning Cloths
AIDEA Cleaning Cloths are highly durable and have been processed to be extra soft so that you can get a safe and reliable clean for your laptop, cell phone, or other electronic devices. The specially crafted fiber is 100% polyester blended with a mixture of micro-polyester and polyamide, allowing the cloth to pick up dust particles much more efficiently than ordinary fabrics. You can use AIDEA cleaning cloths on your laptop, cell phone, and clean electronics without fear of scratching their surfaces.

AIDEA Cleaning Cloth’s durability has been tested in a laboratory to ensure that they will hold up against repeated washing.
The AIDEA cleaning cloths have also been UV-treated which means they can be used in direct sunlight and will not damage the screen of your electronic device. They contain antibacterial properties, allowing you to clean surfaces throughout your house without worrying about building up bacteria or mold.
2. Polyte Microfiber Cleaning Towel
Don’t let go of this microfiber cloth when you lay your hands on it. It comes with quick-drying cloths of natural bamboo fiber and a special quality microfiber. It ensures that your device will be clean and free from bacteria. You can wash it in a washing machine and can be reused up to 300 times, making it very cost-effective in the long term. It’s suitable for both household and automotive use.
3. E-Cloth Microfiber Home Cleaning
This type of microfiber cloth is designed for deep cleaning. The brand boasts of eliminating 99% of surface bacteria, mold, and pollen. It does this by locking contaminants inside the dense fibers until they are washed thoroughly in the machine. This cloth is made in Korea and comes in nine different purposes: dusting, polishing, drying, wet polishing, and much more.
It covers a wide range of home cleaning needs such as kitchen cloth with scrubbing pocket, a range, and a stovetop cloth. It also covers two glass polishing cloths, a bathroom cloth, a window cloth, a dusting cloth, and a stainless steel cloth. Each of these cloths comes with a different pattern and color to shine any room and appliance in your home.
4. MagicFiber Microfiber Cleaning Cloths Review
The microfiber cleaning cloths are great; they take out all the dust and dirt even from the hardest-to-reach places. It is a must-have for everyone who likes an extremely clean home. This set of IXL Korean extra-thick 9-piece Microfiber Cleaning Cloth Set is as useful as it is beautiful as it is durable.
You can use it either wet or dry, for any job in the home you may have. This set includes one multipurpose cloth, two glass polishing cloths, a stovetop cloth, a bathroom cloth, a window cloth, and a dusting cloth in addition to the stainless steel cloth.
You can also use it as an eyeglass cleaner. MagicFiber cloths are good for most delicate surfaces, especially computers and smartphones. Each pack of MagicFiber comes with a protective bag, making it stay clean and ready for use. You should thoroughly clean microfiber cloths and follow the care instructions carefully. These finely woven cloths should be washed gently without harsh chemicals.
5. Kirkland Signature Ultra High Pile Premium Microfiber Towels
These microfiber towels are great for cleaning cars and trucks because of their high fiber density and affordable price. With their thick and plush weave, they can absorb liquids such as oils quickly and completely. You can also use them with or without water for a gentle, deep clean. It’s also the best microfiber cloth for glass.
The company claims that its fibers can get rid of up to 99% of surface bacteria. You can reuse them even a hundred times, and their care is quite easy- you just machine wash in cold water and tumble dry on low. It’s also designed for automotive use and the set of 36 will also protect other delicate surfaces such as car panels and interiors.
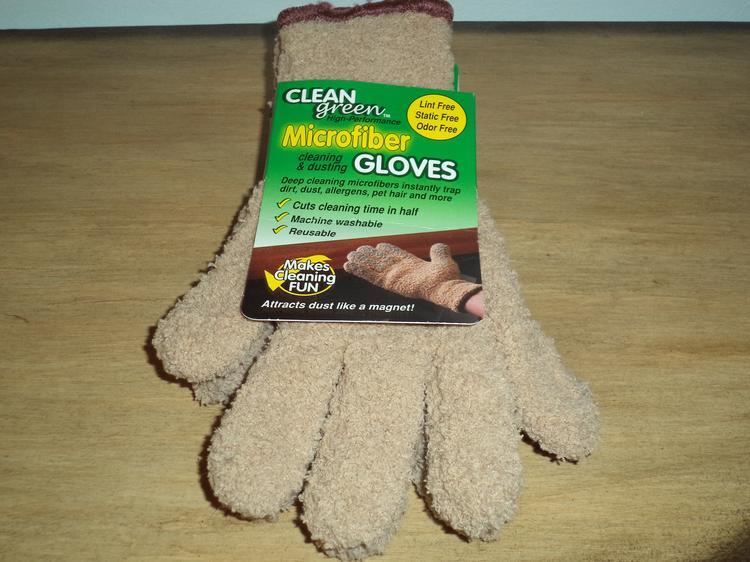
6. CleanGreen Microfiber Cleaning and Dusting Gloves
Do your cleaning with microfiber by using a pair of gloves made of this super soft material. They are perfect for dusting TV and computer screens, blinds, photo frames, and other small surfaces. These microfiber cloths are reusable up to 500 times, so you can forget about buying paper towels, window cleaner, or any other cleaning product.
7. AmazonBasics Microfiber Cleaning Cloth
These microfiber cleaning cloths are Amazon’s best-selling cleaning cloths. They contain 90% polyester and 10% polyamide, making them super absorbent. They are great for a gentle clean and are also affordable and eco-friendly solutions for your cleaning.
They have also accumulated more than 9300 positive reviews on Amazon. So, what are you waiting for? Get yourself this cleaning microfiber cloth and save a little cash plus the environment.
8. Meguiar’s Water Magnet Microfiber Drying Towel
These microfiber towels are super absorbent, well made, and great for drying your car. It has a special weave to soak up water quickly and easily. They are also quite affordable compared to other microfiber cloths in the market because they offer you 16 different sizes to choose from, making them ideal for any use.
They are super absorbent, meaning that you can use them too quickly to clean off a car without any soap and water and without leaving back any streaks. It’s capable of absorbing up to twice as many traditional terry cloth towels. Apart from detailing cars, you can also use these microfiber towels to clean other areas in your home.
9. Microfiber Wholesale Microfiber Glass Cleaning Cloths
These are some of the best microfiber cloths in the market today. They are made from high-quality materials, making them soft and durable at the same time. They are great when it comes to cleaning glass and polishing.
The eight-piece set comes with a total of four 16-inch microfiber cloths and four 12-inch microfiber cloths. You can use them to clean windows, mirrors, lights, and many other surfaces in the house. They are also great for removing stains and marks from wallpaper without leaving any scratches behind.
They are made from a blend of polyester and nylon. They have a very high absorption rate, making them great for cleaning surfaces without leaving streaks behind. The towels also have a plush microfiber pile that traps dust and other particles to make the cloth more effective when polishing surfaces. These microfibers cloths are also reusable and can be machine washed.
Microfiber Wholesale Glass Cleaning Cloths come in four different colors: blue, yellow, red, and green. This is because different colors work best for specific purposes. For example, the blue microfiber towel is excellent for polishing chrome surfaces such as your car’s headlights or trim pieces since it has a very high luster. The green cloth is best to help you clean windows and mirrors since it produces a high level of transparency, allowing the glass to sparkle when dry.
10. SimpleHouseware Microfiber Cleaning Cloth
This is another small microfiber cloth. With their small and mighty towels, they can hold up eight times their weight but still dry quickly. They’re smaller than human hair. These microfiber cleaning cloths are made up of 85 percent polyester and 15 percent nylon for a soft, non-abrasive material that can clean your surfaces at home.
These highly adaptable cloths come in packs of 5, 10, 15, 20, and even 150. But it’s up to you to decide on what number seems good to you. It’s always difficult to know how many microfiber cloths you’ll need in a pack, but for a long-term supply, this microfiber cloth will give you more than enough.
The set includes 50 packs, each measuring 12 by 16. Other than sheer quantity, this microfiber cloth is good for larger cleanups around your home electronic cloth that might fail to clean. The set comes in four assorted colors, including green, yellow, orange, and blue.
11. Mr. Siga Microfiber Cleaning Cloth
This is also the best choice if you’re looking for something colorful. The cloth measures 12 x 16 inches which are just enough to fit into your hand and cover larger spaces. It’s made with 80% polyamide and 20% polyester material, which are safe, especially around electronic devices.
This microfiber cleaner can be used for dusting and cleaning. This is the best choice if you need a cloth that can remove tough stains because it has greater absorption capabilities.
If you’re looking for an affordable cleaning cloth that can work on shower tiles, car windows, and anything in between, then a multi-use towel is the right choice. It can absorb five times more liquid than traditional towels, and it dries faster than a regular towel. This microfiber towel is made from 100% microfiber material, making it safe to use on electronic devices such as smartphones, cameras, and other valuables.
They’re absorbent and are scratch-free microfiber with high-quality stitching and reinforced edges to ensure they will not fray after repeated use.
12. Buff Microfiber Cleaning Cloth
Buff microfiber cleaning towels are made of 50/50 polyester and microfiber blends to help with deep cleaning. This durable material is designed to continue working, even after 500 washes. Each set comes with 12 pieces of clothing, so you don’t need to replace them any time soon. They are also easy to wring out and dry quickly after use. They’re so perfect for heavy-duty cleaning.
13. Unger 18-Inch Microfiber Cloths
The Unger microfiber cloths are perfect for windows, bathrooms, or anywhere that needs a deep cleaning. They are quite big so that you can use them on large surfaces easily. The material of the cloth is very absorbent, making it useful for drying wet floors as well.
They are highly flexible and adaptable to keep your home’s hard surface clean. Whether you’re cleaning your kitchen surfaces, bathroom, floor, glass window, and hardwood floors, this cloth stands out to get the job done.
The cloths themselves are made with a unique weave of tiny, strong microfiber strands that hold effectiveness when used with conventional cleaning fluids. Even without chemical cleaners, it’s eco-friendly and inexpensive to use. Designed for wet and dry use, you can keep this three-pack set around your home for natural, chemical-free cleanups when necessary.
FAQs on Best Microfiber Cloths
Are some microfiber cloths better than others?
Microfiber technology is a relatively new cleaning product, which was not always available for purchase. Today, countless companies sell microfiber products, and competition has driven many of these companies to create innovative and high-quality products.
Microfiber goes through several steps in the process before it becomes a cloth. So, you should look for a company that takes the time to produce high-quality products.
How often should I wash my microfiber cloth?
It is best not to wash your microfiber cloth too frequently, as this causes wear and tear on the fibers.
Final Thought on Best Microfiber Cloths
There you go! There are so many amazing microfiber cloths on the market. So, take your time to choose the right microfiber cloth for your needs. There are so many brands available in the market at an affordable price. Also, make sure you keep them clean to serve you for many years to come. Do not use fabric softeners if you want them to last for long.
The post 13 Best Microfiber Cloths appeared first on Kitchen Infinity.
Did you miss our previous article…
https://www.conduithardware.com/?p=107
How to Treat Bedbugs in Furniture
Bed bugs are the worst nightmare for many people. These tiny creatures can really make life unbearable if they find their way into your furniture. You have to get rid of bedbugs in furniture quickly before they multiply and spread throughout your house.
So, how do you get rid of bed bugs in your furniture? Laundering, bed bug traps, diatomaceous earth, couch encasement, and steamer are some of the ways to remove bedbugs from your furniture.
But for any of these methods to work, you have to follow the right steps. Here is a simple guide on how to get rid of bedbugs in your furniture.
Signs of Bedbugs in Your Furniture
Signs of bedbugs in your furniture are pretty straightforward. They never vary as homes with bedbug infestations always have the same signs.

The first thing you need to do is check underneath your couch cushions. Flip your couch and check underneath. Here are some of the signs of bedbug infestation in your furniture or home if you’re not sure of what to look for:
Bed Bug Eggs and Shells Easily Detectable
Bed Bug shells are not easily detectable because they look just like your regular furniture’s dust. However, it would be very hard to find them in plain sight when you have an infestation. So, the best way is to use a magnifying glass and check for bed bugs by focusing on nooks and corners where they are commonly discovered.
After that, look for easily detectable shells because they are translucent and milky white. For bedbug eggs, you can easily notice them because they’re slightly larger.
Bed Bug Feces and Blood Stains
By using a magnifying glass, you can easily spot feces and bloodstains. These are very tiny, so be careful when inspecting the area. You can determine whether it’s just dirt or something else through further observation by checking for specks of black spots surrounding the area.
If there are many dark spots in the area, it’s likely that the specks are bloodstains or feces. Also, try to check for possible bed bug excrement by looking at the stains closely.
Dead Bed Bug
Another sign of bedbug infestation is that when you apply some treatment, you’ll see many of them dying from your treatment. They’ll be scattered all over your wooden frame. Dead bugs look exactly like the living bedbugs, but the only difference is that they’re not moving. When it comes to size-wise, they’re also the same and color-wise, which is the color of an apple seed.
Living Bed Bugs
The bedbugs that are still alive will be reddish-brown because they will feed on your blood. These bed bugs also tend to scurry away from you or hide in their cracks when you go near them, which would make it difficult for you to get a good look at them. They’ll only go when they’re hungry, but that’s rarely daytime. They’ll only go for a meal when you’re on the couch sleeping.
Ways of Getting Rid of Bed Bugs in Your Furniture
Start with Laundering Your Furniture
The easiest way to kill bed bugs in your furniture is to start by laundering them. Start with washing everything that’s machine washable. Learn how to clean your upholstery while employing hot water while doing so, or at least boiling them for an hour.

Before laundering, put them in a large plastic bag or box, then wash them smoothly and quickly to avoid disturbing bed bugs, which can scatter them all over your house.
Use regular or high heat for at least one hour. After laundering, dry them up in your clothes dryer. Make sure you set up a high temperature to let it dry for half an hour and kill all the bed bugs. While it’s drying, clean and wipe down your frame, and look for holes in the structure.
Then, leave the frame to dry and put back the dried cushions and fabric to your furniture. If you have bulkier cushions, you can dry them at your local Laundromat at a high temperature.
Use Bed Bug Couch Cover
If your couch is a pull-out or a hideaway, you can invest in a bed bug cover. You can find them online and at some furniture stores. These covers are zip-closed and have tiny mesh holes to let air through while keeping the bugs out. They aren’t 100% effective, but they’re better than nothing.
Make sure you treat your frame and cushions before moving to this step and ensure all the bloodsuckers are dead. Then, use a steam cleaner along the edges of your couch. After that, use the vacuum cleaner to vacuum all the sides of your furniture. Now that your furniture is clean and dry, wrap it with a bed bug couch cover and zip it properly.
Use Bed Bug Traps to Catch Bed Bugs
If you don’t have enough time to buy a couch cover, you can always rely on bed bug traps. These are sticky pads that catch the bedbugs whenever they try to climb up your bed or sofa. The bugs get stuck to this pad and are unable to move again. You should put these under the couch and chair legs to make sure you keep your bed bug problem under control.
Use the Right Insecticide Spray
No matter what, using chemical sprays is never recommended. But in times like these, when there is no other option left, you might depend on these insecticides. Before spraying any of these chemicals on your furniture, make sure you are wearing the right clothing.
Wear gloves and the right kind of mask to block your nose from any chemicals that might be harmful to you. Keep the kids away from this place when you are spraying insecticides, especially around the house. Use natural bed bug sprays instead of these chemical treatments.
The only disadvantage with natural spray is that it can only kill these pests when in direct contact and cannot provide continuous protection. You can also use dusting sprays instead of insecticides to dust your furniture legs.
Usage of Vacuum Cleaner
Vacuuming is not only good in eliminating bed bugs, but it also keeps the bed bug numbers down. It does this by picking up a lot of bedbugs and their eggs. So you should vacuum the dust, cobwebs, and other places where these bugs are most likely to hide.
Vacuuming also helps to control bed bugs by eliminating their signs such as their shed skins and fecal matter. Make sure you dispose of your vacuum bag in a tightly sealed plastic bag and throw it outside where none of the bed bugs can infiltrate your home again. This will drive away all the bugs from your home.
Kill the Bed Bugs with Steam
Steam cleaning is a great way to kill the bed bugs, and it also helps get rid of their eggs and nymphs, which can be difficult to remove manually. The steam kills them on contact, so you need not worry about any residual effect. But make sure that the steam does not reach such high levels that it might damage your furniture or belongings.
Use Diatomaceous Earth
If possible, place diatomaceous earth in cracks and crevices and behind bed frames and headboards. Do the same inside electronic devices such as radios and televisions. If your furniture has joints with gaps, go ahead and apply some diatomaceous earth in those joints as well. The dust prevents the bed bugs from reaching maturity and feeding on you.
You can also scatter this powder on the outside of your bed frame. Go for food-grade diatomaceous earth that is safe for you and your kids.
Invest in Non-Upholstered Furniture
Upholstered furniture is the most challenging because of the fabric that it is made of. Instead, get yourself some wooden furniture if you are serious about ridding your home of bedbugs for good. Make sure you treat upholstered furniture by applying pesticides and encasing the furniture in a large plastic bag. Heat treatment can also help you get rid of bed bugs from upholstered furniture.
When using pesticides, be careful and follow all safety guidelines from the manufacturer. Their labels should have detailed information on how to use and protect yourself when using these products. On the other hand, non-upholstered furniture is the best bet because you don’t have to worry about bed bugs hiding in the fabric.
FAQs on Different Ways of Eliminating Bed Bugs in Your Furniture
How long do bed bugs live on furniture?
Bedbugs can live for over a year without feeding on blood. It’s important to remember that not all bedbugs will be seen in your mattress or bedding. Some may stay in cracks and crevices in the walls and behind your furniture.
How long will my bedroom remain bedbug-free after I spray?
It may take up to two weeks before the last of the bedbugs have been wiped out from your home. It’s advisable to carry out a repeat application after two weeks to get rid of everything.
Final Thought on Different Ways of Treating Bed Bugs in Your Furniture
As you can see, bedbugs can infest your furniture anytime, it doesn’t matter whether you’re house is clean or not. Another thing you must know is that getting rid of bed bugs is not as easy how to get rid of ants. But with a few tools and methods mentioned in this article, you can be sure of protecting your furniture from these annoying bugs and have a bed bug-free home.
The post How to Treat Bedbugs in Furniture appeared first on Kitchen Infinity.
Did you miss our previous article…
https://www.conduithardware.com/?p=100
How to Apply Venetian Plaster
Are you looking for a new way to decorate your home? Venetian plaster is an ancient decorative technique that has been around for centuries. The process involves applying multiple layers of plaster onto walls and ceilings, which gives them a unique look.
You can use this type of decoration on any surface in your home or office, including furniture and floors. It goes well with many types of home decor, so there are no limitations in using Venetian plaster in your space. You can also blend lime plaster and marble dust to create this durable compound.
But for you to do all the above, you need to know how to apply Venetian plaster. Wondering how that goes? This article takes you through a comprehensive guide on how to apply Venetian plaster.
The Required Materials
- Eye protection
- Paintbrush
- Roller
- Paint tray
- Work gloves
- Steel trowel
- 400 to 600 grit sandpaper
- Drop cloth
- Venetian plaster
- Roller cover
- Painting primer
- Topcoat or paste wax
- Universal colorants
- Dust mask
Instructions
Sharpen Your Skills
Before you start rolling on the Venetian plaster, it’s good to get an idea of what your skills are. Get a few practice pieces together for this project. Some sheets of drywall, plywood or fiberboard will work well. Spread some newspaper on the floor and cover up any objects you don’t want paint on.
Then, practice your plastering techniques on these pieces of wood. Use a paintbrush to get your Venetian plaster onto the piece, then smooth it out with a trowel or spatula.
Choose a Plaster to Apply
Venetian plaster comes in two varieties, which include synthetic paint and lime-based plasters. The one you choose depends on your budget and your level of expertise. Lime-based plasters are considered true Venetians because, with time, they’ll turn to stones.
Lime-based plasters are more durable and retain their beauty longer, unlike the homemade finish of synthetic plasters. They’re also natural and are considered environmentally friendly rather than synthetics. Lime plaster is naturally resistant to molds and mildews.
On the other hand, synthetic Venetian plaster is inorganic, and its color is limited to the few offered by the manufacturer. It’s not easy to tint it either because it requires a special machine. Make sure you choose authentic Venetian plaster for your project.
Gather Your Tools and Lay Down Tarps
Make sure you protect the floor in your work area by laying down plastic sheets, so the dust from your work doesn’t get all over. You should also have buckets, a trowel, a grout sponge and a paint roller with a long handle at the ready. Do not use painter’s tape to protect molding or other walls that you’re not plastering.
Remember that plaster is not paint, so it can bond to the tape and crack or flake when you remove it, especially if you’re using lime-based plaster.
Prepare Your Room
Clear your room as much as possible and wipe down the entire surface with a clean rag saturated in soap solution. Take a few minutes to learn how to mop your floor before you proceed. Next, drape the tarp over the molding and lower part of the wall.
Of course, you apply Venetian plaster to most walls and ceilings, but the surface must be flat and smooth. If there are any holes and cracks, the plaster will seep through them when you apply Venetian plaster, so fill them in with spackling before applying the coating.
If you’re applying Venetian plaster to an existing wall that has paint on it, remove all of the old paint first, and then repair any holes or cracks with spackling and lightly sand the spackled area with 100-grit sandpaper. Wash off any dirt and grease, then prime the surfaces before applying the Venetian plaster. Avoid using steel trowel and drywall knives as they can leave lines and scratches in your plaster.
If you plan to plaster a bumpy surface, sand the entire surface or scrape it with a putty knife. If you’re using synthetic Venetian plaster, make sure you fill the holes and cracks with plaster as you go.
Apply Primer to Discolorations
If your wall has been painted with flat paint, apply a primer that you can tint to the color of Venetian plaster. Spread the primer across the wall evenly and lightly using a paint roller. Depending on the walls you’re plastering, you may leave it dry before applying a second coat to get a smooth, even coat.
If you’re using lime-based plasters, you can apply the plaster directly to the stucco or masonry. You can also use a special primer called Fondo. Note that natural Venetian won’t adhere well to standard primers. Let it dry for 24 hours before applying the plaster.
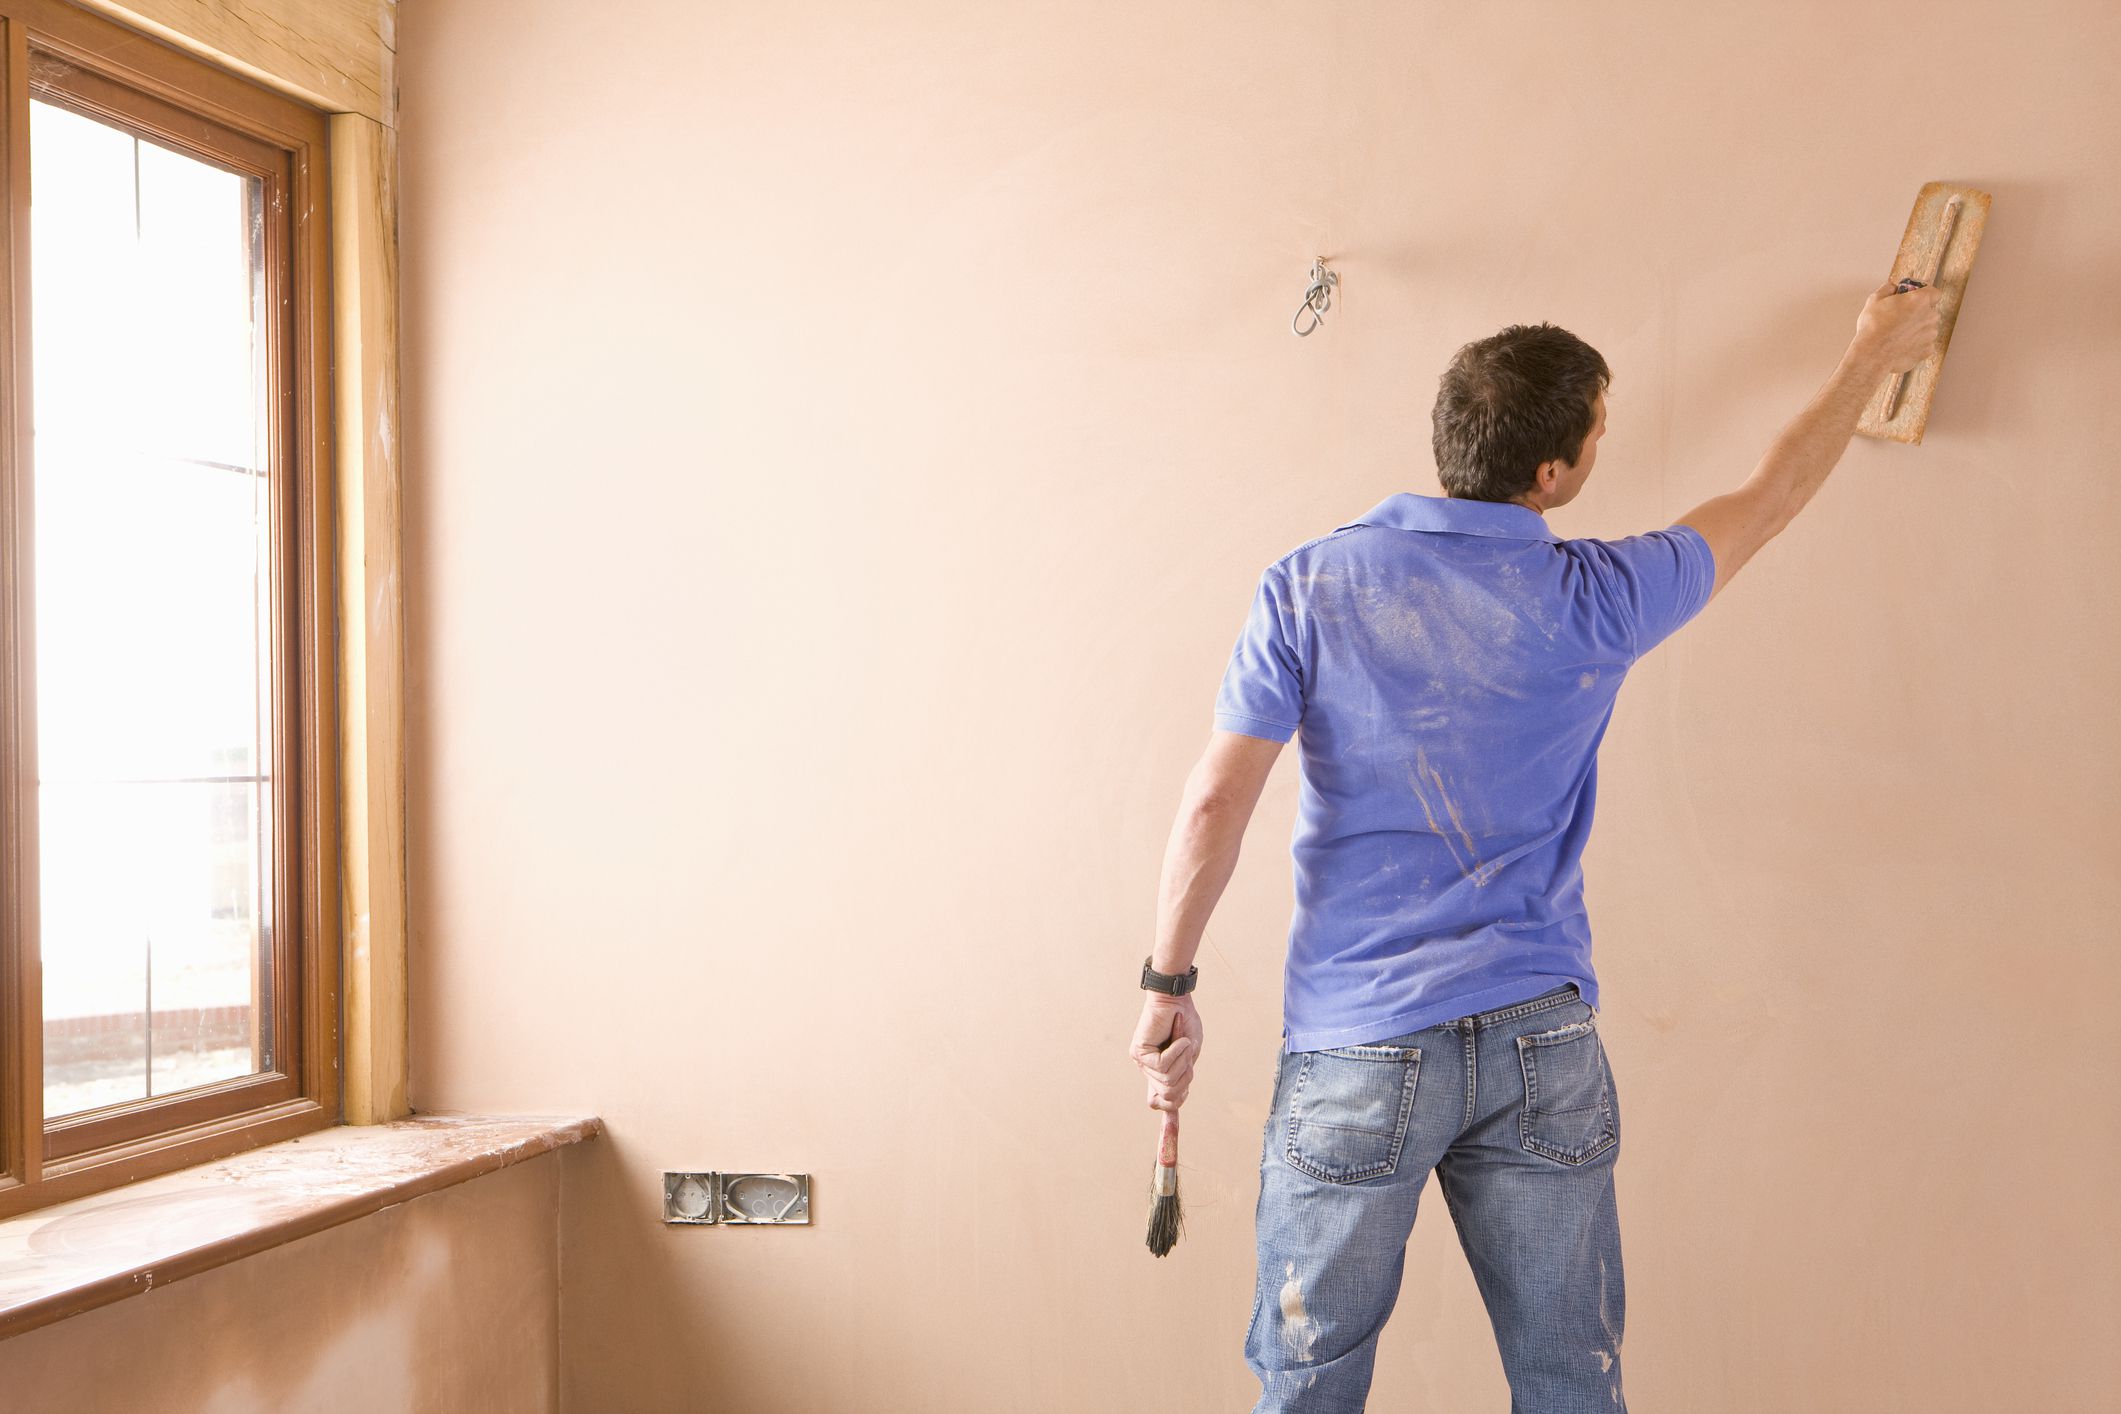
Apply the First Coat
Wear gloves while mixing Venetian plaster to achieve an even color. Load your trowel with the hot-dog compound of the hawk, then apply an eighth of an inch thick coat of joint compound over the surface. Use short, gently curved, x-shaped strokes at different angles.
Starting at the top left corner of your room, use a flexible steel trowel to apply a thin layer of plaster while holding your trowel at a 15 to 30-degree angle of the wall. Gradually work your way out toward the other end, covering approximately 8 feet at a time until you’ve covered all four walls. Try not to apply too much pressure on the trowel, or it may cause ridges in your wall.
Clean off your steel trowel from time to time to remove any hardened plaster that may be clinging to its surface. Leaving these on can cause damage to your wall, later on, so always take the time to remove them before applying more plaster onto the wall.
Apply the Second Coat
If you’re using synthetic plaster, wait for at least four hours for the base coat to rest before applying a second coat. But for lime-based plaster, you can wait for as long as ten days between the coats. Start in the same way you applied the first coat. Hold your trowel or drywall knife at a 60 to 90-degree angle, then apply your plaster in long and short overlapping strokes to get an irregular look to the final finish.
As you work your way across, check your progress to ensure that all the ridges and depressions have been filled. If you see some small areas with deep pits or ridges, use a thin trowel to smooth it out before the mixture becomes too dry.
If you’re not satisfied with the final result after applying a second coat, you can apply the third coat if you wish. If you’re using lime-based plaster, add a tinted topcoat of lime dust, linseed oil, soap, and coloring agent. Let your plaster dry for 24 hours before proceeding to the finish treatment.
Burnish the Surface
After the second coat has dried, you can burnish it with a dry sponge. This gives your surface a nice, polished sheen that’s slightly matte. To burnish synthetic plaster, use 400 to 600 grit paper if you wish. After that, clean the surface with a damp cloth.
You can also make the surface look more polished by rubbing the surface with your fingers. You can also rub the surface with a clean cloth or putty knife for an even more glossy sheen. When you’re finished, wipe down your wall using soap and water to get rid of dust particles.
Proceed to Waxing
Dip your clean trowel in tinted paste wax and spread it in light coats over your plaster. Let each coat dry before applying another one. It’s best to put on several thin coats instead of one thick layer. A good rule of thumb is to let the wax dry for ten minutes after each coat, then buff it with a clean rag or soft cloth until you get a nice shine that resembles a freshly waxed car.
You can also deepen the color variations by brushing pre-tinted glaze over the lighter areas of your surface using a paintbrush. Remember that real marble has a high contrast between light and dark tones. So, choose the darker tone if you’re looking to recreate the look of the marble. Check the pros and cons of marble flooring to learn more.
Apply a Topcoat
This final step is optional. You can apply a topcoat to add durability, color and help seal the surface. For this step, it’s best to use 100% acrylic latex paint instead of wax if you want your finished product to last longer. Applying a topcoat is most recommended in rooms with high humidity, like bathrooms and kitchens. Otherwise, it’s optional though recommended for a nice finishing touch.
You can also preserve the texture of your Venetian plaster finish by covering it with one coat of clear water-based sealant. And if you’re looking for polished marble, go for a sealant with a semi-gloss or satin finish. You can also choose a matte sealant if you want a limestone finish.
FAQs on How to Apply Venetian Plaster
Can you Venetian plaster over drywall?
Yes, you can, but keep in mind that you’ll have to skim coat the whole thing. This means after applying a scratch coat, you’ll have to apply a ‘skim’ coat over it with drywall compound and sand smooth.
Can Venetian plaster be applied over paint?
Yes, as long as the paint is well cured. If it hasn’t been, the moisture in the air will create bubbles, and it won’t look good.
Final Thought on How to Apply Venetian Plaster
As you can see, applying Venetian plaster finish takes a little bit of skill and some extra work, but it’s well worth it in terms of quality. Make sure you keep your sealed Venetian plaster clean by dusting the surface weekly with an electrostatic duster.
The post How to Apply Venetian Plaster appeared first on Kitchen Infinity.
Did you miss our previous article…
https://www.conduithardware.com/?p=95
Guide to Standard Drywall Sizes and Thicknesses
When building your own house or making repairs, you’ll need to decide what type of wall and ceiling surfaces you want. Drywall is widely used for interior walls and ceilings because it’s very economical and easy to install. The flat white and clean appearance makes it ideal for ceiling finishes and residential construction.
But choosing the right sizes and thicknesses for drywall isn’t an easy thing, but you definitely won’t need professional help. This guide shows different types of drywall sheets in various sizes and thicknesses. So, you can easily compare them by size, making it easier for you to choose which ones would work best for your project. Let’s get started!
Drywall Thickness
Drywall comes in 3/8″, 1/2″ and 5/8″ thicknesses or in metric 6, 9.5, or 12.7mm. Standard US drywall is 1/2″ (12.7mm) thick, while the other two are called “non-standard.” Building codes also have some requirements when it comes to standard thickness. The building code dictates the thickness of each application.
1/4 Inch-Thick Drywall
This is not very common, and it’s used as a skimming material for placing over an existing surface. You can also use these thin drywall sheets to install drywall on the slightly curved surface. If the drywall is not meeting the curve, you need to add a layer of mesh tape and compound before applying another thin sheet.

1/2 Inch Drywall
This is the most common type of drywall used in construction, and it can be found in all building and construction material stores and outlets. Thanks to their standard thickness, the regular 1/2″ (12.7mm) sheets are suitable for interior walls.
They’re very easy to carry and hang. It’s the most versatile board and common thickness for the 16-inch on-center interior walls. It provides a great balance between strength and weight.
5/8-Inch drywall
If your ceilings or walls require a prescribed fire-resistant rating, then this is the right drywall thickness for you. It’s a heavier product that can resist sagging in your ceilings and 24-inch wall. It’s also the thickness standard for fire-resistant or fire-code drywall, mostly found in garages. This added thickness also improves soundproofing.
Due to its excellent soundproofing qualities, 5 8 works well in bedrooms and living areas. However, you’ll have to pay more for this type of drywall than 1 2 inches thick and smaller.
3/8-Inch drywall
When you’re looking to fix drywall patches or if your drywall is damaged and worn out, this is a great drywall thickness you need to consider. It’s the best option for home remodeling projects. Note that it doesn’t offer the strength of 1/2-inch panels.
Drywall Sizes
The length and width of drywall sheets usually come in 4x. The most common ones include 4-foot by 8-foot, 4-foot by 12-foot, and 4-foot by 16-foot sheets. The building codes don’t dictate the requirements for drywall sizes. The sizes are determined by the needs of the architect, builder, and client.
4-Foot by 8-Foot drywall
This is the most common size of drywall. It’s commonly used because it’s easy to carry. Working and installing this type of drywall is very easy. However, it’s not the best option for remodeling jobs because its small size is limiting. You can’t use this type of drywall in rooms more than 8-feet wide and 12-feet long.
A drywall board size with these dimensions together with the thickness of 1 2 makes it manageable. It’s the biggest sheet ideal for a DIY project because you can easily carry and lift it into place. It allows for both vertical and horizontal installation.
4-Foot by 12-Foot drywall
For long and tall drywall, you can find drywall in lengths of 12 or 16 feet. So, if you have long and tall walls, go for this size of drywall. If you also want an unbroken line from floor to ceiling and prefer a smooth surface when working with a long and high wall, this is the best solution.
These longer sheets also produce fewer butt joints than 8-foot-long sheets. However, they are heavy to carry by a single person, so if you’re going to install them at your home, make sure you have people around to help you.
2-Foot by 2-Foot drywall
This type of drywall size is best when you have small spaces. When you also need to do some patchwork around your stairs, alcove, and nooks, opt for this drywall size. It’s not the standard size of drywall, but you’ll find it at local hardware stores and home improvement stores.
Alternatives to Drywall Sizes
When your wall panels come in lengths and widths instead of four feet multiples, then those are not drywall panels. They are cement board or drywall alternatives such as DRIcor Smartwall. 4-1/2-foot wide drywall sheets are not very common in the consumer market, but you can get them with special orders. They are rarely available in home improvement centers and are only used by professionals.
Types of Drywall
While standard drywall works well for bedrooms and living areas, there are other types of drywall for special purposes. Here are the types of drywall that you should consider on your next home project. They are excellent in humid areas such as bathrooms, kitchens, and laundry rooms.

Fire-Resistant Drywall
Fire-resistant drywall contains glass fibers and other materials, enabling them to endure flames more than any other type of drywall. You can use it in the laundry room, near furnaces, stairwells, and garage ceilings. It will help reduce flames from spreading in case of fire break out.
In addition, they enable the walls to generate less smoke and are also good for sound control. When renovating your home, the building codes will request you to use a fireboard with fiberglass in areas where you have rooms with wood studs. You’ll also be required to install this type x drywall if you have furnaces, garages, and utility rooms.
Abuse-Resistant Drywall
This is the type of drywall that can withstand any abuse. It has a polystyrene layer that bonds well to the non-decorative gypsum board.
Mold and Moisture-Resistant Drywall
Both mold and moisture-resistant drywall panels are paperless panels with a special coating that blocks moisture and helps prevent mold growth. So, if you’re wondering how to get rid of mold from your home, installing this drywall will be your first solution. This combination is an excellent choice for bathrooms, kitchens, and laundry rooms. As it reduces mold, it extends the appearance and lifespan of surfaces.
Cement Board Drywall
Cement board drywall is durable drywall that’s designed to be installed on plywood or studs. It is available in 1/2-inch and 5/8-inch thicknesses. The cement board is made by sandwiching a cement core between two layers of fiberglass mat. You can use this type of drywall behind ceramic tile and marble for high moisture areas. It’s the hardest material to cut.
It’s also known as a backer board and can also be used under floors and counters. Its moisture-resistant quality makes it ideal for high-moisture areas.
Standard Sheet Drywall
This is the common type of drywall. It is ideal for residential remodeling and basements. It doesn’t have any interesting features and can be used for ceilings and residential interior walls.
Square-Edged Drywall
This type of drywall is most common, and it’s fitted into standard studs 16 inches apart. If you’re looking to plaster your ceiling or wall, here is the drywall solution for you.
Fire Code Drywall
Fire code drywall is thicker than half-inch material. It has a special gypsum core that resists heat and provides fire protection. Despite having a heavier core, it’s still easy to cut.
Tapered-Edge Sheets
This type of drywall sheet is great for finishing walls. The tapered ends allow the compound fillers between gaps.
Foil-Backed Drywall
They don’t offer much moisture resistance like moisture-resistant boards. But, it’s suitable for areas with less moisture but more for colder temperatures.
FAQS on Guide to Standard Drywall Sizes and Thicknesses
What is the best thickness of standard drywall?
Most drywall measures 1/2-inch thickness, which is the most common for interior walls. This is because they are easy to carry and hang, unlike other types of thickness.
What sizes does drywall come with?
The standard size of drywall includes 8, 9, 10, 12, 14, and 16 feet. However, 8, 12, and 16 work well for residential construction, so you’ll find it in most retail hardware stores.
Is it better to hang drywall vertically or horizontally?
Fire codes require seams to fall on the length of the framing, especially on commercial jobs, so ensure you hang your drywall horizontally. If your walls are 9 feet higher or shorter, hanging your drywall horizontally will leave you with more benefits.
Final Thought on the Guide to Standard Drywall Sizes and Thicknesses
As you can see, it’s very important to be careful when choosing drywall because choosing the wrong size and thickness can break your project. You don’t want to spend a lot of money and time on your home improvement project only to end up with losses.
The post Guide to Standard Drywall Sizes and Thicknesses appeared first on Kitchen Infinity.
Did you miss our previous article…
https://www.conduithardware.com/?p=89
How to Clean Silver with Frugal Silver Cleaner
How to Clean Silver with Frugal Silver Cleaner
Cleaning your antique and silver jewelry is very simple and easy. But only if you use the right products. The best way to ensure your pieces’ longevity is to use a frugal recipe for cleaning silver.
Instead of using harsh chemicals that might damage the finish or cause it to darken, this frugal silver cleaner uses common household ingredients like baking soda and vinegar. This method of cleaning sterling silver is simple, cheap, and doesn’t use any heavy chemicals.
But how do you do it? This article will teach you how to clean sterling silver with a simple method that’s easy on your hands, as well as saving you money.
What You’ll Need
- Aluminum foil
- Glass baking pan
- Baking soda
- Soft, clean white rag
- Hot water
- Two tablespoon salt
- Tea kettle or coffee pot for boiling water
Instructions
Line the Baking Pan with the Aluminum Foil in the Washtub
Lay down a layer of aluminum foil in the bottom of a large wash-tub for easy cleanup later. Fill your container with hot water, especially the boiling water from a coffee pot or any other container from which you can pour it safely. After that, place your jewelry on top of the aluminum foil.
Don’t worry if you don’t have aluminum foil, instead, use a clean aluminum lasagna-style baking dish. Make sure you throw away your dish after using it to clean the silver.
Cover Baking Pan with Boiling Water
Pour some boiling water into the baking pan that’s large enough to hold your silverware, until it’s more than halfway full. You will need more water if you’re cleaning heavily tarnished silver. This will help restore the shine to your silver, and it will also help the boiling water dissolve the grime.
Add Salt and Baking Soda
Sprinkle in two tablespoons of salt and two tablespoons of baking soda. After sprinkling baking soda, pour some boiling water to cover the jewelry in the pan and allow it to sit for a few minutes.

Your solution will bubble and smell. The chemical reaction will cause a sulfur smell, but will not be too strong as it will go away quickly once it’s done. You can also achieve a great silver polish by adding washing soda to hot water.
Add the Silver
Place your silver into the water and ensure they are touching the aluminum foil. However, the silver pieces should not touch each other. Add the dishwashing soap and let the silver set for about 12 hours. Use wooden or plastic utensils to turn over your solver pieces.
Do not use metal and avoid using your fingers in hot water to allow as many surfaces of the item to touch the aluminum foil. The chemical reaction taking place in the container should be able to eliminate dirt and stains.
Soak the Silver
Allow your silver to soak for about two to three minutes on each side. For lightly tarnished silver, you’ll require several minutes for it to be restored. But for heavily tarnished silver, you may require a few treatments. So, soak heavily tarnished items for as long as five minutes and if the water cools down, don’t hesitate to add more hot water, plus salt and baking soda.
Remove the Silver
Take your silver items out of the water. The tarnish should have already started to peel off, which means it’s time to clean the item with a gentle brush or towel. You can use a soft cloth or paper towel for this task in case you prefer not to use your hands in hot water.
Once your silver is clean, remove it from the pan then rinse it with clean water. Let it air dry before storing away. Never use gloves when you’re cleaning silver as this may cause the items to become scratched.
Tips for Keeping Your Silver Clean for Long
Shine and Polish
You need to keep your silver jewelry shiny all the time with a quick and routine washing using warm water and mild dishwashing soap. Swish your jewelry around in the water for some minutes, rinse, and then buff dry.

Avoid Bleach and Harsh Chemicals
You must not use your silver jewelry with cleaning detergent and bleach that can ruin their surface. Some jewelers suggest using vinegar and baking soda for brightening the silver’s finish when cleaned at home. Vinegar is also safe for all metals, including sterling silver, but if you do not feel comfortable using it, commercial silver cleaners are also good.
Store Your Silver Jewelry in a Dry Location
Never expose your jewelry to direct sunlight or heat because it can cause tarnishing when the metal reacts with sulfur and other chemicals in the air. Store your items in a dry location if you are not wearing them regularly to stop tarnishing too.
Also, do not put your silver pieces away when they are still damp. Moisture causes silver to tarnish faster, so make sure your pieces are completely dry before storing them.
Soak the Naturally in Sea Salt
Leave the metal pieces in sea salt overnight, especially if you have already tried all-purpose cleaning products and have not noticed any improvements. Seawater is known for its high volume of natural salts that can help remove tarnish very easily. This helps clean silver naturally without damaging it.
Salt and baking soda are great cleaning products to use when you want to make your own silver polish. Combine one part salt with two parts baking soda, put them on a cloth or paper towel, and apply the mixture directly onto tarnished silver pieces.
Rub the piece gently to remove any signs of tarnishing, rinse off all the mixture, and dry the piece with a clean cloth. This homemade silver cleaner will remove tarnish without harming your silver plating.
Use Toothpaste
Toothpaste also can be used in a pinch when a silver cleaner is not available. Apply a small amount of toothpaste onto a dry cloth or paper towel and apply it directly to the piece that you would like to clean. Gently rub the silver in a circular motion, rinse with water, and dry with a clean cloth. This method will remove tarnish from the silver piece without scratching it.
After you are finished cleaning your silver, make sure to properly store them so they do not tarnish again. Keep the pieces in air-tight containers and place a piece of tissue paper on top of the container before sealing it. This will help absorb any moisture that may seep into the container and cause tarnish.
Use Your Silver Jewelry
It’s recommended to use silver jewelry and silverware more often as this will prevent them from tarnishing. Be sure to wipe each piece before you put it away and seal it properly in a container. If your silver is already tarnished, it may be too late for simple cleaning. If this is the case, consider taking a trip to see a professional who can remove the tarnish from your silver effectively.
FAQs on How to Clean Silver with Frugal Silver Cleaner
Can you use silver cleaner on sterling silver?
Yes, you can use silver cleaner on sterling silver. This silver cleaner quickly removes tarnish and restores shine and brilliance to your silverware.
How often do you clean your silverware?
You should be cleaning your silverware at least once per week in order to prevent tarnish. This is not only for aesthetic reasons, but because the chemicals used in most silverware can actually eat away at your skin and cause reactions that will be costly to treat.
Final Thought on How to Clean Silver with Frugal Silver Cleaner
Improper cleaning of your antique silver plate and good-quality silver jewelry can make it lose value. Therefore, it’s important to know how to clean silver and the correct way of cleaning it. If you’re in doubt about how to clean your valuable silver, it may be best to call in professional help.
The post How to Clean Silver with Frugal Silver Cleaner appeared first on Kitchen Infinity.
Did you miss our previous article…
https://www.conduithardware.com/?p=85